Home » appium-tutorial
Category Archives: appium-tutorial
Automating Hybrid Apps with Appium
Previous Topic, In the tutorial we are going to learn Automating Hybrid Apps with Appium. Before going further lets understand with is Hybrid Apps.
What are Hybrid App?
Hybrid apps are the apps that are coded in same technology as web application and mobile web application and pushed in a native container on mobile device. Its basically a sandwich approach web technology and native app.
In automation testing point of view, while automation the hybrid app, we come up with two approaches, native app and web view. When ever we have to switch from native to web platform. We need to change the context and continue with scripting or execution.
How to change context from Native to Web view in Hybrid app?
During the automation creation or execution, whenever there is a need to change the context, it can be performed getContextHandles() method, within the driver instance which returns a Set contains all the context within the hybrid app.
If we want to switch to any context, we can iterate and get in to webview and perform the action that is done with in web application.
Automating Hybrid Apps with Appium
To Automate the Hybrid apps in mobile application, download app “WebView Test” from playstore and consider the scenario below:
- Launch the hybrid application “WebView Test” on your device.
- Click to website icon on the top right.
- Enter the website name “facebook.com”
- Input the User name in the user text box
- Enter the password under password textbox.
- Close the application.
Code for the above scenario.
public static DesiredCapabilities capabilities=null;
public AndroidDriver<AndroidElement> adriver=null;
File app =new File(System.getProperty("user.dir")+"\\apks\\WEBVIEWTEST.apk");

capabilities =new DesiredCapabilities();
capabilities.setCapability("deviceName","Redmi");			//capabilities.setCapability(MobileCapabilityType.BROWSER_NAME, "Chrome");
capabilities.setCapability("platformVersion","9 PKQ1.181203.001");			capabilities.setCapability("platformName","Android");			capabilities.setCapability("chromedriverExecutable","C:\\Users\\XXXXX\\Desktop\\Eclipse_Installer\\GeckoDriver\\chromedriver.exe");
capabilities.setCapability("noReset","true");
capabilities.setCapability("fullReset","false");						capabilities.setCapability("appium:chromeOptions",ImmutableMap.of("w3c",false));
capabilities.setCapability("app", app.getAbsolutePath());

try {
System.out.println("Opening Hybrid Application");
adriver = new AndroidDriver<AndroidElement>(new URL("http://0.0.0.0:4723/wd/hub"), capabilities);
Thread.sleep(3000);
AndroidElement browsrIcon =adriver.findElement(MobileBy.AndroidUIAutomator("new UiSelector().resourceId(\"com.snc.test.webview2:id/action_go_website\")"));
browsrIcon.click();

AndroidElement inputUrl=adriver.findElement(MobileBy.AndroidUIAutomator("new UiSelector().resourceId(\"com.snc.test.webview2:id/input_url\")"));

inputUrl.sendKeys("facebook.com");
Thread.sleep(2000);

AndroidElement goButton=adriver.findElement(MobileBy.AndroidUIAutomator("new UiSelector().resourceId(\"android:id/button1\")"));

goButton.click();

Set<String> contextNames =adriver.getContextHandles();
Iterator<String> itr=contextNames.iterator();
while(itr.hasNext()){

System.out.println(itr.next());
}

adriver.context((String) contextNames.toArray()[1]); 				adriver.findElement(By.id("email")).sendKeys("code2test.com");				adriver.findElement(By.id("pass")).sendKeys("TestingSite");
adriver.close();
} catch (Exception e) {
e.printStackTrace();
}
}
Code Description of above code:
Step 1) Add the below capabilities on the Appium Automation script:
//Create the object of Desired Capability
capabilities =new DesiredCapabilities();
//Define the Device name
capabilities.setCapability(“deviceName”,”Redmi”);
//Define the platform version
capabilities.setCapability(“platformVersion”,”9 PKQ1.181203.001″);
//Define Platform name
capabilities.setCapability(“platformName”,”Android”);
//provide the chrome driver exe path saved in local system with same version as the browser version in mobile device
capabilities.setCapability(“chromedriverExecutable”,”C:\Users\Girvar Singh Negi\Desktop\Eclipse_Installer\GeckoDriver\chromedriver.exe”);
//Define Browser name
capabilities.setCapability(MobileCapabilityType.BROWSER_NAME, “Chrome”);
//Define the string for chrome option
capabilities.setCapability(“appium:chromeOptions”,ImmutableMap.of(“w3c”,false));
Step 2) Create the object the android Driver passing host, port number along with capabilities as a parameter
adriver = new AndroidDriver(new URL(“http://0.0.0.0:4723/wd/hub”), capabilities)
Step 3) Inspect the element of browserIcon on the top right and click to the element using AndroiduiAutomator.
AndroidElement browsrIcon =adriver.findElement(MobileBy.AndroidUIAutomator(“new UiSelector().resourceId(\”com.snc.test.webview2:id/action_go_website\”)”));browsrIcon.click();
Step 4) Now inspect the text box under browsericon window and enter the website name as “facebook.com” using sendKeys method
AndroidElement inputUrl=adriver.findElement(MobileBy.AndroidUIAutomator(“new UiSelector().resourceId(\”com.snc.test.webview2:id/input_url\”)”)); inputUrl.sendKeys(“facebook.com”);
Step 5) Now call the method getContextHandles() from driver instance which returns Set, capture the set in an instance variable contextNames.
Set<String> contextNames =adriver.getContextHandles();
Step 6) Iterate the set using Iterator and move to next element by next() using while loop.
Iterator itr=contextNames.iterator();
while(itr.hasNext()){ System.out.println(itr.next());
}
Step 7) Convert the contextNames in to Array and move get the 1 st index from context Names(which is web view)
adriver.context((String) contextNames.toArray()[1]);
Step 8) Inspect the email text box and password text box and insert the value.
- adriver.findElement(By.id(“email”)).sendKeys(“code2test.com”); adriver.findElement(By.id(“pass”)).sendKeys(“TestingSite”);
Step 9) Close the browser.
adriver.close();
Mobile WebApplication Automation with Appium
Prevoius Topic, We are going to learn to perform Mobile WebApplication Automation with Appium, in this tutorial, but before we start let understand about WebApplication Automation.
What is WebApplication Automation in Mobile?
Web Application are the browser specific application, which are hosted in web with specific address or domain name. When we open the browser in mobile device and run our automation test, we call it as web application Automation testing in mobile device.
The mobile device has native applications, hybrid application along with have the provision to open the web application through browser. But to automate the web application is a bit different as what we performed earlier for mobile application.
The locator or the objects for mobile apps(native & hybrid) is different then the locators or objects in mobile web application because of different platform.
The locators in Mobile application is inspect in the same way as we did in Selenium, and also to create or execute the automation script for web application in mobile browser, we need to add few more capabilities .
How to perform Mobile WebApplication Automation with Appium?
To perform the Web apps automation, let consider a scenario and after writing the code, we will see, what are the capabilities are been added and setting performed.
Scenario:
- Open the facebook application in Mobile browser.
- Under “Create an Account “, Enter first name and last name.
Code:
Note: There are few Reference variable that are predefined these are:
public static DesiredCapabilities capabilities=null;
public AndroidDriver adriver=null;
capabilities =new DesiredCapabilities();
capabilities.setCapability("deviceName","Redmi");
//capabilities.setCapability(CapabilityType.BROWSER_NAME,"");
capabilities.setCapability("platformVersion","9 PKQ1.181203.001");
capabilities.setCapability("platformName","Android");
capabilities.setCapability("chromedriverExecutable","C:\Users\XXXXX\Desktop\Eclipse_Installer\GeckoDriver\chromedriver.exe");
capabilities.setCapability(MobileCapabilityType.BROWSER_NAME, "Chrome");
capabilities.setCapability("appium:chromeOptions",ImmutableMap.of("w3c",false));
try {
System.out.println("Opening the browser------------>");
adriver = new AndroidDriver(new URL("http://0.0.0.0:4723/wd/hub"), capabilities);
Thread.sleep(3000);
adriver.get("https://www.facebook.com/");
adriver.findElement(By.xpath("//input[@name='firstname']")).sendKeys("Code2test.com");
adriver.findElement(By.xpath("//input[@name='lastname']")).sendKeys("WebView Automation");
adriver.quit();
} catch (Exception e) {
e.printStackTrace();
}Code Description of above code:
Step 1) Add the below capabilities on the Appium Automation script:
//Create the object of Desired Capability
capabilities =new DesiredCapabilities();
//Define the Device name
capabilities.setCapability(“deviceName”,”Redmi”);
//Define the platform version
capabilities.setCapability(“platformVersion”,”9 PKQ1.181203.001″);
//Define Platform name
capabilities.setCapability(“platformName”,”Android”);
//provide the chrome driver exe path saved in local system with same version as the browser version in mobile device
capabilities.setCapability(“chromedriverExecutable”,”C:\Users\Girvar Singh Negi\Desktop\Eclipse_Installer\GeckoDriver\chromedriver.exe”);
//Define Browser name
capabilities.setCapability(MobileCapabilityType.BROWSER_NAME, “Chrome”);
//Define the string for chrome option
capabilities.setCapability(“appium:chromeOptions”,ImmutableMap.of(“w3c”,false));
Step 2) Create the object the android Driver passing host, port number along with capabilities as a parameter
adriver = new AndroidDriver(new URL(“http://0.0.0.0:4723/wd/hub”), capabilities)
Step 3) Now open the facebook application on mobile browser
adriver.get(“https://www.facebook.com/”);
Step 4) Now inspect the element for first name using xpath and send the string “Code2tes.com” under First name text box
adriver.findElement(By.xpath(“//input[@name=’firstname’]”)).sendKeys(“Code2test.com”);
Step 5) Inspect the element for last name and send the string under last name text box and at the end close the browser.
adriver.findElement(By.xpath(“//input[@name=’lastname’]”)).sendKeys(“WebView Automation”); adriver.quit()
Conclusion:
So with the below tutorial, we have learned how to automated the web browser application using mobile device and inspect and work with the element on mobile web.
Appium Zoom with Multi TouchAction in Android
Previous Topic, This tutorial we are going to learn Appium Zoom with MultiTouchAction in Android. Before going further lets understand Zoom in appium.
What is Zoom Action in Mobile Device?
Zoom action is an event to maximize and minimize the window for any image, web page etc so that it is more visible and clear to the user.
or in other words during the in zoom action the coordinates (x,y) from a specific point changes ,is being moved to other point location results in the change in co ordinates, which magnifies the window and makes it more clear to the user.
The zoom action is performed manually with the help of multiple touch(more than two), so that the area to be zoom out or in can be made larger or smaller , the action can be performed by double touch, triple touch or multi touch. Lets understand how to perform in Appium.
How to to perform Appium Zoom with MultiTouchAction in Android?
Appium provides the capability to perform zoom action or multi touch action using MultiTouchAction class. With the help of MultiTouchAction class, we are capable to add different AndroidTouchAction and perform action simultaneously.
For each touch action, we individually perform action ( move the co ordinates from on place to another) creating different object and finally add them using MultiTouchAction using add method.
Lets understand it more in depth by taking a scenario:
Step1) Open the application “MultiTouch Tester” (if you do not have please download it from playstore).
Step 2) Now point two touch gesture and move both the points to other location by changing the coordinates(try to zoom).
Step 3) close the application.
Dimension dim=adriver.manage().window().getSize();
int width=dim.width;
int height =dim.height;

int firstTouchXcoordinate_Start =(int)(width*.5);
int firstTouchYcoordinate_Start =(int)(height*.4);

int firstTouchXcoordinate_End =(int)(width*.1);
 int firstTouchYcoordinate_End =(int)(height*.1);

 int secondTouchXcoordinate_Start =(int)(width*.5);
 int secondTouchYcoordinate_Start =(int)(height*.6);

 int secondTouchXcoordinate_End =(int)(width*.9);
 int secondTouchYcoordinate_End =(int)(height*.9);

 TouchAction touch1=new TouchAction(adriver);
 TouchAction touch2=new TouchAction(adriver);

 touch1.longPress(PointOption.point(firstTouchXcoordinate_Start, firstTouchYcoordinate_Start))
 .waitAction(WaitOptions.waitOptions(Duration.ofMillis(2000)))
 .moveTo(PointOption.point(firstTouchXcoordinate_End, firstTouchYcoordinate_End));

 touch2.longPress(PointOption.point(secondTouchXcoordinate_Start, secondTouchYcoordinate_Start))
 .waitAction(WaitOptions.waitOptions(Duration.ofMillis(2000)))
 .moveTo(PointOption.point(secondTouchXcoordinate_End, secondTouchYcoordinate_End));

 MultiTouchAction multi=new MultiTouchAction(adriver);
 multi.add(touch1).add(touch2).perform();
Code Description of above code:
Step1) Firstly get the size of the window and extract the width and height of the window
Dimension dim=adriver.manage().window().getSize();
int width=dim.width;
int height =dim.height;
Step 2) Get the (x,y) coordinates of source point of the First touch gesture and (x,y) co ordinates of destination point of the coordinates
int firstTouchXcoordinate_Start =(int)(width.5); int firstTouchYcoordinate_Start =(int)(height.4);
int firstTouchXcoordinate_End =(int)(width.1); int firstTouchYcoordinate_End =(int)(height.1);
Step 3) Get the (x,y) coordinates of source point of the Second touch gesture and (x,y) co ordinates of destination point of the coordinates
int secondTouchXcoordinate_Start =(int)(width.5); int secondTouchYcoordinate_Start =(int)(height.6);
int secondTouchXcoordinate_End =(int)(width.9); int secondTouchYcoordinate_End =(int)(height.9);
Step 4) Now create the 2 object of TouchAction class passing the driver as parameter for 2 touch action named as touch1 and touch2.
TouchAction touch1=new TouchAction(adriver);
TouchAction touch2=new TouchAction(adriver);
Step 5) Now in first Touch gesture longPress the drag element from starting element taking (x,y) co ordinate and wait for 2 seconds or 2000 milliseconds and then move to the destination element by (x,y) co ordinate.
touch1.longPress(PointOption.point(firstTouchXcoordinate_Start, firstTouchYcoordinate_Start))
.waitAction(WaitOptions.waitOptions(Duration.ofMillis(2000)))
.moveTo(PointOption.point(firstTouchXcoordinate_End, firstTouchYcoordinate_End));
Step 6) Now in Second Touch gesture longPress the drag element from starting element taking (x,y) co ordinate and wait for 2 seconds or 2000 milliseconds and then move to the destination element by (x,y) co ordinate.
touch2.longPress(PointOption.point(secondTouchXcoordinate_Start, secondTouchYcoordinate_Start))
.waitAction(WaitOptions.waitOptions(Duration.ofMillis(2000)))
.moveTo(PointOption.point(secondTouchXcoordinate_End, secondTouchYcoordinate_End));
Step 7) Now create the object of MultiTouchAction and through refence variable add the two touch action and perform.
MultiTouchAction multi=new MultiTouchAction(adriver);
multi.add(touch1).add(touch2).perform();
Conclusion: So we can not perform Appium zoom action with multi gesture using MultiTouchAction and add mulitple touch to it.
Drag And Drop Action using Appium
Previous Topic, We are going to learn Drag And Drop Action using Appium in this tutorial using Touch Action.
What is Drag And Drop Action?
Drag And Drop are the two action that are performed simultaneously for moving the element from one place to another specific or defined place.
During the drag and drop event, an element changes its place or in other words its x and y co-ordinates and placed to another place with new x and y co-ordinates.
The movement of the element is done by providing a container which captures an object and changes its DOM structure and DOM gets refresh during run time , results in change in locator element along with its attributes and values.
How to Perform Drag And Drop Action using Appium?
Appium provides a set of commands to perform drag and drop operation with in mobile application. Touch Action Class provides the method to longpress the element , which is to be dragged and moveTo method helps in dropping the element to its destination location on the basis of x and y co-ordinates.

Lets consider a scenario to perform drag and drop action in appium.
Scenarion:
- Open the “Drag & Drop” in mobile device (if not installed, recommend you install from playstore).
- Select the Literature
- Answer the question by dragging the first Option and dropping it to Square bracket(???).
- close the application.
AndroidElement literature =driver.findElement(MobileBy.AndroidUIAutomator("new UiSelector().text(\"LITERATURE\")"));
literature.click();
AndroidElement dragElement =driver.findElement(MobileBy.AndroidUIAutomator("new UiSelector().resourceId(\"dragdrop.stufflex.com.dragdrop:id/chooseA\")"));
AndroidElement dropElement =driver.findElement(MobileBy.AndroidUIAutomator("new UiSelector().resourceId(\"dragdrop.stufflex.com.dragdrop:id/answer\")"));
int middleXCoordinate_dragElement =dragElement.getLocation().x + (dragElement.getSize().width/2);
int middleYCoordinate_dragElement =dragElement.getLocation().y + (dragElement.getSize().height/2);
int middleXCoordinate_dropElement =dropElement.getLocation().x + (dropElement.getSize().width/2);
int middleYCoordinate_dropElement =dropElement.getLocation().y + (dropElement.getSize().height/2);
TouchAction action =new TouchAction(adriver);
action.longPress(PointOption.point(middleXCoordinate_dragElement, middleYCoordinate_dragElement))
.waitAction(WaitOptions.waitOptions(Duration.ofSeconds(3)))
.moveTo(PointOption.point(middleXCoordinate_dropElement, middleYCoordinate_dropElement))
.release()
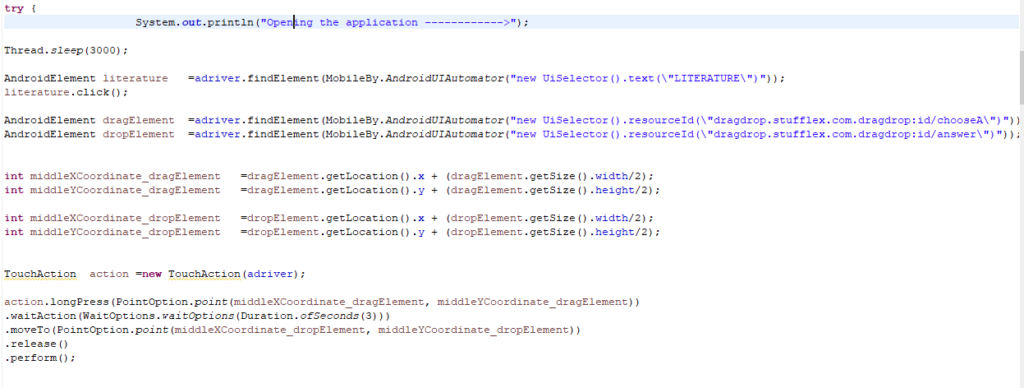
.perform();Code Description:(drag and Drop)
Step 1) Inspect the element Literature using AndroidUIAutomator
AndroidElement literature =driver.findElement(MobileBy.AndroidUIAutomator(“new UiSelector().text(\”LITERATURE\”)”));
Step 2) Click to the element (Literature)
literature.click();
Step 3) Inspect the first Answer element using AndroidUIAutomator, for which the drag event has to be performed.
AndroidElement dragElement =driver.findElement(MobileBy.AndroidUIAutomator(“new UiSelector().resourceId(\”dragdrop.stufflex.com.dragdrop:id/chooseA\”)”));
Step 4) Inspect the Element of Square (???) , where the drop operation has to be performed.
AndroidElement dropElement =driver.findElement(MobileBy.AndroidUIAutomator(“new UiSelector().resourceId(\”dragdrop.stufflex.com.dragdrop:id/answer\”)”));
Step 5) Identify the mid point (x,y) co-ordinated of the draggable element by taking the location of the axis + half the size of the element.
int middleXCoordinate_dragElement =dragElement.getLocation().x + (dragElement.getSize().width/2);
int middleYCoordinate_dragElement =dragElement.getLocation().y + (dragElement.getSize().height/2);
Step 6) Identify the mid point (x,y) co-ordinated of the drop element by taking the location of the axis + half the size of the element.
int middleXCoordinate_dropElement =dropElement.getLocation().x + (dropElement.getSize().width/2);
int middleYCoordinate_dropElement =dropElement.getLocation().y + (dropElement.getSize().height/2);
Step 7) Create an Object of Touch Action, which contains the methods for longPress and moveto event.
TouchAction action =new TouchAction(driver);
Step 8) Now longPress the drag element (answer field) from starting element taking (x,y) co ordinate and wait for 2 seconds and then move to the destination element by (x,y) co ordinate.
action.longPress(PointOption.point(middleXCoordinate_dragElement, middleYCoordinate_dragElement))
.waitAction(WaitOptions.waitOptions(Duration.ofSeconds(2)))
.moveTo(PointOption.point(middleXCoordinate_dropElement, middleYCoordinate_dropElement))
.release()
.perform();
Code In Eclipse look like below screenshot:
Facebook-> https://www.facebook.com/code2test/?modal=admin_todo_tour
Vertical And Horizontal swipe/scroll in Appium
Previous Topic, We are going to learn the Vertical And Horizontal swipe/scroll in Appium in this tutorial. So lets start.
What is Swipe/Scroll in mobile device?
Swipe/Scroll is a touch Action which is performed in mobile device to move the mobile screen from top to bottom or bottom to top , so that the user can view the hidden elements of mobile application and perform action or event accordingly.
Vertical and horizontal scrolling/swipe are the two different approaches by which user move the application with in screen.
In vertical swipe/scroll, mobile application is moved from top to bottom by touch action and vice versa, where x co ordinates remains the same but y co ordinates changes simultaneously.
Similarly in horizontal swipe/scroll, mobile application on device is moved from left to right Or right to left, where x co-ordinates changes but y co-ordinates remains the same.
Note: In this Tutorial we will be take the example of Flipkart moble application to understand in depth and inspect its locator.
How to perform Vertical And Horizontal swipe/scroll in Appium

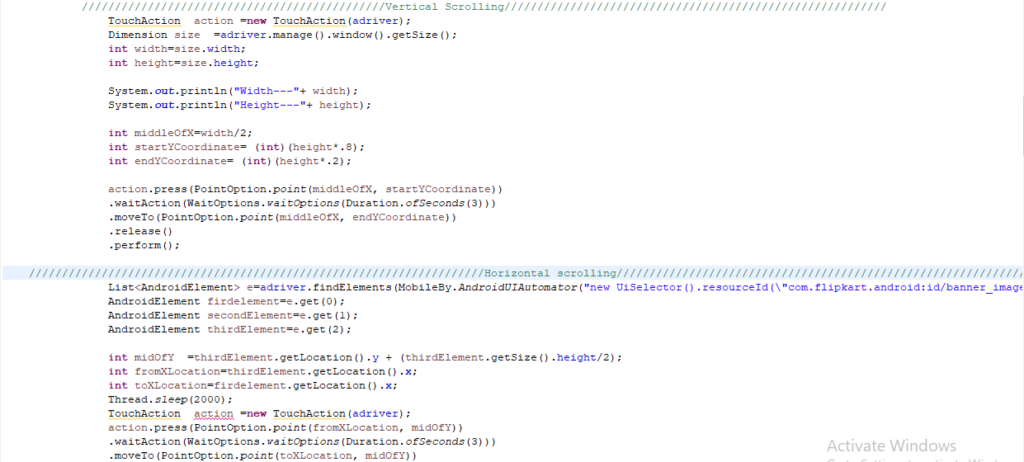
1 ) Vertical Scrolling: As we discussed above what is vertical scrolling, now we will discuss, how can we perform through Appium, Below is the code for vertical scrolling in appium.
TouchAction  action =new TouchAction(driver);
Dimension size	=driver.manage().window().getSize();
int width=size.width;
int height=size.height;
int middleOfX=width/2;
int startYCoordinate= (int)(height*.7);
int endYCoordinate= (int)(height*.2);

action.press(PointOption.point(middleOfX, startYCoordinate))
.waitAction(WaitOptions.waitOptions(Duration.ofSeconds(2)))
.moveTo(PointOption.point(middleOfX, endYCoordinate)).release().perform();
Code Description:(Vertical Scrolling)
Step 1) We have created the object of TouchAction by passing driver as a parameter.
TouchAction action =new TouchAction(adriver);
Step 2) Get the size of the mobile application window and extract its height and width and store it in a variable.
Dimension size =driver.manage().window().getSize();
int width=size.width;
int height=size.height;
Step 3) Now get the x co-ordinates of the middle of mobile application and store it in a variable by dividing the width by 2.
int middleOfX=width/2;
Step 4) Now take the start y co ordinate and end y co ordinate from where the swipe/scroll is to be
int startYCoordinate= (int)(height.7);
int endYCoordinate= (int)(height.2);
Step 5) Now press the element from starting element taking (x,y) co ordinate and wait for 2 seconds and then move to the destination element by (x,y) co ordinate.
action.press(PointOption.point(middleOfX, startYCoordinate))
.waitAction(WaitOptions.waitOptions(Duration.ofSeconds(2)))
.moveTo(PointOption.point(middleOfX, endYCoordinate)).release().perform();
How to perform Horizontal Swipe/Scroll in Appium?
2) Horizontal Scrolling: we have dicussed the horizontal scrolling above, now lets perform horizontal scrolling in appium.
List<AndroidElement> e=adriver.findElements(MobileBy.AndroidUIAutomator("new UiSelector().resourceId(\"com.flipkart.android:id/banner_image\")"));
AndroidElement firdelement=e.get(0);
AndroidElement secondElement=e.get(1);
AndroidElement thirdElement=e.get(2);

int midOfY =thirdElement.getLocation().y +(thirdElement.getSize().height/2);
int fromXLocation=thirdElement.getLocation().x;
int toXLocation=firdelement.getLocation().x;

TouchAction  action =new TouchAction(adriver);
action.press(PointOption.point(fromXLocation, midOfY))
.waitAction(WaitOptions.waitOptions(Duration.ofSeconds(3)))
.moveTo(PointOption.point(toXLocation, midOfY))
.release()
.perform();
Code Description:(Horizontal Scrolling)
Step 1) Firstly inspect the elements of banner image at the top (as they all have common attribute value, so take all element on list.
List e=adriver.findElements(MobileBy.AndroidUIAutomator(“new UiSelector().resourceId(\”com.flipkart.android:id/banner_image\”)”));
Step 2) Get all the 3 android elements by their index.
AndroidElement firdelement=e.get(0);
// AndroidElement secondElement=e.get(1);
AndroidElement thirdElement=e.get(2);
Step 3) Now get the y co-ordinates till the mid of the image element by adding the location of y and half the size of image,
int midOfY =thirdElement.getLocation().y +(thirdElement.getSize().height/2);
Step 4) Now get the x coordinates of the element from which the swipe to be performed and the x coordinates to which the swipe is drived.
int fromXLocation=thirdElement.getLocation().x;
int toXLocation=firdelement.getLocation().x;
Step 5) Now press the element from starting element taking (x,y) co ordinate and wait for 2 seconds and then move to the destination element by (x,y) co ordinate.
action.press(PointOption.point(fromXLocation, midOfY))
.waitAction(WaitOptions.waitOptions(Duration.ofSeconds(2)))
.moveTo(PointOption.point(toXLocation, midOfY))
.release()
.perform();
How to Perform Horizontal Swipe/Scroll in Appium | Touch Action| Android device
Code in Eclipse will look as below screenshot:
Conclusion:
So in this tutorial we have learned to perform vertical and horizontal scrolling in appium using the touch action with multiple commands.
TouchAction : Tap And longPress in Appium
Previous Topic, In this tutorial we will learn touch Action commands like “TouchAction : Tap And longpress in Appium“
How to perform TouchAction : Tap And longpress in Appium?
In Appium client library, Touch Action is a class which extends Object class and implements PerformsAction Interface.

Touch action class has multiple events to perfrom actions on mobile devices like tap, release, press, longpress,cancel, moveto,wait etc.
In this tutorial we will be performing Tap, Press and long press on mobile application through appium client library, let start now.
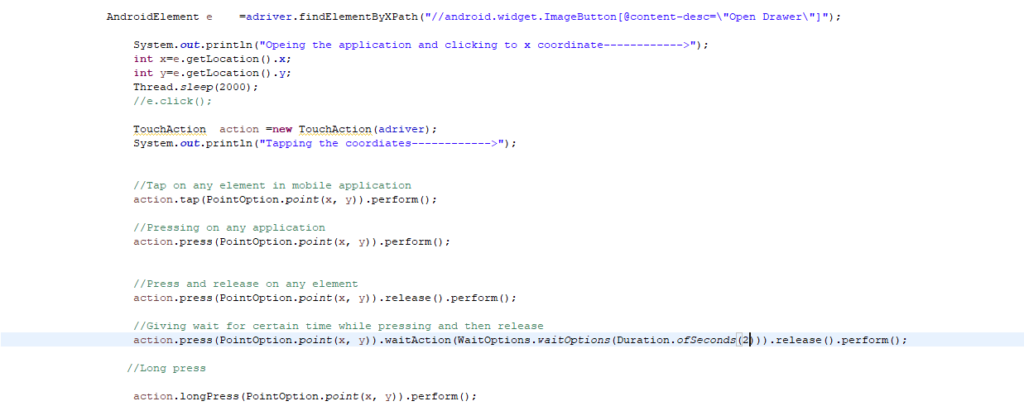
1 ) Tap: In mobile application Tap method works same as click method in UI. We provide the co ordinates of x and y as a parameter to point on the element where the tap for an element is to be performed.
We call PointOption.point() method and pass in tap method to perform tap operation. Find below the code.
//defining the locator
AndroidElement e =driver.findElementByXPath(" ");

//Finding the x and y coordinates
int x=e.getLocation().x;
int y=e.getLocation().y;

//Creating the object of Touch Action
TouchAction  action =new TouchAction(adriver);

//Calling the tap method and passing the x and y co ordinates
action.tap(PointOption.point(x, y)).perform();
So on the above code we have firstly created or defined the locator of the mobile element , after that we extracted the x and y co ordinates of the element.
Finally we have created the object of Touch Action and called the tap method providing the x and y co-ordinates using PointOption.point(x,y) method followed by performed method.
How to perfrom Press and LongPress in Appium?
2 ) Press: Press action in mobile application is, pressing of element to a certain time period or wait, so that the element could perform an event. For ex sometimes in an application we come up with scenario where pressing on any element displays mutiple listing or changes the UI of an application or an event gets triggered.
Syntex of Press without wait is below:
//defining the locator
AndroidElement e =driver.findElementByXPath(" ");

//Finding the x and y coordinates
int x=e.getLocation().x;
int y=e.getLocation().y;

//Creating the object of Touch Action
TouchAction  action =new TouchAction(adriver);

//Calling the press method and passing the x and y co ordinates
action.press(PointOption.point(x, y)).perform();
Syntex of Press with wait command and release the press is below:
action.press(PointOption.point(x, y)).waitAction(WaitOptions.waitOptions(Duration.ofSeconds(2))).release().perform();In the above code press with wait command, we firstly press an element in mobile application and then provide a wait of 2 seconds using WaitOptions.waitOptions() method and after 2 second release the press from the element.
3 ) LongPress: Longpress method is just simply pressing the UI element for a longer time span so that the specific element can trigger an even and perform action.
The longPress works same as press method with wait for certain seconds, the difference is that the longpress is a customised method where the wait is not implicitly defined.
Syntex for the LongPress method is below:
//defining the locator
AndroidElement e =driver.findElementByXPath(" ");

//Finding the x and y coordinates
int x=e.getLocation().x;
int y=e.getLocation().y;

//Creating the object of Touch Action
TouchAction  action =new TouchAction(adriver);

//Calling the longPress method and passing the x and y co ordinates
action.longPress(PointOption.point(x, y)).perform();
So using the above code, we are good to perform longpress on mobile application to any element with the help of x and y co-ordinates. The code in the eclipse will look like as below screenshot.
Conclusion:
So we have come with the final conclusion that, we can perform Touch Action on the mobile android device with events like tap, press, long press with the above mentioned code and syntex using Touch Action class.
How to Use UISelector in Appium
Previous Topic, In this tutorial we are going to learn How to Use UISelector in Appium.
UISelector is a class which implements the object class and provides different public method to locate or identify elements with different attribute or property values.
Note: In this tutorial we will discuss few of the most frequently used method in UISelector with syntex and for the rest of method will share their name(implementation is same for all) with its decription
How to Use MobileBy class with UISelector in Appium?
Below are the most used method:
1 ) className (String className): This method sets the criteria of matching the class name with in the code heirarcy with the name provided as a parameter.
//Syntex
driver.findElement(MobileBy.AndroidUIAutomator("new UiSelector().className(\"Enter the Class Name here\")"));
2 ) resourceId(String id): This method search for the locator or inspect element from the code hierarchy on the basis of resourceId present first on the code.
//Syntex
//driver.findElement(MobileBy.AndroidUIAutomator("new UiSelector().resourceId(\"Enter the resource Id here\")"));
3) text(String text): Search on the basis of text visible on the widget of the page.
//Syntex
//driver.findElement(MobileBy.AndroidUIAutomator("new UiSelector().text(\"Enter the text here\")"));
4 ) packageName(String name): Search on the basis of package Name on the widget for the mobile application.
//Syntex
driver.findElement(MobileBy.AndroidUIAutomator("new UiSelector().packageName(\"Enter the package name here\")"));
5) decription(String desc): By providing the attribute value of content-description of the widget. We are good to locate or inspect the element.
//Syntex
driver.findElement(MobileBy.AndroidUIAutomator("new UiSelector().description(\"Enter the content-description here\")"));
6) instance(int instance): when we have element with similar property in that case we can identify or locate the element with the occurance of it instance no.The instance of an element is given by identifying element with common attribute followed by instance method.
//Syntex
driver.findElement(MobileBy.AndroidUIAutomator("new UiSelector().description(\"Enter the content-description here\")").instance(2));
7) index(int index): Search the widget on the basis of node index from layout.
//Syntex
driver.findElement(MobileBy.AndroidUIAutomator("new UiSelector().resourceId(\"Enter the content-description here\")").index(2));
As we See above how UISelector works and defined with syntex, now we are going to list down few more methods below, their systex are same as we discussed above.
8) checkable(boolean value): It matches as search criteria with the current mobile window code hierarchy and looks if the element is checkable.
9) checked(boolean value): This method provides the search criteria in the widget to check that is checked.
10) clikable(boolean Value): This method checks whether the element is clikable.
FindElement & FindElements Command in Appium
Previou Topic, In this tutorial we will learn how to FindElement & FindElements Command in Appium.
If we wish to interact the elements with in mobile device, the first step is to interact with elements, Android driver instance provides the method “FindElement” and “FindElements” to locate the elements in mobile application.
How to implement FindElement And FindElements Command with Appium
The major difference between FindElement And FindElements is that FindElement returns a WebElement and FindElement returns a list of WebElements.
The different types of locators are below:
1 ) By ID: By using this ID attribute the Appium inspector find the first element with the same id value and return the object. This is the most adopted way of locating the element, as most of the time the ID is unique. If the locator is not unique it displays an error message as “NoSuchElementException”.
Syntex for ID Attribute is below:

//driver.findElementById("com.flipkart.android:id/search_widget_textbox");
OR
//driver.findElement(By.id("com.flipkart.android:id/search_widget_textbox");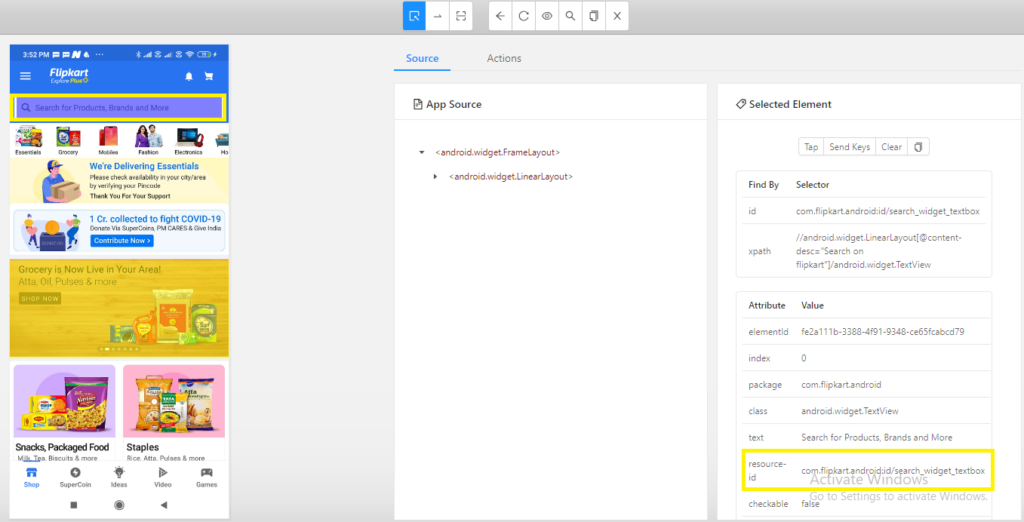
2 )By Name: The other way of locating the element is by Name of the element. We define the text of the locator and it return the object of the element but problem arises is that the text is not always unique.
Syntex are below:
//driver.findElementByName("Search for Products, Brands and More");
OR
//driver.findElement(By.name("Search for Products, Brands and More"));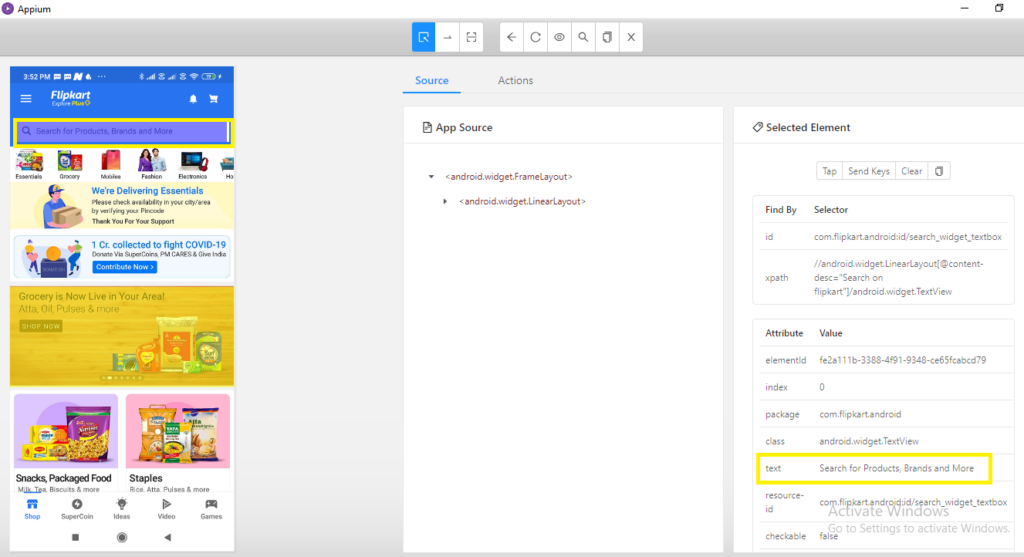
How to locate Element by Content-desc?
Note : If the attribute type is “content-desc” it will be handled in the same way as we handle the attribute text, by By name method.
Handling attribute “content-desc” are as below:
Syntex of "content-desc" are below:
//
//driver.findElementByName("Open Drawer");
OR
//driver.findElement(By.name("Open Drawer"));
3 ) By Class: We can also locate the element using class attribute but the problem again arises regarding uniqueness, As there can be multiple elements be found with same class name.
Syntex of "ClassName" are below:

//driver.findElementByClassName("android.widget.ImageView");
OR				/driver.findElement(By.className("android.widget.ImageView"));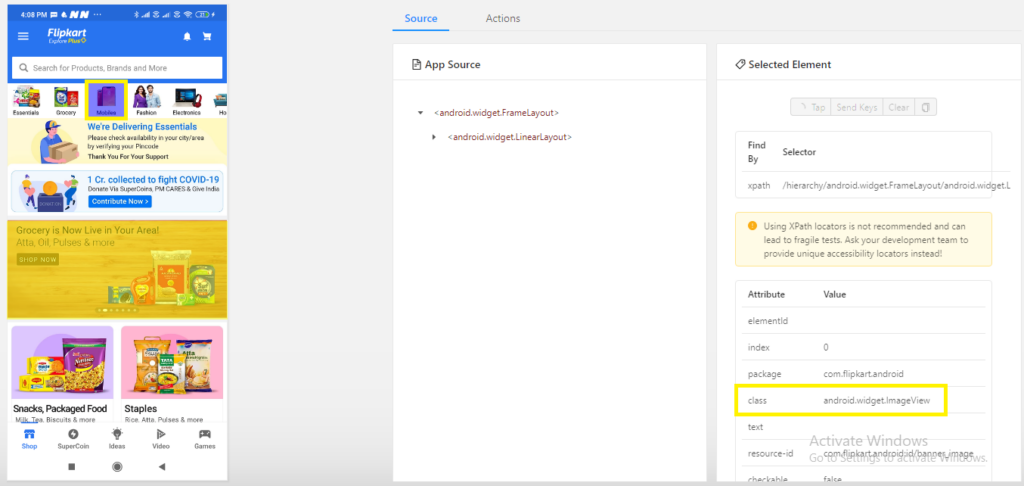
4) By AccessibilityId: You can also find element by accessibilityID, the accessibility id provided by appium inspector for the element in mobile application can be given by below syntex.
Syntex"
//driver.findElementByAccessibilityId("Shop");
5) By Xpath: This method is the most preferred way of object identification in all area for, WebApplication along with mobile application.As we come up with many elements where unique elements or the id is not available.
So to handle such elements we define locator or identify locator by xpath.
To understand the concept of xpath, consider a scenario, where we are identifying the locator , by different attribute name.
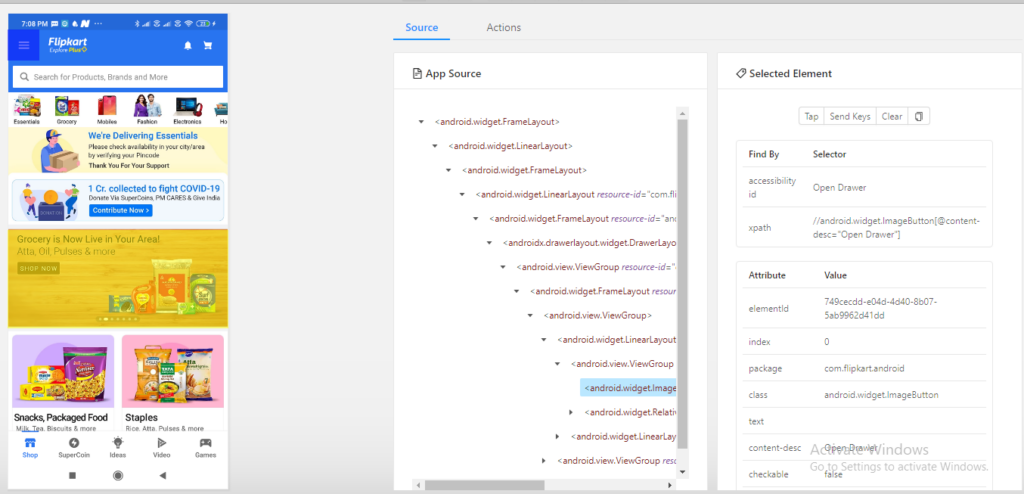
So to find the locator we will use by class : android.widget.ImageButton
but the class is not unique and we do not find other attribute that is unique within this page. So the solution for such elements is using xpath.
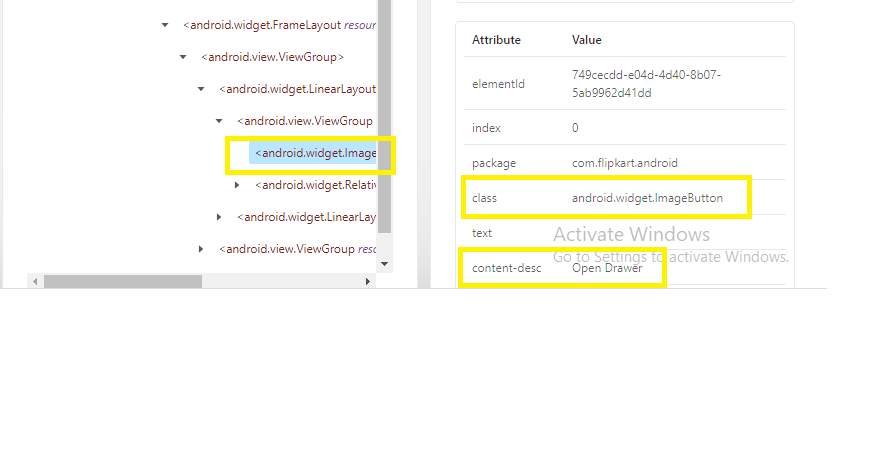
We generally created Xpath by the combination of different attribute and also by traversing from parent to child element. Here will locate xpath by the combination of different attibute value shown below.
//Syntex
driver.findElement(By.xpath("//android.widget.ImageButton[@content-desc="Open Drawer"]"));
OR

//driver.findElementByXPath("//android.widget.ImageButton[@content-desc="Open Drawer"]");
So here we made combination of class attribute and content-desc attribute to create a xpath as: //android.widget.ImageButton[@content-desc=”Open Drawer”]
Inspect Element Using Appium Inspector
Previous Topic, In this tutorial session we are going to learn how to Inspect Element Using Appium Inspector.
How to Inspect Element Using Appium Inspector?
To inspect element by Appium Inspector, we need to first connect our mobile device with our local system and follow the below steps:
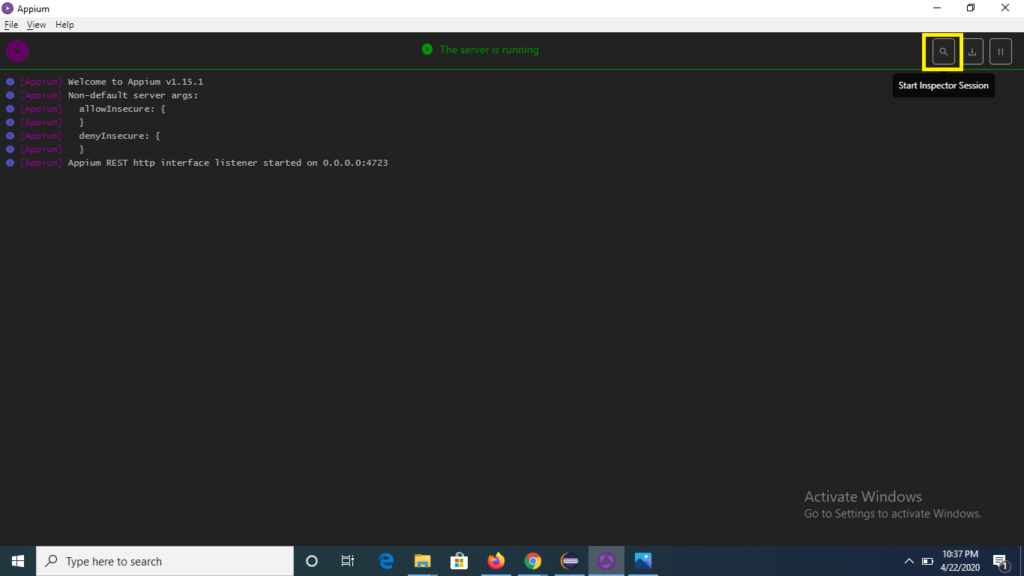
Step1) Open the Appium desktop client application.
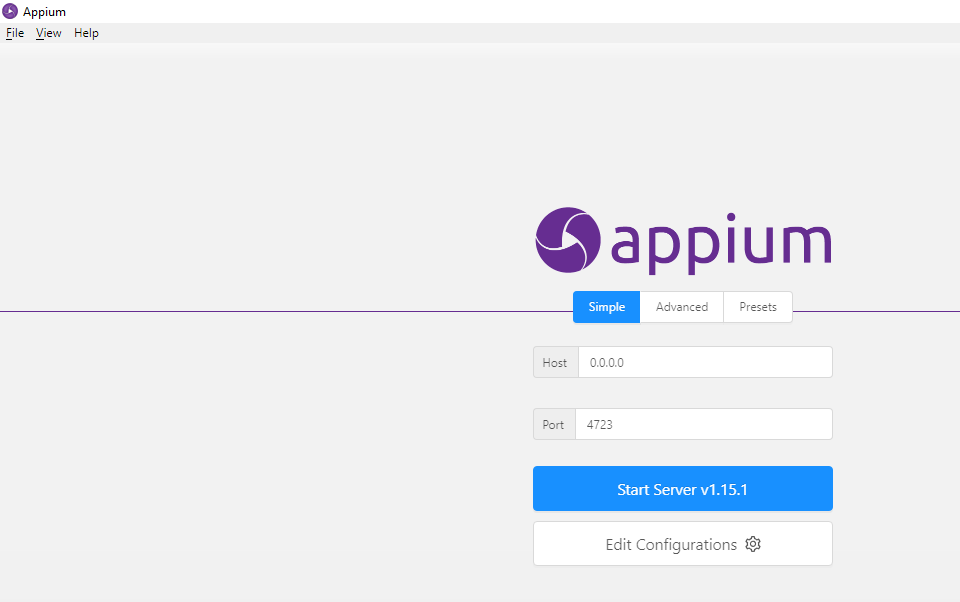
Step 2) Now Click in to Start Server, to get appium your server started.
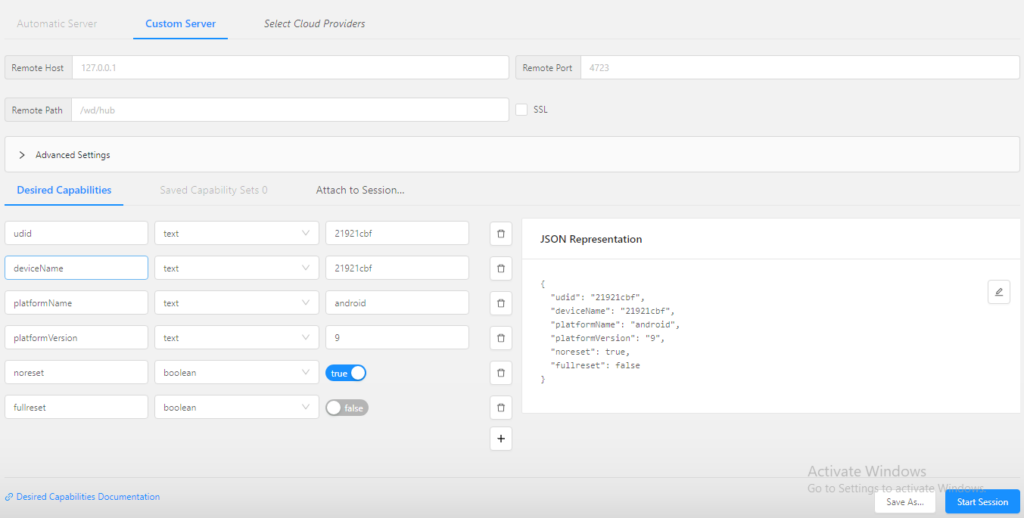
Step 3) Now define the desired capabilities as below:
- udid
- deviceName
- platformName (define as android)
- platformVersion (define as per per mobile device)
- noReset (define as true)
- fullReset (define as false)
Refer the screenshot below:
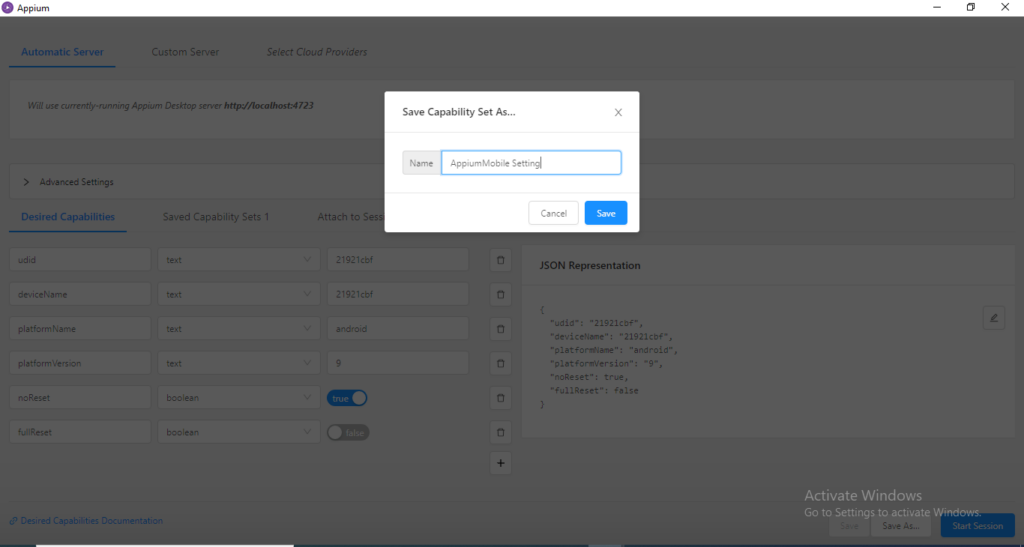
Step 4) Now save the desired capabilities for future reference, so that we need not to define these capabilities again. Click to Save As and give any name of your preference and click to save button.
Step 5) Now we see that the capabilities we have save is getting displayed under “Saved Capabilities Sets1” menu.
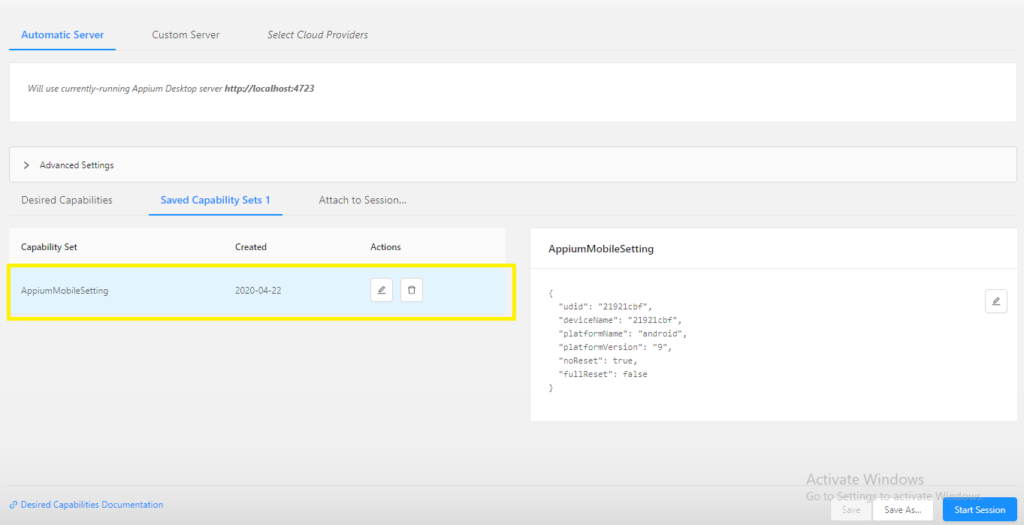
Step 6) Now select the capability and click to Start Session button and wait for few seconds.
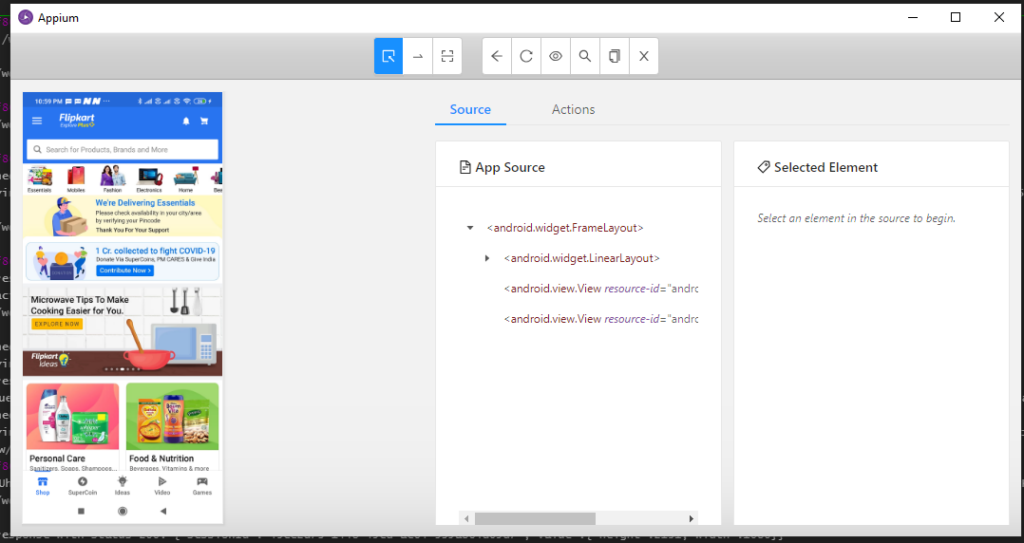
We see that the Flipkart application opened in mobile device is getting displayed in appium inspecter, the screenshot is displayed on left and its properties are displaying on the right side of window.
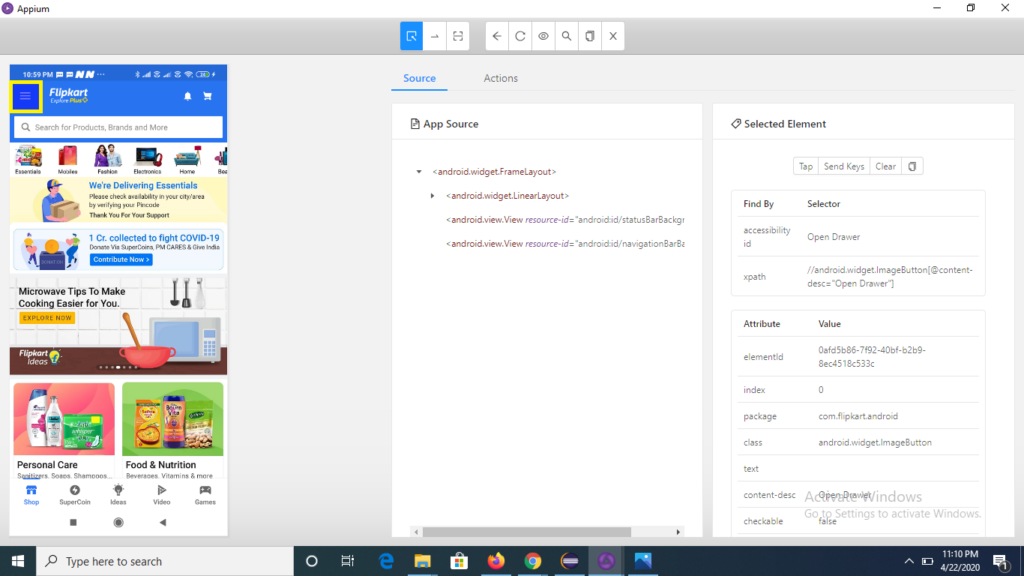
Step 7) Now lets check the properties of element in the application, click to Hemburger button on the top left of the element and check its properties and source on the right pane.
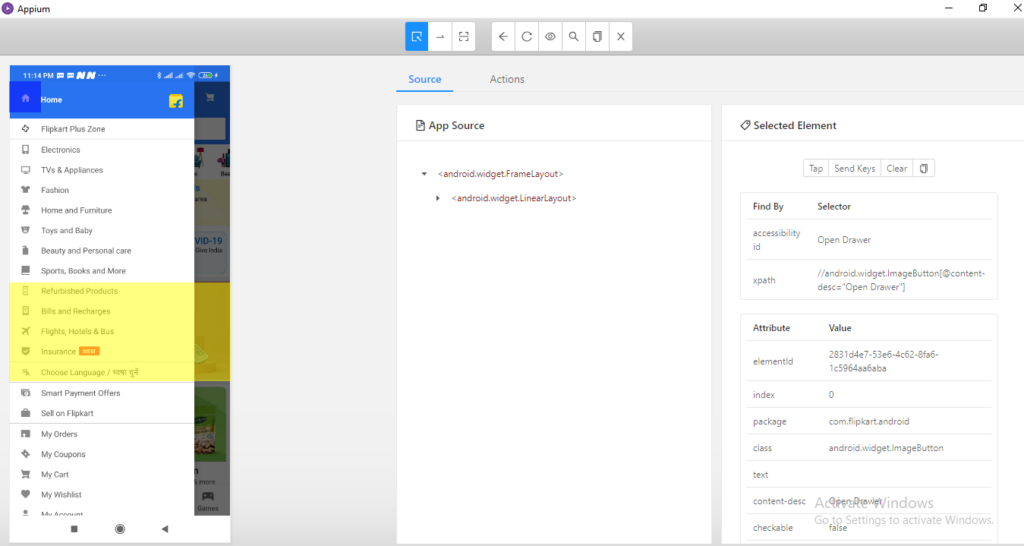
Note: We can also click or perform any action to Hemburger menu from the appium inspector window and view all the listing under the menu option without touching the mobile device.
For this click to Tap button on the right side of the pane below Selected Element heading (refer the screenshot below).
Conclusion:
So we from the above tutorial we have learned inpecting of locating the elements of mobile device using Appium Inspector and perform any task for the selected element from appium inspector itself.
Appium Mobile Device Commands
Previous Topic, In this tutorial we will learn Appium Mobile Device Commands and its syntex under Android driver.
What are Appium Mobile Device Commands?
Those commands which are written under the script for handling the android device features like keyboard handling, orientation etc are referred to as Appium Device Commands.
Lets discuss the commands in details:
1 ) pressKeyCode(key): As every key in the mobile device is associated with a code in its back-end, and to hit the key we need to call the keycode to perform operation.
If we want to hit the key in mobile device through appium script we call pressKeyCode(Key) method and pass keycode as a parameter. For calling keycode we use method “AndroidKeyCode“.
//Syntex
//This syntex will hit the home button of your mobile device
adriver.pressKeyCode(AndroidKeyCode.HOME);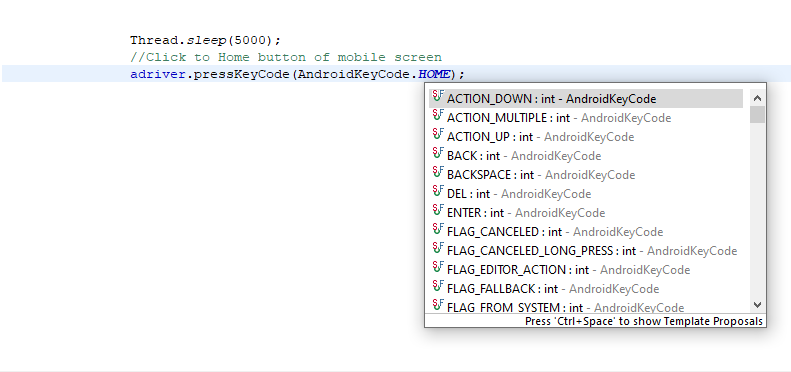
2 ) pressKeyCode(AndroidKeyCode.KEYCODE_APP_SWITCH): There are multiple scenarios where we need to switch from on application to another application, so to handle such scenario we can use this method.
This method minimizes the current window and all the application gets displayed on single screen.
//Syntex
adriver.pressKeyCode(AndroidKeyCode.KEYCODE_APP_SWITCH);
How to change the orientation of screen in mobile device?
3 ) rotate(orientation): If we want to change the orientation of the screen of device, it can be performed using the command, this command requires screen orientation as parameter and returns nothing or void.
The orientation is defined by using the ScreenOrientation class followed by its type (ex Landscape, portrait ) etc
//Syntex
//Change orientation to landscape
driver.rotate(ScreenOrientation.LANDSCAPE);
4 ) getKeyboard(): We can perform any task on the mobile key board only when its enabled or displayed on screen.
To get the keyboard on mobile device we call getKeyboard() method, it takes nothing as parameter or void and return keyboard type object.
//Syntex
//Enable the keyboard on mobile device
driver.getKeyboard();
5 ) hideKeyboard(): To hide or disable the keyboard from the mobile screen we call the hideKeyboard() method, it take nothing and return nothing or void.
//Syntex
driver.hideKeyboard();
6 ) lockDevice(): Using the lockDevice() method, we can lock mobile device through appium script , it takes no parameter and returns void.
//Syntex
driver.lockDevice();
7 ) unlockDevice(): As we can lock mobile device, similarly we have the capability to unlock device through appium script. It takes no parameter and returns void.
//Syntex
driver.unlockDevice();
8 ) isLocked(): If we want to check whether the mobile device is locked in current session or not, we can get this information using the command. It takes no parameter and return boolean (true or false).
As per the return boolean to the condition we can perform multiple operations.
//Syntex
//It check wheter mobile device is locked or not and returns boolean
driver.isLocked();
9 ) toggleLocationServices(): Appium provides the capability to toggle the location service through command, it takes no parameter and returns void.
//Syntex
driver.toggleLocationServices();
10 ) getSessionId(): Session Id is something which active thoughout the session and provided the connectivity of appium server with mobile application.
To get the session id we use getSessionId().
//Syntex
//Will give the session id of the instance
driver.getSessionId().toString();
Conclusion:
So below are the few basic device command to work on mobile application, in next topic we will learn few more advance topic on Appium.
Please comment us for any query or suggession.