Home » restAssured-tutorial
Category Archives: restAssured-tutorial
How to perform Deserialization with Rest Assured
In previous tutorial, we have learned How to perform Serialization with Rest Assured. In this tutorial we are going to learn Deserialization with Rest Assured, this concept of deserialization is reverse of serialization. Lets focus on the concept of deserialization.
How to perform Deserialization with Rest Assured?
Deserialization is a process or mechanism of transforming bit stream in to object state. In context of Rest assured deserialization is a process of converting response body or payload in to in to object state.
In this tutorial, we will understanding the concept with java language to get things more simpler. To achieve deserialization we create POJO class where all the attribute are defined globally and below the variable the getter and setter methods are created.
Understanding concept of Deserialization with example
As we trigger the request payload using rest assured library, we get response and the value of the response gets initialized to the class attribute or global initialized variable with the help of POJO class object.
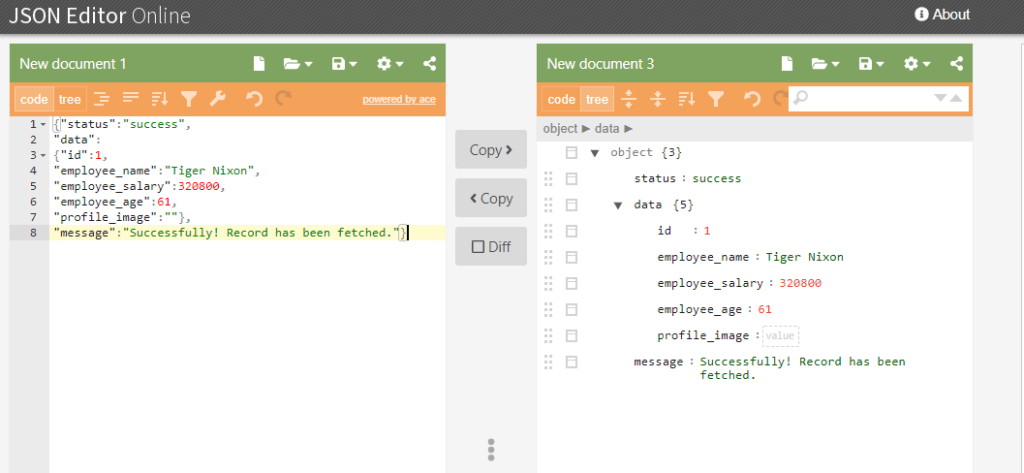
Let consider a response payload for which POJO class is to be created.
{"status":"success",
"data":
{"id":1,
"employee_name":"Tiger Nixon",
"employee_salary":320800,
"employee_age":61,
"profile_image":""},
"message":"Successfully! Record has been fetched."}
Let open the payload in jsoneditor.
Now create a POJO class(EmployeeDetails.java) and define all the attribute or key of the response json displayed above in a form of global valriable and also create their getter and setter methods as below.
package com.restAssured.employee;

public class EmployeeDetails {

	private String status=null;
	private Data data=null;
	private String message=null;

	public String getMessage() {
		return message;
	}
	public void setMessage(String message) {
		this.message = message;
	}
	public String getStatus() {
		return status;
	}
	public void setStatus(String status) {
		this.status = status;
	}
	public Data getData() {
		return data;
	}
	public void setData(Data data) {
		this.data = data;
	}


}
As we see in response json that their is again a json (nested json) inside Data attribute or key. So in this case create another POJO class(Data.java) as displayed below.
package com.restAssured.employee;

public class Data {

	private int id;
	private String employee_name=null;
	private int employee_salary;
	private int employee_age;
	private String profile_image=null;

	public int getId() {
		return id;
	}
	public void setId(int id) {
		this.id = id;
	}
	public String getEmployee_name() {
		return employee_name;
	}
	public void setEmployee_name(String employee_name) {
		this.employee_name = employee_name;
	}
	public int getEmployee_salary() {
		return employee_salary;
	}
	public void setEmployee_salary(int employee_salary) {
		this.employee_salary = employee_salary;
	}
	public int getEmployee_age() {
		return employee_age;
	}
	public void setEmployee_age(int employee_age) {
		this.employee_age = employee_age;
	}
	public String getProfile_image() {
		return profile_image;
	}
	public void setProfile_image(String profile_image) {
		this.profile_image = profile_image;
	}

}
We are now done with creation of POJO classes. Create a class (RestAssuredRider.java) and run the class where we call the rest assured methods and pass the rest API and get the reponse inside the defined POJO variables.
package com.restAssured.employee;

import static io.restassured.RestAssured.given;

import io.restassured.RestAssured;
import io.restassured.parsing.Parser;

public class RestAssuredRider {

	public static void main(String[] args) {

RestAssured.useRelaxedHTTPSValidation();


EmployeeDetails empDetail =given().expect().defaultParser(Parser.JSON)
.when()
		.get("http://dummy.restapiexample.com/api/v1/employee/1").as(EmployeeDetails.class);

System.out.println("Status value is---->"+empDetail.getStatus());
System.out.println("Message is---->"+empDetail.getMessage());

	}

}
Code in eclipse with be displayed as below.
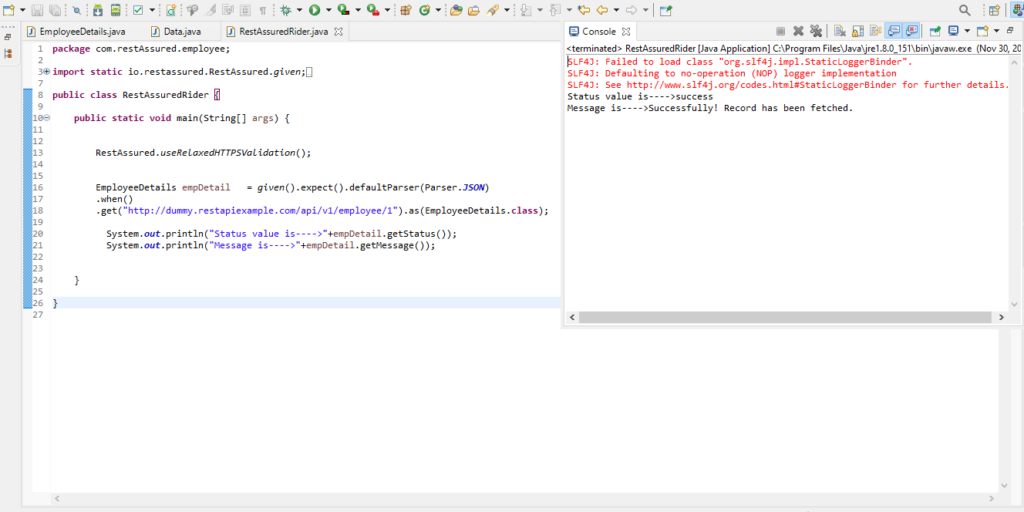
Conclusion
So in the above eclipse console, we see that we have received the response that is printed by calling the object of POJO class, and we the help of reference variable we call all the attribute key along with its value and work with it as per requirement.
How to perform Serialization with Rest Assured
In previous tutorial, we have learned how to parse Json Response body . In this tutorial we will discuss the concept of Serialization with Rest Assured using POJO classes
How to perform Serialization with Rest Assured?
Serialization is a process or mechanism of transforming the object state in the bit stream. In context of rest assured serialization is a process of converting the object state in the request body or payload.
As in this tutorial we are using java language to make things more simpler, In serialization we create java object from the POJO (plain old java object) class where all the attributes of the request is been defined with in a class as per the required payload structure and passed this object as a request with in the body keyword as a parameter in rest assured.
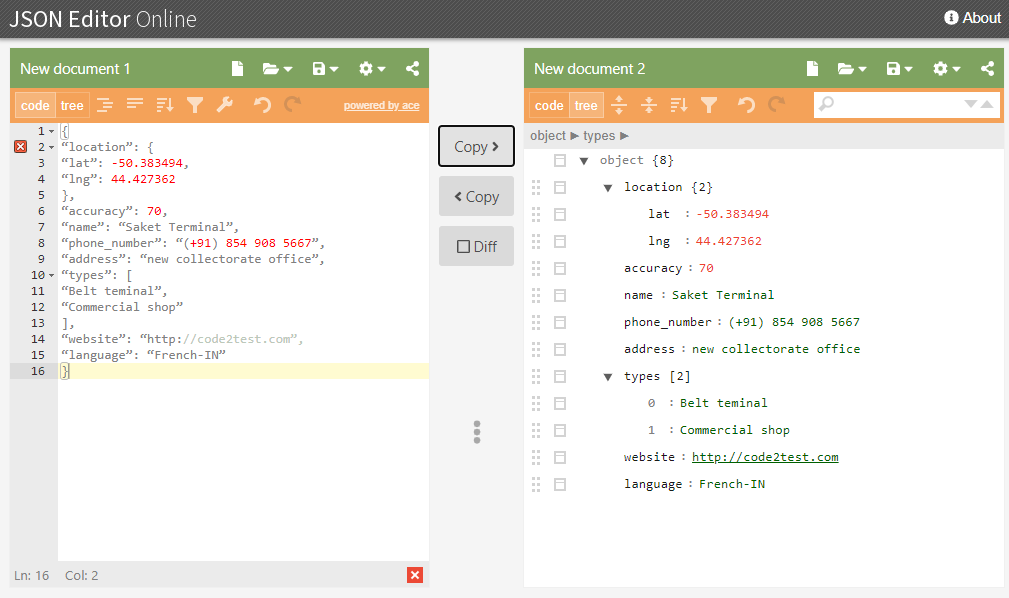
Let consider a payload as an example for which POJO class is to be created.
{
“location”: {
“lat”: -50.383494,
“lng”: 44.427362
},
“accuracy”: 70,
“name”: “Saket Terminal”,
“phone_number”: “(+91) 854 908 5667”,
“address”: “new collectorate office”,
“types”: [
“Belt teminal”,
“Commercial shop”
],
“website”: “https://code2test.com”,
“language”: “French-IN”
}
Let open this payload inside the jsoneditor, it will display as below.
Creating POJO class (AddPlace.java) with getter and setter objects for the all the attributes present on the above JSon.
package com.restAssured;
import java.util.List;
public class AddPlace {

	private int accuracy=0;
	private String name=null;
	private String phone_number=null;
	private String address=null;
	private String website=null;
	private String language=null;
	private Location location=null;
	private List<String> types=null;

	public Location getLocation() {
		return location;
	}
	public void setLocation(Location location) {
		this.location = location;
	}
	public int getAccuracy() {
		return accuracy;
	}
	public void setAccuracy(int accuracy) {
		this.accuracy = accuracy;
	}
	public String getName() {
		return name;
	}
	public void setName(String name) {
		this.name = name;
	}
	public String getPhone_number() {
		return phone_number;
	}
	public void setPhone_number(String phone_number) {
		this.phone_number = phone_number;
	}
	public String getAddress() {
		return address;
	}
	public void setAddress(String address) {
		this.address = address;
	}
	public List<String> getTypes() {
		return types;
	}
	public void setTypes(List<String> types) {
		this.types = types;
	}
	public String getWebsite() {
		return website;
	}
	public void setWebsite(String website) {
		this.website = website;
	}
	public String getLanguage() {
		return language;
	}
	public void setLanguage(String language) {
		this.language = language;
	}

}
As we need to create other POJO class (Location.java) for location attribute, as its again a json (nested JSon).
package com.restAssured;
public class Location {
	public double lat;
	public double lng;


	public double getLat() {
		return lat;
	}
	public void setLat(double lat) {
		this.lat = lat;
	}
	public double getLng() {
		return lng;
	}
	public void setLng(double lng) {
		this.lng = lng;
	}

}
Now create a final POJO class (RestServiceDemo.java) which provides all the values to the setter methods and finally call rest assured keywords along with methods and pass the object inside body keyword and run the script.
package com.restAssured;
import io.restassured.RestAssured;
import io.restassured.path.json.JsonPath;
import io.restassured.response.Response;
import static io.restassured.RestAssured.*;
import static org.hamcrest.Matchers.*;
import java.util.ArrayList;

public class RestServiceDemo {
public static void main(String[] args) {

	RestAssured.baseURI ="https://rahulshettyacademy.com";
	RestAssured.useRelaxedHTTPSValidation();

	AddPlace  pojo= new AddPlace();
	pojo.setAccuracy(70);
	pojo.setAddress("Saket Terminal");
	pojo.setLanguage("UnitedKingdon-IN");
	pojo.setPhone_number("(+91) 8567523457");
	pojo.setWebsite("https://code2test.com");
	pojo.setName("new collectorate office");

	ArrayList<String> list=new ArrayList<String>();
	list.add("Belt Number");
	list.add("Local Number");

	pojo.setTypes(list);

	Location loc=new Location();
	loc.setLat(-34.4567);
	loc.setLng(56.2453);

	pojo.setLocation(loc);

 Response response=given().queryParam("key","qaclick123")
.body(pojo)
.when().post("maps/api/place/add/json")
.then().log().all().assertThat().assertThat().statusCode(200).extract().response();
System.out.println("Get the response"+response.toString());

	}
}
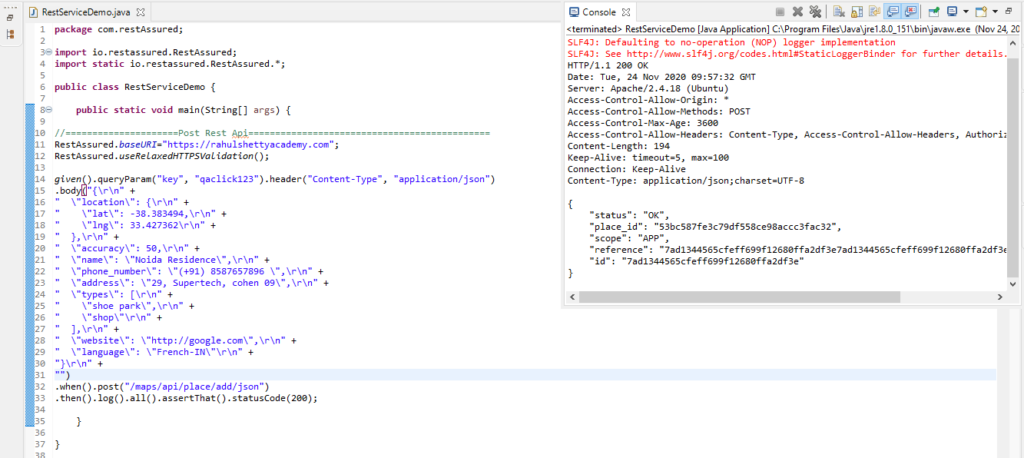
After Running the code in eclipse, the output in console display as below.
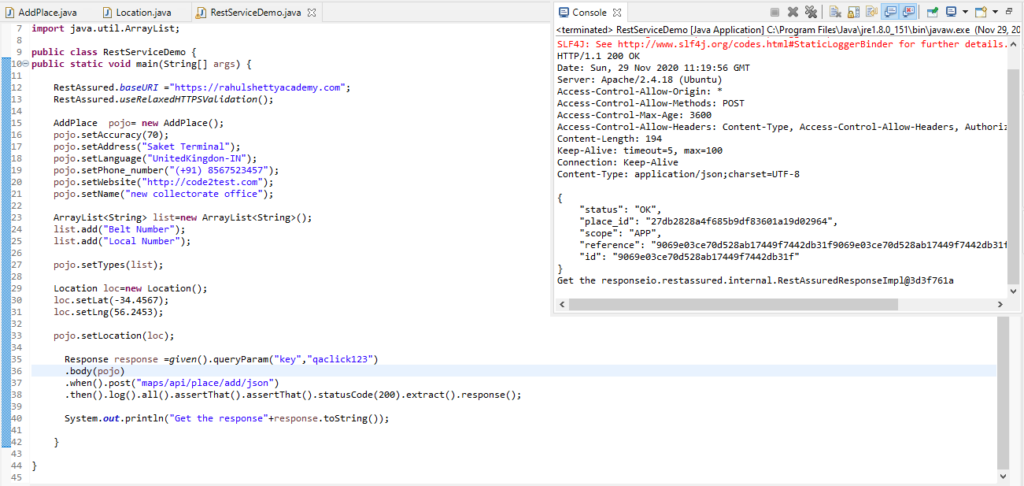
Conclusion
So in above image we see that, we received the status “OK” response or in other words successful response.
We have not passed any Json request or payload on the body keyword as parameter but the object of the POJO class. So now we are clear with the concept of serialization in our next tutorial we will understand the concept of de-serialization with rest assured.
Parse JSON Response Body with Rest Assured
In Previous tutorial, we have learned how to Test Rest Api using Rest Assured so in current tutorial we will move to more advance topic and understand Parse JSON Response Body with Rest Assured.
How to Parse JSON Response Body with Rest Assured?
To under in depth, we will parse Json mock response body with two differnet type of json body, firstly we will consider a simple json response after that we will take nested json response body and try to parse with different sets of scenarios.
1) Simple Json : To parse json body ,we will be using JsonPath class and be using its methods to get the value of a particular attribute.
Below is the mock json response
{
"status": "OK",
"place_id": "9172e95034d47483d8e0775710eb6a54",
"scope": "APP",
"reference": "de2fad9729217c7b69d9a0bb4906e742de2fad9729217c7b69d9a0bb4906e742",
"id": "de2fad9729217c7b69d9a0bb4906e742"
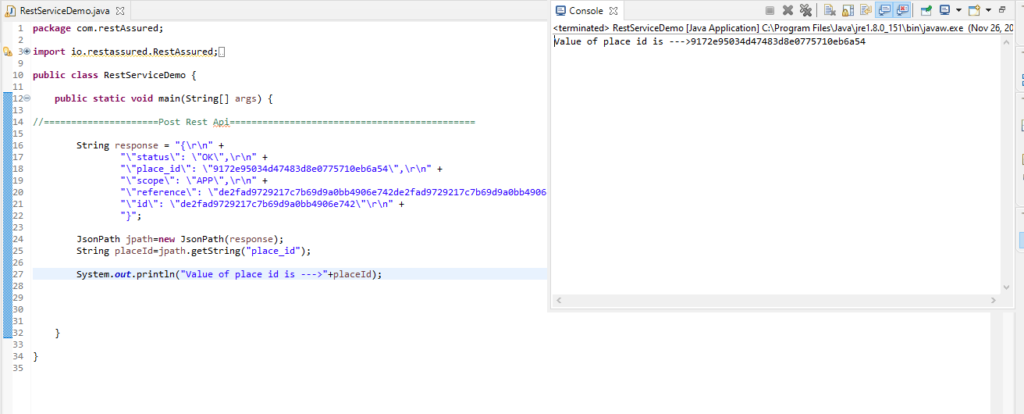
}Suppose we required to retrieve the value of place_id from the above mock json response, so to get the vlaue of “place_id ” below is the code for the same.
JsonPath jpath=new JsonPath(response);
String placeId=jpath.getString("place_id");
Complete code in eclipse with be look like this:
2) Nested Json: Json can contain nested objects in Json format and these object may contains Array with value assigned to it key in key value form this type of json structure is known as nested Json.
Below is the mock json response example:
{
"dashboard": {
"purchaseAmount": 1060,
"website": "code2test.com"
},
"courses": [
{
"title": "Selenium",
"price": 50,
"copies": 6
},
{
"title": "Appium",
"price": 40,
"copies": 4
},
{
"title": "Rest Assured",
"price": 45,
"copies": 10
},
{
"title": "SoapUI",
"price": 30,
"copies": 5
}
]
}
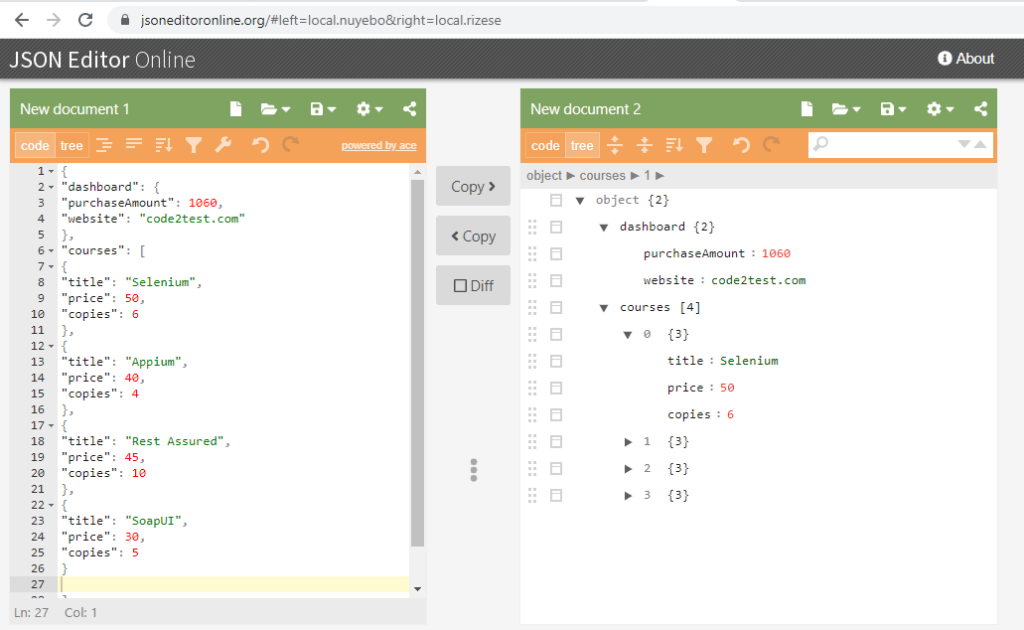
To view or under json in better way, you can can open https://jsoneditoronline.org/ website and paste above json file it will give a tree structre as shown below.
Lets parse the above json with all possible ways by considering the below scenarios.
a) Get the purchase amount of the course?
b) Title of first course (which is selenium) ?
c) Total copies sold by SoapUI?
d) Total number of courses?
e) Print all the title of the courses
Lets start above sechanario sequesncially.
a) Get the purchase amount of the course
JsonPath jpath=new JsonPath(response);
int puchaseAmt=jpath.getInt("dashboard.purchaseAmount");
b) Title of first course (which is selenium)
JsonPath jpath=new JsonPath(response);
String firstCourseTitle=jpath.getString("courses[0].title");
c) Total copies sold by SoapUI
JsonPath jpath=new JsonPath(response);
String totalCopiesSoapUi=jpath.getString("courses[3].copies");
d) Total number of courses?
JsonPath jpath=new JsonPath(response);
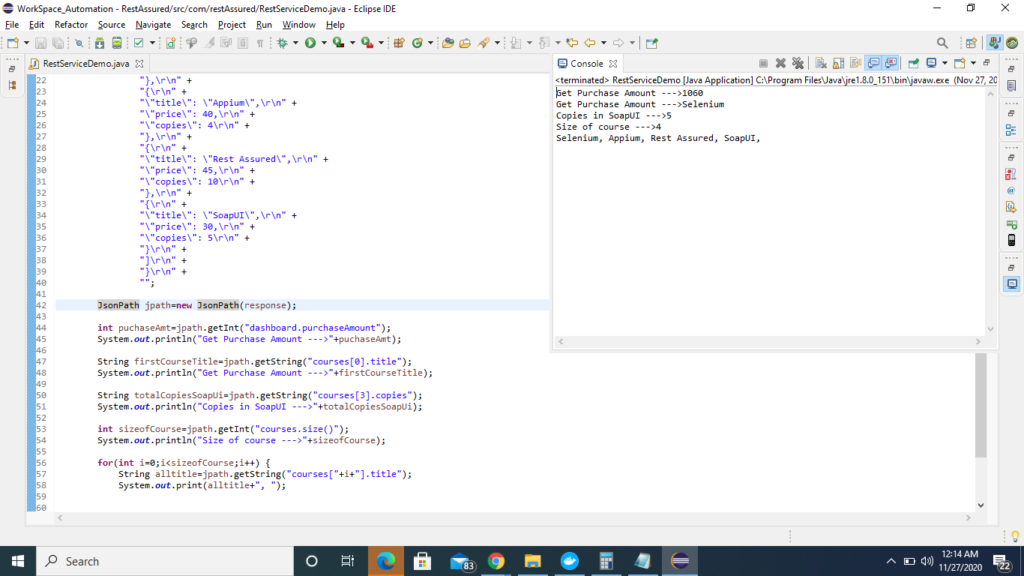
int sizeofCourse=jpath.getInt("courses.size()");e) Print all the title of the courses
JsonPath jpath=new JsonPath(response);
int sizeofCourse=jpath.getInt("courses.size()");
for(int i=0;i<sizeofCourse;i++)
{
String alltitle=jpath.getString("courses["+i+"].title");
System.out.print(alltitle+", ");

}
Complete code in eclipse will look in below
Conclusion
So in the above tutorial we have learned to parse a simple and complex json or nested json , this parsing of json is very helpful when we hit any rest api and get the json response, in that case we need to retrieve the value from json in key value pair.
Test Rest Api using Rest Assured
In previous tutorial we have how to Configure Eclipse with Rest-Assured API, In this tutorial we will be learning how to write and Test Rest Api using Rest Assured.
Test Rest Api using Rest Assured
To understand in depth, we will are taking a simple Rest Api and the details of this Api is provided below.
End Point->https://rahulshettyacademy.com
Resource->/maps/api/place/add/json
Query Parameter -> key =qaclick123
Http method-> POST
Sample Request Json->
{
“location”: {
“lat”: -38.383494,
“lng”: 33.427362
},
“accuracy”: 50,
“name”: “Frontline house”,
“phone_number”: “(+91) 983 893 3937”,
“address”: “29, side layout, cohen 09”,
“types”: [
“shoe park”,
“shop”
],
“website”: “http://google.com”,
“language”: “French-IN”
}
Sample Response Json->
{
“status”: “OK”,
“place_id”: “928b51f64aed18713b0d164d9be8d67f”,
“scope”: “APP”,
“reference”: “736f3c9bec384af62a184a1936d42bb0736f3c9bec384af62a184a1936d42bb0”,
“id”: “736f3c9bec384af62a184a1936d42bb0”
}
In order to get the above response, we will follow the below steps through java code using rest assured api
1) We will use Rest assured class to create a request body and provide the required parameters to the request body
2) Will define the https type
3) Sending request to the server
4) Getting back the response from the server
5) Display the response in console of eclipse
How to Write and Test Rest Api using Rest Assured
Find Below code to hit the request from Rest Assured Api and getting back the response from the server.
package com.restAssured;

import io.restassured.RestAssured;
import static io.restassured.RestAssured.*;

public class RestServiceDemo {

public static void main(String[] args) {

//=====================Post Rest Api======================
RestAssured.baseURI="https://rahulshettyacademy.com";
RestAssured.useRelaxedHTTPSValidation();

given().queryParam("key", "qaclick123").header("Content-Type", "application/json")
.body("{\r\n" +
"  \"location\": {\r\n" +
"    \"lat\": -38.383494,\r\n" +
"    \"lng\": 33.427362\r\n" +
"  },\r\n" +
"  \"accuracy\": 50,\r\n" +
"  \"name\": \"Noida Residence\",\r\n" +
"  \"phone_number\": \"(+91) 8587657896 \",\r\n" +
"  \"address\": \"29, Supertech, cohen 09\",\r\n" +
"  \"types\": [\r\n" +
"    \"shoe park\",\r\n" +
"    \"shop\"\r\n" +
"  ],\r\n" +
"  \"website\": \"http://google.com\",\r\n" +
"  \"language\": \"French-IN\"\r\n" +
"}\r\n" +
"")
.when().post("/maps/api/place/add/json")
.then().log().all().assertThat().statusCode(200);

	}

}
Code in Eclipse:
Code Explanation:
1) This line of code uses Rest Assured Class followed by baseURI method to capture the baseURL
RestAssured.baseURI="https://rahulshettyacademy.com";2) It means you are trusting all hosts even regardless the SSL certificate is invalid
RestAssured.useRelaxedHTTPSValidation();3) In this line of code we are providing the credentials, as query parameters header type and request json under body keyword.
given().queryParam("key", "qaclick123").header("Content-Type", "application/json")
.body("{\r\n" +
"  \"location\": {\r\n" +
"    \"lat\": -38.383494,\r\n" +
"    \"lng\": 33.427362\r\n" +
"  },\r\n" +
"  \"accuracy\": 50,\r\n" +
"  \"name\": \"Noida Residence\",\r\n" +
"  \"phone_number\": \"(+91) 8587657896 \",\r\n" +
"  \"address\": \"29, Supertech, cohen 09\",\r\n" +
"  \"types\": [\r\n" +
"    \"shoe park\",\r\n" +
"    \"shop\"\r\n" +
"  ],\r\n" +
"  \"website\": \"http://google.com\",\r\n" +
"  \"language\": \"French-IN\"\r\n" +
"}\r\n" +
"")
4) under When keyword we are providing the resource or in other words the extended URL after base url. for ex: https://rahulshettyacademy.com//maps/api/place/add/json
.when().post("/maps/api/place/add/json")
5) Under then keyword, we provide validation code here we provided 200 which means successfull
.then().log().all().assertThat().statusCode(200);So in above tutorial we have learned the test rest assured api using rest assured, in further tutorial we will learn more features with in Rest API
Configure Eclipse with Rest-Assured API
In Previous Tutorial we have learned Introduction of Rest Assured, so in current tutorial we will understand how to Configure Eclipse with Rest-Assured API.
How to Configure Eclipse with Rest-Assured API
To configure and setup eclipse with Rest Assured API, we need to follow the below steps step by step:
3) Download the Rest Assured Jars
4) Setup rest assured jars in eclipse
Above steps will help in configuration of Rest assured, Step 1 & 2 are already discussed in previous tutorials (click and walkthrough the tutorial sequentially), we will proceed with 3 & 4 steps to get more in depth.
Download the Rest Assured Jars
1) Click to url Rest assured website for jar download.
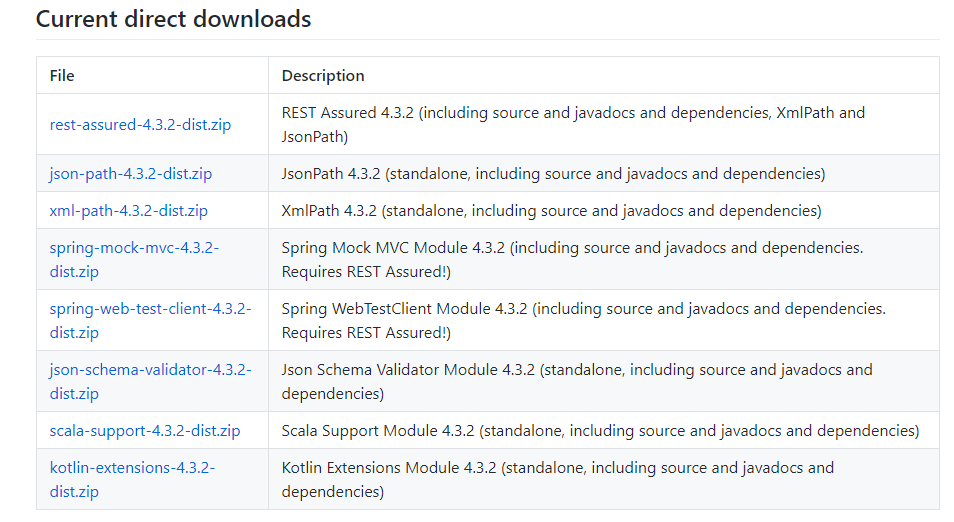
2) Download all the jars below the Files columns.
3) Unzip all the jars and save to your preferred folder, now next step is to setup rest assured jars in eclipse Ide.
Setup Rest assured jars in eclipse
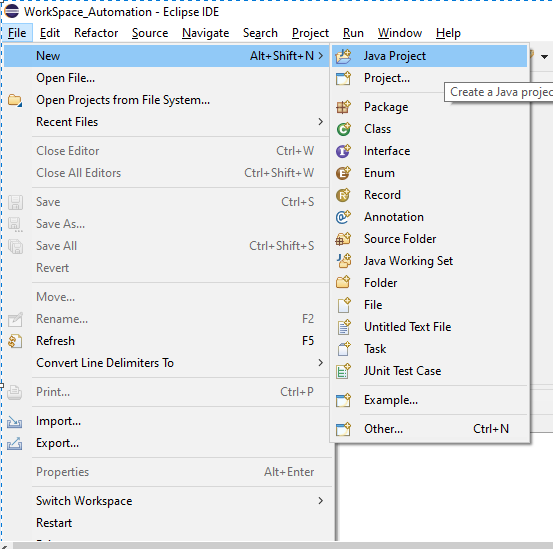
1) Create java project in eclipse by click to File->New-> Java Project , mention the project name and click to Finish button
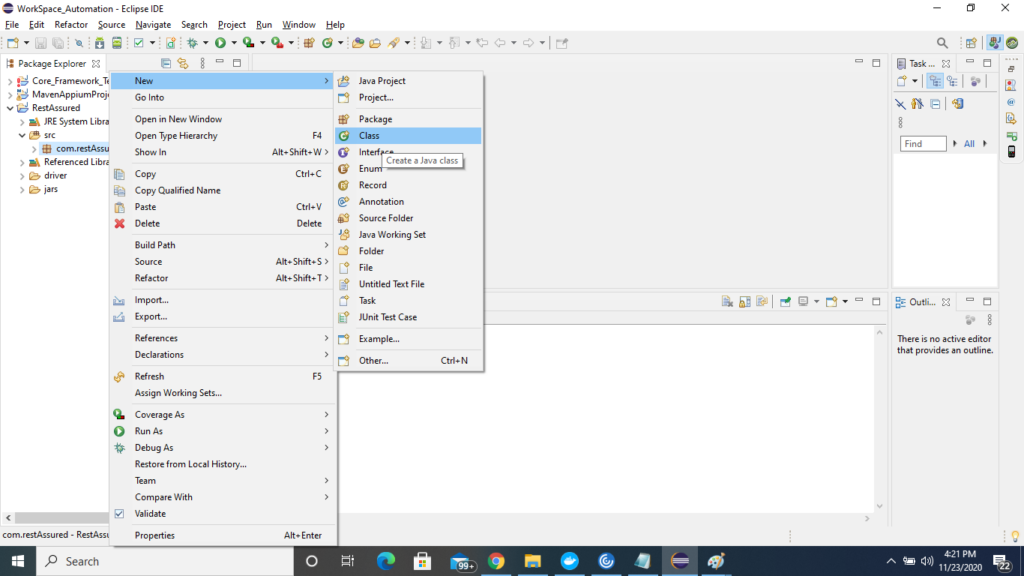
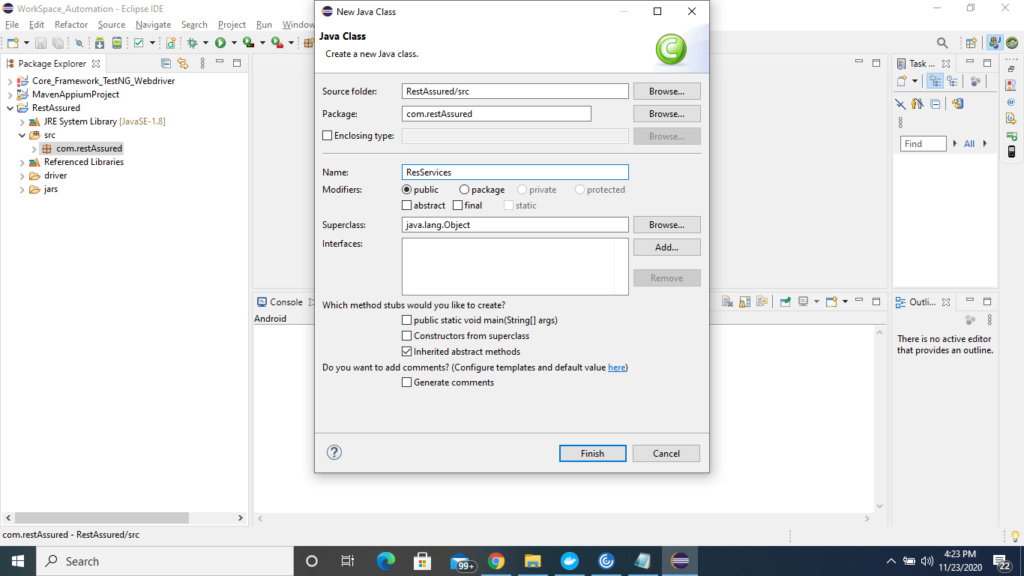
2) Now create a class inside default package
3) Now we need to provide the rest assured jars to the project for this follow the below steps.
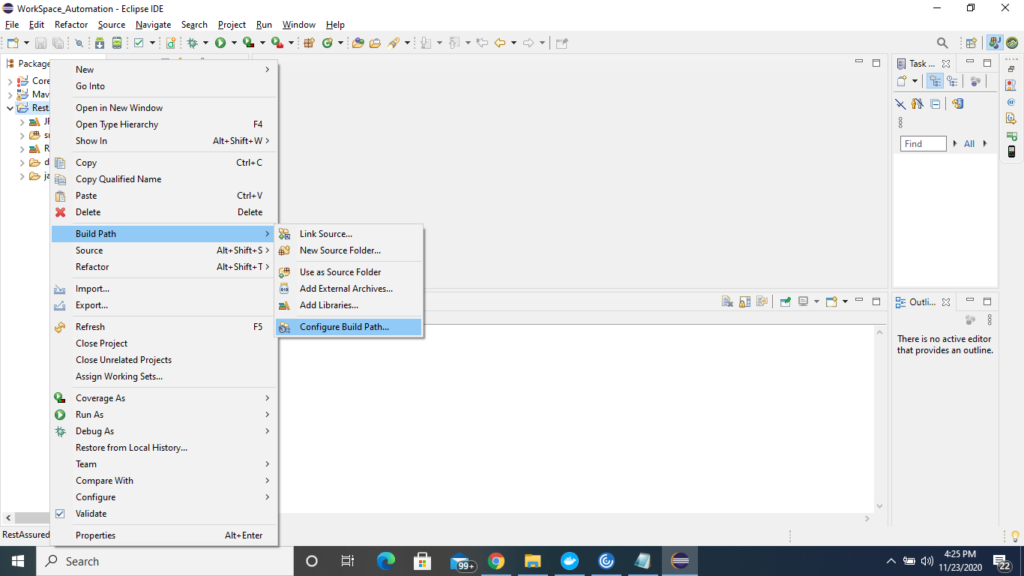
Right click to Project -> Select->Build path->Select Build path
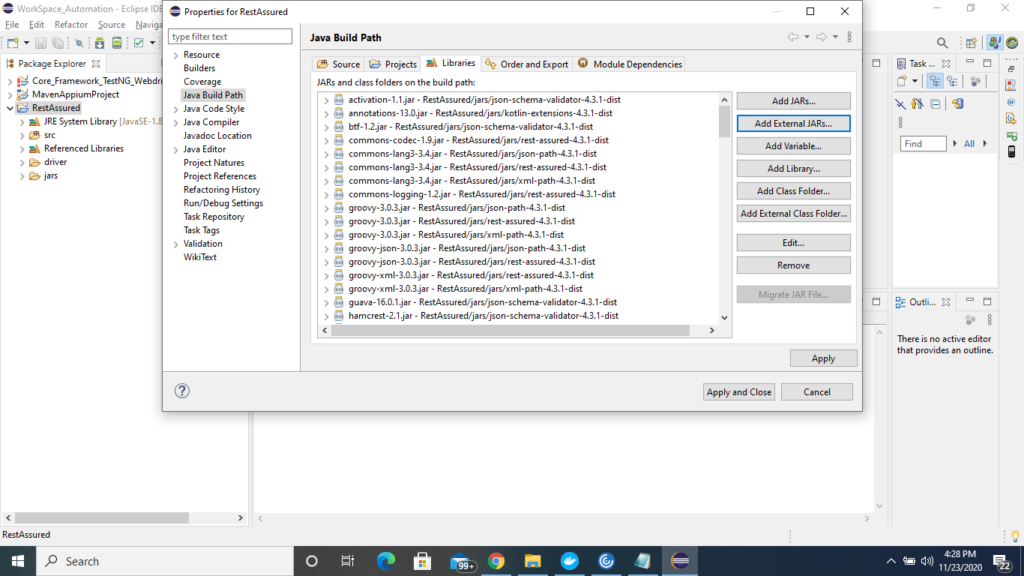
4) Under Java Build Path window-> Click to Libraries->click to Add External jars and now select all the unzip external jars of rest assured and click t apply and close.
So by following above steps we will successfully install and setup rest assured on eclipse, in further tutorial , we will learn working on rest api and will try to hit rest services using rest assured and validate the output or expected output.
Comment for any feedback regarding the tutorial or any query on tutorial part
Introduction of Rest Assured
Previous Topic, In this tutorial we will learn the overview and Introduction of Rest Assured API and the advantage.
What is Rest Assured?
Rest Assured provides the capability to test your Rest Representation State Transfer services using java and integrate with build tools like maven, Ant etc. Rest Assured Api has different method that helps to trigger your request payload and get the expected response.
Introduction of Rest Assured
Further with the received payload or in other words the output , we can get the required data and validate our automation as per the requirement.
Suppose you are looking for online hotel booking, and login to OYO rooms. As during the hotel search you come up with all the available hotels on the place along with the details of the available rooms from a defined time interval.As we are aware that all the hotels are not belongs to OYO ownership, so how the OYO manages to show them all. The answer is due to exposed APIs of these hotels providers.
If we are required to test this type of application UI before the development or during the development its not possible, so testing API is very important and testing repeatedly with different sets of data or parameterized data sets.
Advantage of Rest Assured
1) The major advantage of rest assured is it removes the writing of complex code for http connection, send the request and receives a readable response.
2) Rest Assured works on the basis of 3 principles, Given(), When() and Then(), which makes easy to provide the parameter and receive the readable code.
3) Being Rest Assured as java API, the integration with other tools becomes quite easy, it can easily connect with maven , testng etc.
Working Principle of Rest Assured
Rest Assured works on the basis of 3 principles Given(), When(), Then()
1) Given(): Given Keyword are the pre-requisites or the request parameter that is passed like header, query Parameter, request body.
2) When(): When keyword keeps the resource url, for the specific service to work with.
3) Then(): Under then keyword, we provide the assertions and matcher conditions or in other words all the validation work is performed to this keyword.
So, in next tutorial we are going to setup the Rest Assured and try with a sample application.