Home » selenium-tutorial (Page 2)
Category Archives: selenium-tutorial
How to Select value from dropdown using selenium
Previous topic, In this tutorial we will learn select value from dropdown & multiple selection using selenium webdriver.
Dropdown List box in selenium Webdriver can be handled using Select class. Select class in selenium provided the provision to select and deselect the options from the listbox using three approaches they are: by index , by value and Visible Text, Lets discuss the different approached of selection of option from drop down list box one by on.
How to select value from dropdown using selenium webdriver?
To understand, it lets take a scenario:
- Open the url “www.facebook.com“
- Under Create my option enter First name
- Enter email
- Enter password
- Under Birthday list box-> select date
- Birthday list box-> select month
- Birthday list box-> select year
1) selectByIndex: We can select the option from the list box on the basis of Index (starts with “0”). To provide the index for a list box selection, firstly we create the object of Select class and pass the web element as a parameter. Below is the syntax.
Select selectData=new Select(WebElement );
selectData.selectByIndex(int);
Code for the above scenario with explanation for each line of code in comments:
  // Create object of chrome driver
     WebDriver driver =  new ChromeDriver();
     Thread.sleep(3000);
    driver.get("https://www.facebook.com/");


          Thread.sleep(3000);

          // Locate the element for first name and enter "Rahul" on text box
           driver.findElement(By.xpath("//input[@name='firstname']")).sendKeys("Rahul");

         // Locate the element for email and enter "[email protected]" on text box
           driver.findElement(By.xpath("//input[@name='reg_email__']")).sendKeys("[email protected]");

        // Locate the element for password and enter "Rahul123" on text box
           driver.findElement(By.xpath("//input[@name='reg_passwd__']")).sendKeys("Rahul123");

           // Locate the element for day list box
           WebElement  date =driver.findElement(By.xpath("//select[@name='birthday_day']"));

           //Create the object for Select class and pass Webelement as parameter
           Select selectData=new Select(date);

           //Select 5 index from the date list box
           selectData.selectByIndex(5);

        // Locate the element for month list box
           WebElement  month =driver.findElement(By.xpath("//select[@name='birthday_month']"));

         //Create the object for Select class and pass Webelement as parameter
           Select selectMonth =new Select(month);

         //Select 5 index from the month list box
           selectMonth.selectByIndex(5);


        // Locate the element for year list box
           WebElement  Year =driver.findElement(By.xpath("//select[@name='birthday_year']"));

         //Create the object for Select class and pass Webelement as parameter
           Select selectYear =new Select(Year);

         //Select 5 index from the month list box
           selectYear.selectByIndex(5);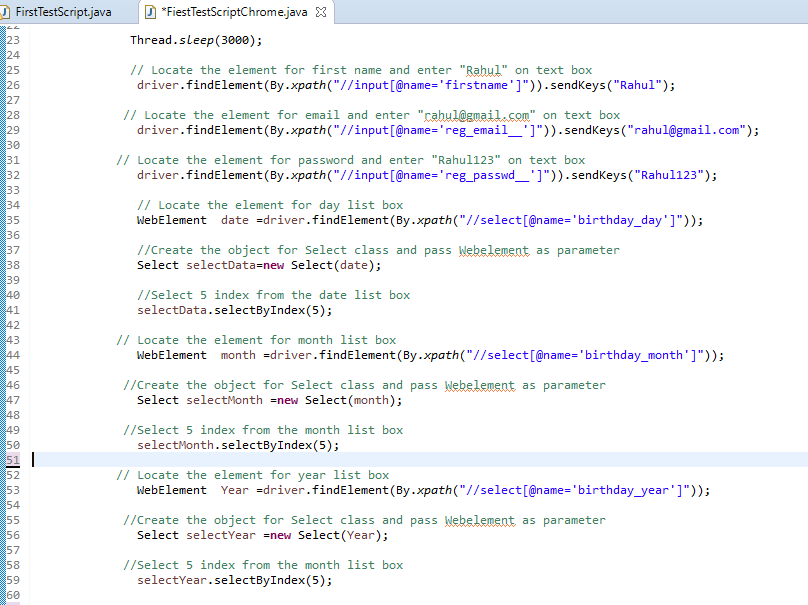
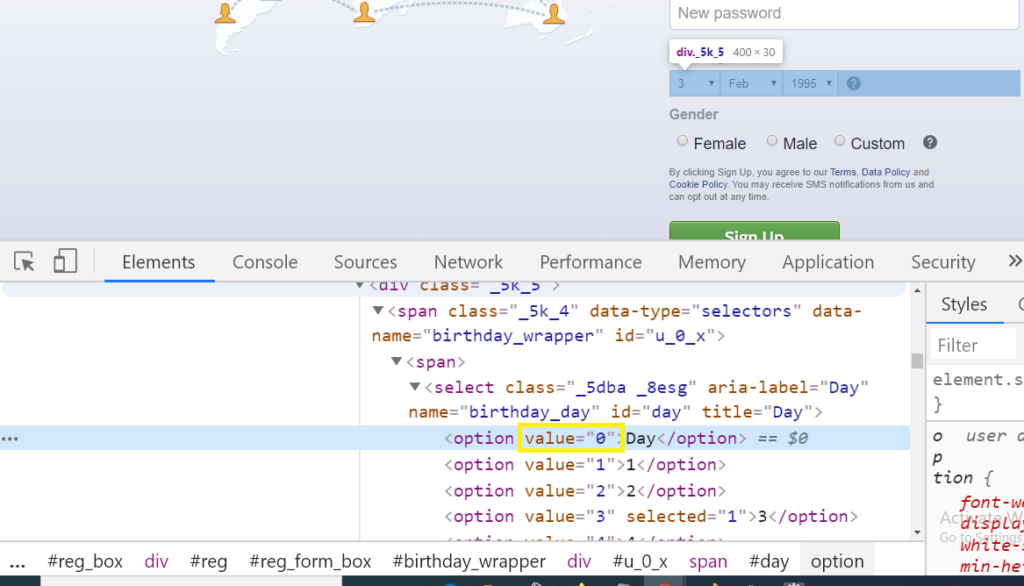
2) selectByValue: Another way of selecting the options from dropdown list box is by providing the value under option tag. refer screenshot for reference below.Value highlighted in yellow
The syntaxfor the selectByValue is:
Select value=new Select(date);
value.selectByValue("String");
Code of the above scenario as given below:
//System property of the Chrome driver
               System.setProperty("webdriver.chrome.driver","C:\Users\XXXX\Desktop\Eclipse_Installer\GeckoDriver\chromedriver.exe");
 // Create oject of chrome driver
          WebDriver driver =  new ChromeDriver();
          Thread.sleep(3000);

          driver.get("https://www.facebook.com/");

          driver.manage().window().maximize();
          Thread.sleep(3000);

          // Locate the element for first name and enter "Rahul" on text box
           driver.findElement(By.xpath("//input[@name='firstname']")).sendKeys("Rahul");

         // Locate the element for email and enter "[email protected]" on text box
           driver.findElement(By.xpath("//input[@name='reg_email__']")).sendKeys("[email protected]");

        // Locate the element for password and enter "Rahul123" on text box
           driver.findElement(By.xpath("//input[@name='reg_passwd__']")).sendKeys("Rahul123");

           // Locate the element for day list box
           WebElement  date =driver.findElement(By.xpath("//select[@name='birthday_day']"));

           //Create the object for Select class and pass Webelement as parameter
           Select selectData=new Select(date);

           //Select 5 as value from the date list box
           selectData.selectByValue("5");

        // Locate the element for month list box
           WebElement  month =driver.findElement(By.xpath("//select[@name='birthday_month']"));

         //Create the object for Select class and pass Webelement as parameter
           Select selectMonth =new Select(month);

         //Select 5 as value from the month list box
           selectMonth.selectByValue("5");

        // Locate the element for year list box
           WebElement  Year =driver.findElement(By.xpath("//select[@name='birthday_year']"));

         //Create the object for Select class and pass Webelement as parameter
           Select selectYear =new Select(Year);

         //Select 2015 as value from the month list box
           selectYear.selectByValue("2015");
3) selectByVisibleText: Last approach for selecting the options from dropdown list box is using the Text on the list box. By this approach we can directly select he option on entering the text as displayed in web application. Syntax is mentioned below:
 Select text=new Select(month);
 text.selectByVisibleText("String");
Code of the above scenario using selectByVisibleText as given below:
//System property of the Chrome driver
               System.setProperty("webdriver.chrome.driver","C:\Users\XXXX\Desktop\Eclipse_Installer\GeckoDriver\chromedriver.exe");

// Create object of chrome driver
  WebDriver driver =  new ChromeDriver();
  Thread.sleep(3000);
driver.get("https://www.facebook.com/");
driver.manage().window().maximize();
Thread.sleep(3000);

 // Locate the element for first name and enter "Rahul" on text box
           driver.findElement(By.xpath("//input[@name='firstname']")).sendKeys("Rahul");

// Locate the element for email and enter "[email protected]" on text box
           driver.findElement(By.xpath("//input[@name='reg_email__']")).sendKeys("[email protected]");

 // Locate the element for password and enter "Rahul123" on text box
           driver.findElement(By.xpath("//input[@name='reg_passwd__']")).sendKeys("Rahul123");

           // Locate the element for day list box
           WebElement  date =driver.findElement(By.xpath("//select[@name='birthday_day']"));

           //Create the object for Select class and pass Webelement as parameter
           Select selectData=new Select(date);

           //Select 5 as Text from the date list box
           selectData.selectByVisibleText("5");

        // Locate the element for month list box
           WebElement  month =driver.findElement(By.xpath("//select[@name='birthday_month']"));

//Create the object for Select class and pass Webelement as parameter
 Select selectMonth =new Select(month);

 //Select May as text from the month list box
  selectMonth.selectByVisibleText("May");

 // Locate the element for year list box
WebElement  Year =driver.findElement(By.xpath("//select[@name='birthday_year']"));
 //Create the object for Select class and pass Webelement as parameter
 Select selectYear =new Select(Year);
 //Select 2015 as text from the month list box
  selectYear.selectByVisibleText("2015");
This is the post for select value from dropdown and multiple value using selenium webdriver. if you have any query , feel free to comment
CheckBox & Radio button
CheckBox and Radio button both are handled in same way, it is generally can be handled by finding the locator and directly clicking on the element on Web Page but most of time it happens that the checkbox is by default checked and we need to verify and uncheck it or may be conditional check box need to be handled same in case of Radio button.
Lets discuss one by one in details.
CheckBox: To handle a check box, first we find its locator using any of the technique as discussed in previous topic (by id, name, xpath , css etc ) and directly click to the that element. But if the checkbox is already checked then in case we need to check by our test case whether it is checked or not.
For this we have a mehod which is isSelcted() , it return a boolean and according to it we can make condition either to check or uncheck. Let go to the coding part to get it more clear.
public Boolean Flag =false; //Define this globally after the class at class level
//Take all the element of checkbox in list
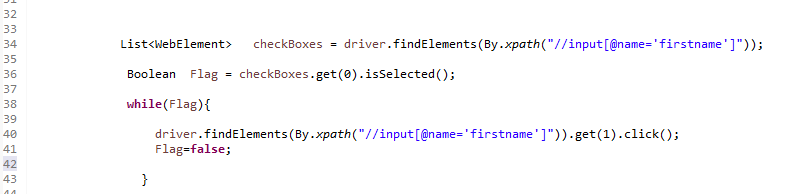
List checkBoxes = driver.findElements(By.xpath("//input[@name='firstname']"));
// This line will check whether the first check box is checked or unchecked and will return boolean
Boolean Flag = checkBoxes.get(0).isSelected();
// If the Boolean is true, it will check the second check box and come out of loop
while(Flag){
driver.findElements(By.xpath("//input[@name='firstname']")).get(1).click();
Flag=false;
} Above code in eclipse will look like this at below in image
So the similar way we can handle the radio button on the web page.
Commands for WebElements
When we talk about WebElements, we talk about source code or HTML documentation of a Web page. Web Elements in the user interface are the elements that are due to the HTML tag or syntax that are written in Dom structure.These tags have starting and ending tag.
So to interact with these webElements, first we need to take webElements as a return type from any of webdriver method. Take the return type from the findElements method as below:
WebElement driver= driver.findElement(By.name(“Email”));
1) click: This method is used to click to the element in web page and returns void(no return type).Command for click is below:
WebElement driver1= driver.findElement(By.name(“XXXXX”));
driver1.click();
2) clear: This method clears the value from the web element for ex: any text present in the text field gets cleared after evoke clear method. Command for clear is displayed below.
WebElement driver1= driver.findElement(By.name(“Email”));
driver1.clear();
3) getAttribute: This method gives the value of the attribute name passed as a parameter and return a string. Command for clear is displayed below.
WebElement driver1= driver.findElement(By.name(“Email”));
driver1.getAttribute(“name”); //This will return Email as a string
4) getCssValue: This method will return the string and provide the value of the css attribute value.
WebElement driver1= driver.findElement(By.name(“Email”));
driver1.getCssValue(“background-border”);
5) getSize: This method will give you the size of the element and return you the Dimension object.
WebElement driver1= driver.findElement(By.name(“Email”));
driver1.getSize();
6) getLocation: This method do not required any parameter and provided the x and y co-ordinated and return the object of Point.
WebElement driver1= driver.findElement(By.name(“Email”));
Point coOrdinates =driver1.getLocation();
coOrdinates.x;
coOrdinates.y;
7) getText: This method provide the text of the element and return the object as String.
WebElement driver1= driver.findElement(By.name(“Email”));
String coOrdinates =driver1.getText();
8) Submit: This method submits the the web page for its a form type image its works same as click.
WebElement driver1= driver.findElement(By.name(“Email”));
driver1.submit();
9) isDisplayed: This method helps in getting the presence of web element on web page.This method do not accept any parameter and returns a Boolean.
WebElement driver1= driver.findElement(By.name(“Email”));
driver1.isDisplayed();
10) isEnabled: This method helps to know whether the element is Enabled or not and return Boolean as an Object.
WebElement driver1= driver.findElement(By.name(“Email”));
driver1.isEnabled();
11) isSelected: This method helps to know whether the element in web page is selected or not . For example a check box is checked or not and return Boolean as Object.
WebElement driver1= driver.findElement(By.name(“Email”));
driver1.isSelected();
SqlServer Connection through JDBC in Selenium
Previous Topic, In this tutorial we are going to learn SqlServer Connection through JDBC in Selenium but before starting with connecting database we need to understand what is JDBC?
JDBC: JDBC stands for (java database connectivity) is a java API that provides methods which helps in creating the connection with the database. that helps in inserting the query, receiving the result and evaluating the outcome on the basis of actual and expected result.
Use of JDBC connection with database in selenium Script?
Once we are connected with database through jdbc connection, we are able access all the data available in database and perform any action as per requirement.
Suppose we execute any test case through selenium webdriver that created a profile in Web application and stores data is database, so if we are connected with the database we can check whether the saved data is safely stored or created in database or not.
How to perform SqlServer Connection through JDBC in Selenium?
Steps to create connection with Sql server using JDBC connection are below:
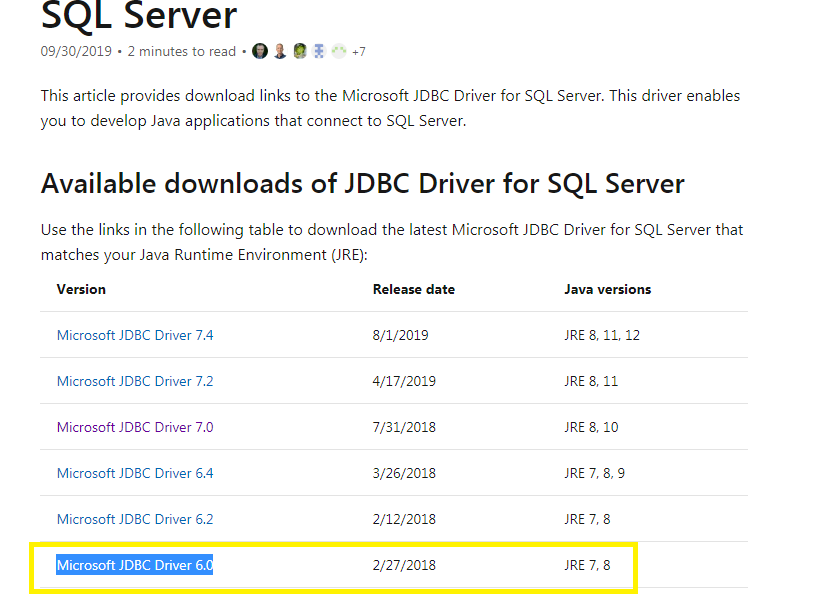
Step1) Download the SqlServer driver from this location location-> https://docs.microsoft.com/en-us/sql/connect/jdbc/download-microsoft-jdbc-driver-for-sql-server?view=sql-server-ver15 and click to any updated version (we are downloading Microsoft JDBC Driver 6.0 version)
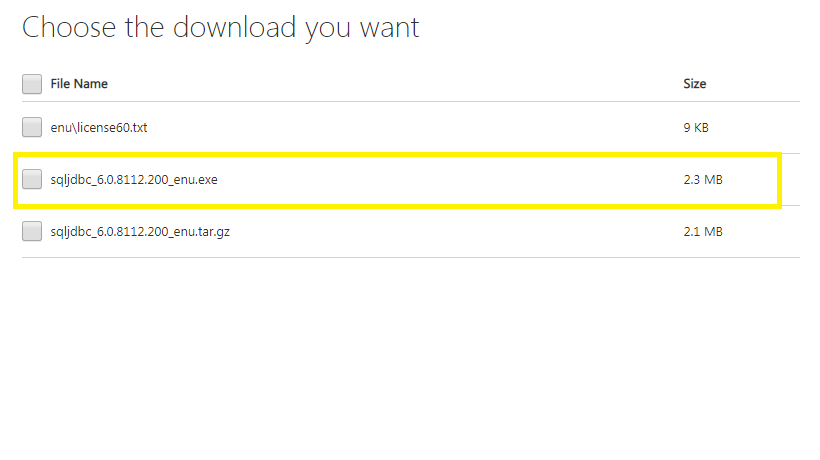
Step 2) Under Download window select sqlJdbc.exe file and click to download.
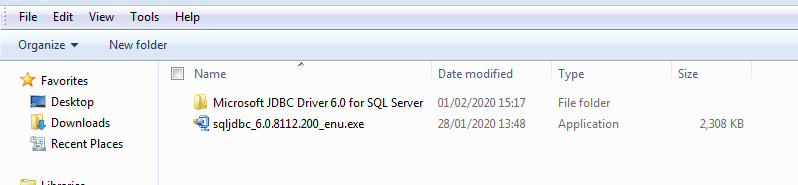
Step 3) After download the .exe file double click and unzip it as below in screenshot
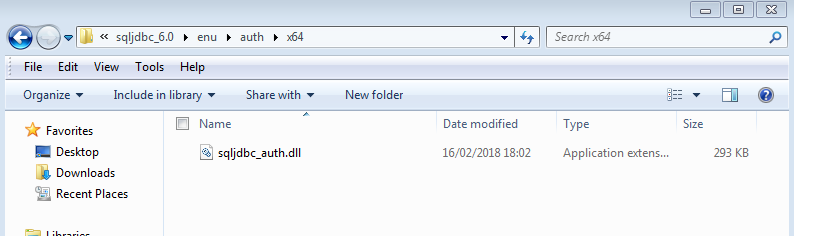
Step 4) Copy the JDBC driver folder to any of preferred location. Now open the folder and open the x64 in auth folder ex -> C:\Workspace\Microsoft JDBC Driver 6.0 for SQL Server\sqljdbc_6.0\enu\auth\x64 and copy the .dll file
Step 5) Copy the .dll file and paste under bin folder to Jre and jdk folder of you java location , generally its in (Important Step)
for JDK->C:\Program Files\Java\jdk1.8.0_102\bin
for JRE->C:\Program Files\Java\jre1.8.0_102\bin
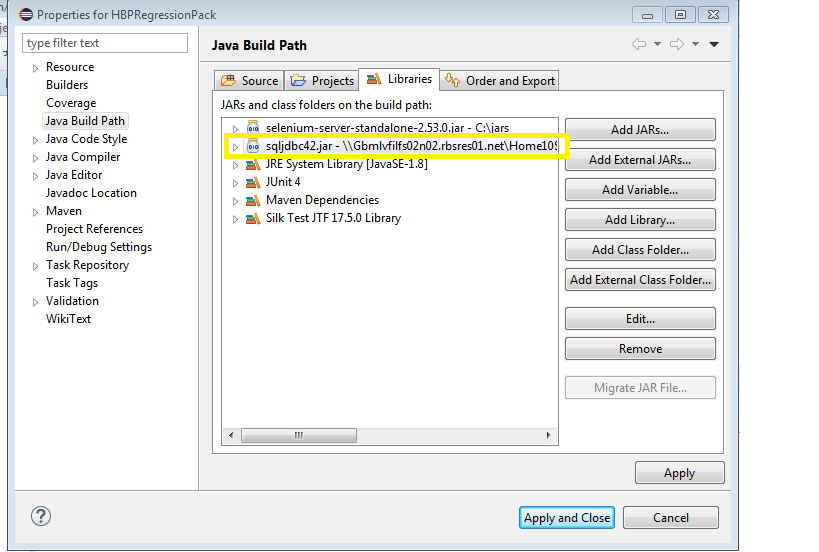
Step 6) Go to eclipse and right click to your project and open configure build path. Under libraries add external jar, which is under the JDBC driver folder . Path for the jar -> Microsoft JDBC Driver 6.0 for SQL Server->sqljdbc_6.0->enu->jre8 and add the jar.(refer screenshot)
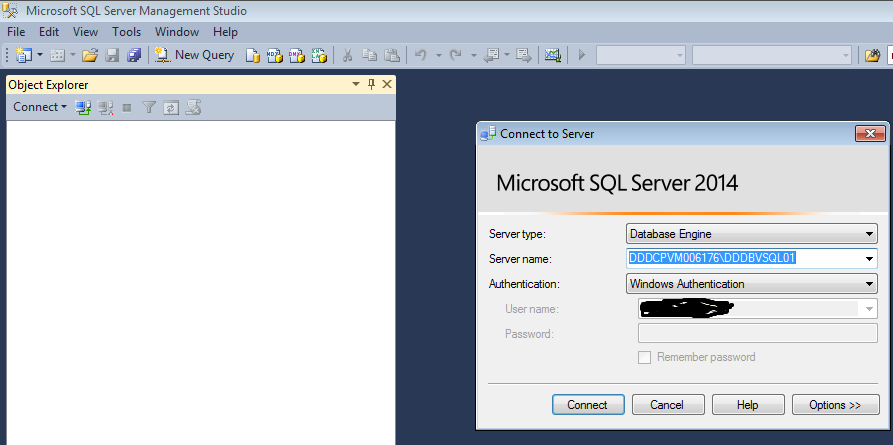
Step 7) Now open your SQLServer Database, On login page or connection page always select authentication as ->Window Authentication (on selecting this you don’t have to provide the credentials under your script ) if option not available we will pass the credentials on Test case.
Step 8) We are now done with all the setting stuffs, open the eclipse create a project, Inside the package under class copy the below code.Each Line in code have explanations in comment.
package com.sanity.UserTest;
import java.sql.DriverManager;
import java.sql.PreparedStatement;
import java.sql.ResultSet;
public class DatabseConnection {
public ResultSet databaseConnection() {
java.sql.Connection conn =null;
ResultSet result = null;
try {
String url="jdbc:sqlserver://localHost:1433;"+ "databaseName=xxxxxxxxxxx; integratedSecurity=true;";
String username ="xxxxx\\XXXXXXXXXX";
String password="XXXXX";
//Initialize Sqldriver instance
Class.forName("com.microsoft.sqlserver.jdbc.SQLServerDriver");
// Creating the connection providing URL and username password
conn = DriverManager.getConnection(url, username, password);
//Checking for the connection( returns boolean false if connected)
System.out.println(conn.isClosed());
// For Print
System.out.println("Data values getting displayed below");
// Sql Query to dispaly all the values under xxxxxxxx table
String query = "SELECT * from XXXXXXXXX";
// Providing the query under prepareStatement parameter
PreparedStatement pst=conn.prepareStatement(query);
//Command to execute query and capturing all the result under Result set
result=pst.executeQuery();
while(result.next()) {
//Printing the 1 column 2 column and 6 column of the table
System.out.println(result.getString(1)+ " "+ result.getString(2) +" " +result.getString(6));
}
return result;
} catch (Exception e) {
e.printStackTrace();
}finally {
}
return result;
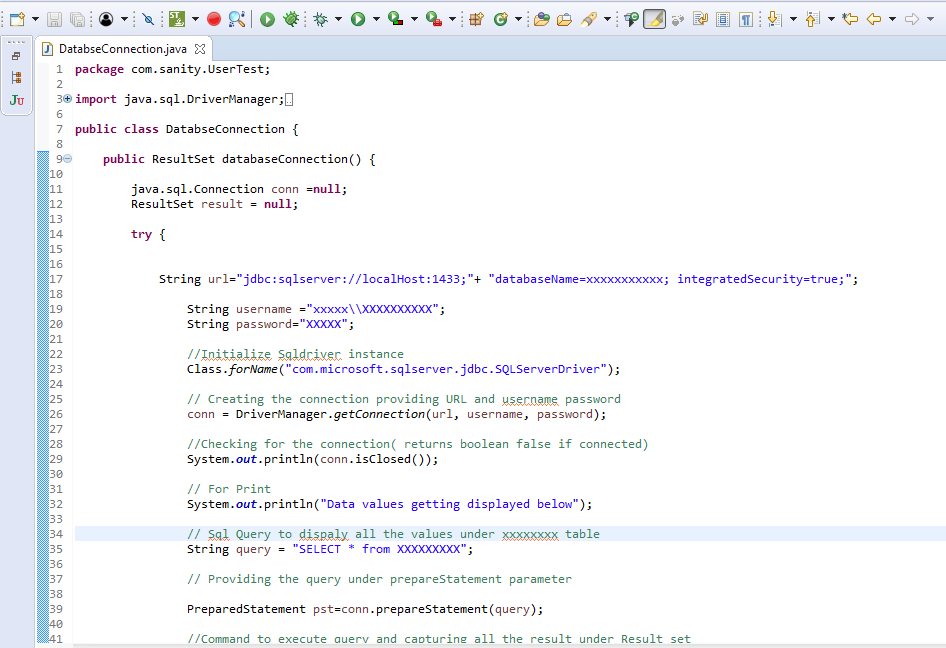
}}Step 9) Now provide your server name ,database name, Username, Password after the right click to the .java file and run the program, you will see that all the values of the column are getting displayed under the console. Code in the eclipse displays in the below ways.
Code Description:
Step 1) Define global variable for the connection and ResultSet
java.sql.Connection conn =null;
ResultSet result = null;
Step 2) Provide the connection strings containing the host name along with database name.
String url=”jdbc:sqlserver://localHost:1433;”+ “databaseName=xxxxxxxxxxx; integratedSecurity=true;”;
Step 3) Provide the database credentials
String username =”xxxxx\XXXXXXXXXX”;
String password=”XXXXX”;
Step 4) This commands is import step, it initializes the driver instance.
Class.forName(“com.microsoft.sqlserver.jdbc.SQLServerDriver”);
Step 5) Creating the connection using credentials and Url instance
conn = DriverManager.getConnection(url, username, password);
Step 6) This step will return boolean and get to know that the connection is up or not. Returns you false if connection is done.
System.out.println(conn.isClosed());
Step 7) General select query
String query = “SELECT * from XXXXXXXXX”;
Step 8) By this command your query if been fetched and executed to database internally and result is captured .
PreparedStatement pst=conn.prepareStatement(query); //Command to execute query and capturing all the result under Result set
result=pst.executeQuery();
Step 9) The statement will move to next every time and with display the data of 1,2 and 6 columns.
while(result.next()) { //Printing the 1 column 2 column and 6 column of the table
System.out.println(result.getString(1)+ ” “+ result.getString(2) +” ” +result.getString(6));
}
Conclusion:
So will above tutorial we can conclude that, we can get the data from the database connection for sqlserver and use the data in a form of String to the selenium automation script, and execute script on different sets of data.
Object identification through xpath
Xpath: is basically extended as XML path, its basically a syntax or command by which we can allocate or find the elements of Web page in Html Dom Structure. The basic syntax for Xpath is: //Tag[@attribute=”Value”]
There are basically two types of Xpath.
1) Absolute Xpath
2) Relative Xpath
Lets discuss the above type of Xpath in depth:
1) Absolute Xpath: In Absolute Xpath, the position of the element in HTML Dom structure is created in linear approach. The element is location from top of /HTML and followed the path till the required element followed by “/” sign.
/html/body/div[1]/div[2]/div/div/div/div/div[2]/form/table/tbody/tr[2]/td[1]/input
2) Relative Xpath: In Relative Xpath, there is no need to write the xpath from the start of HTML tag or writing the long xpath from Parent to child sequentially.The xpath can be created from the middle of the HTML body using “//” and use the tag name followed by attribute name and value.
//TagName[@Attributename=”Value”]
Methods can be used in Xpath Expression:
There are few methods or functions that can be used in the Xpath to create a unique Xpath elements and so that if there any change in the HTML or DOM structure this will not effect in the identification of Xpath and also helps on reducing the efforts of creating long xpath, searching the uniqness of web element and consumes time.
Below are the few mostly used method for Xpath creation as below:
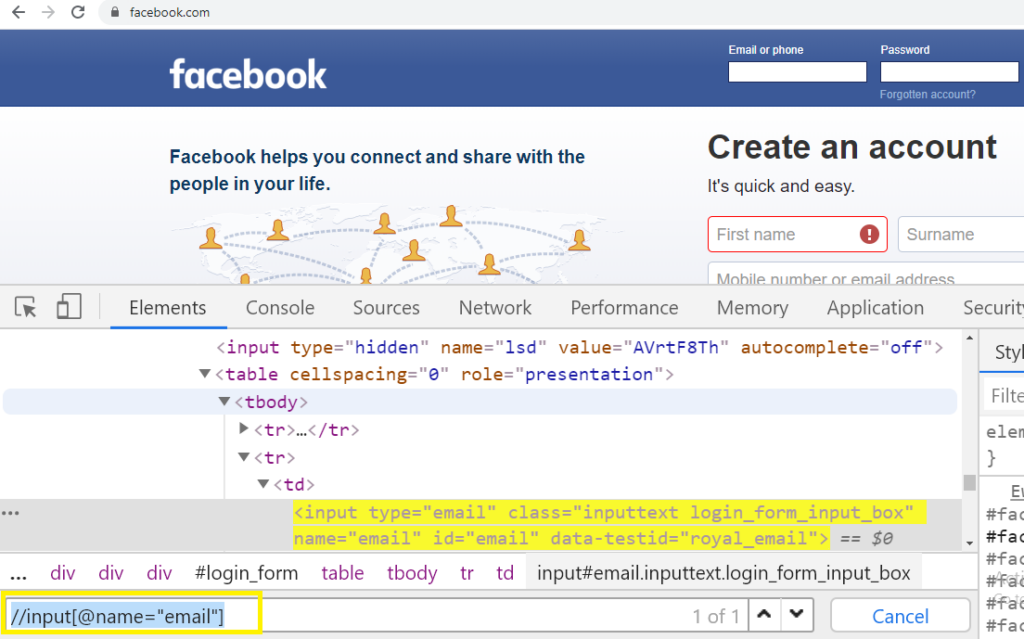
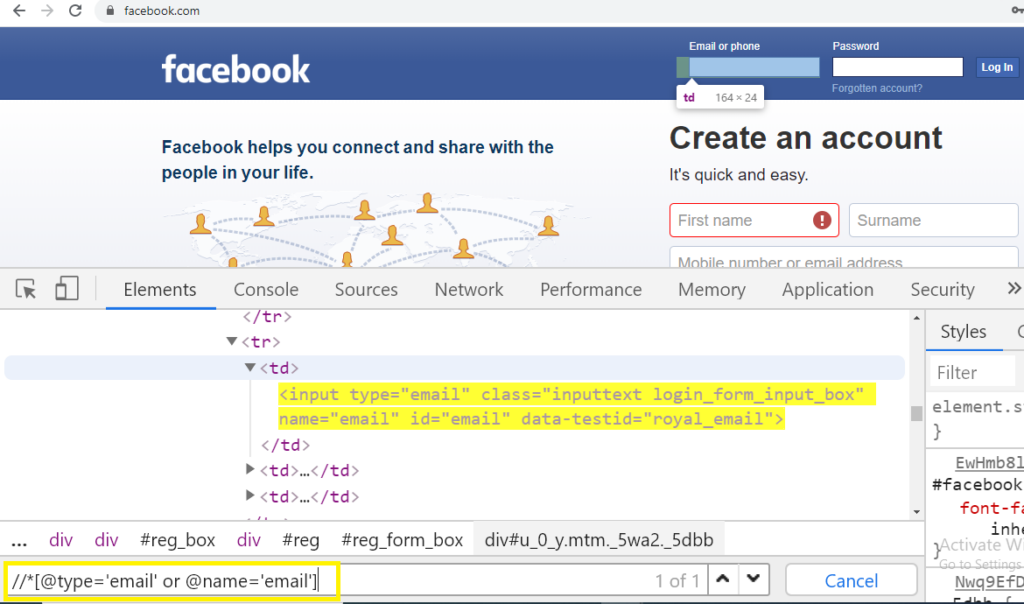
1) Contains(): This method is helpful for the Web page where the HTML dom structure changes frequently, so with the help of partial text in the value of the attribute name we can locate the element on the Web page.Below is the syntax for Contains() method.
//*[contains(@attributeName,’partialValue’)
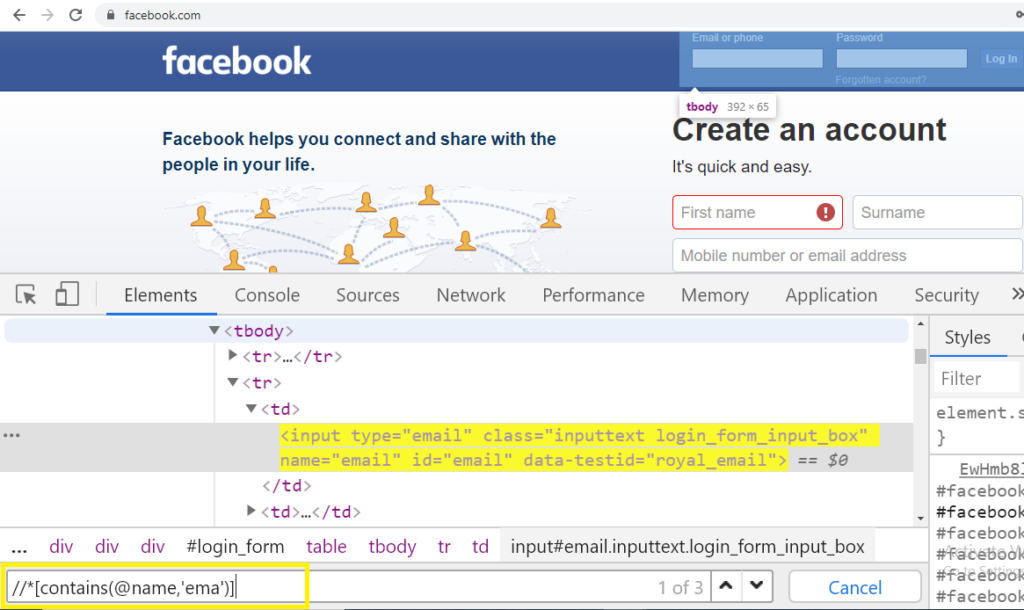
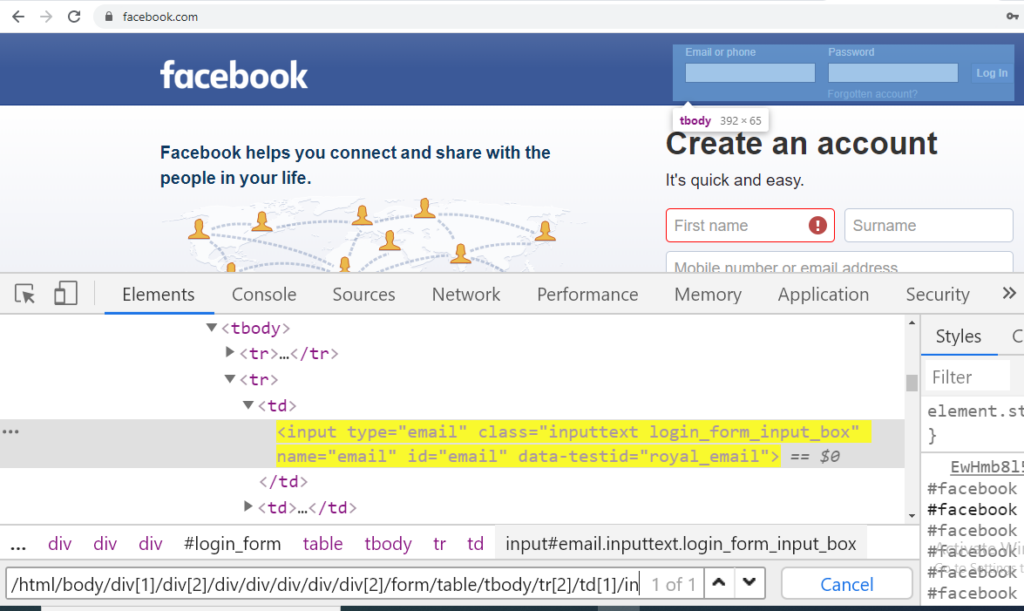
In the above screenshot example we can see that using partial text value of attribute the xpath is created.The attribute (name) with partial value (ema) is provided under the contains method and the element is highlighted in yellow in HTML Dom structure
2) Starts-with(): Using this function we need to provide the starting name of the value of the attribute of dynamic element and non dynamic web element. For example: We have a text in the web page which changes its value from (email) to (email123), (email1234),(email12345).
In this case we can provide the value as “email ” under the starts-with function. Below is the syntax:
//*[starts-with(@attributeName,’value”)]
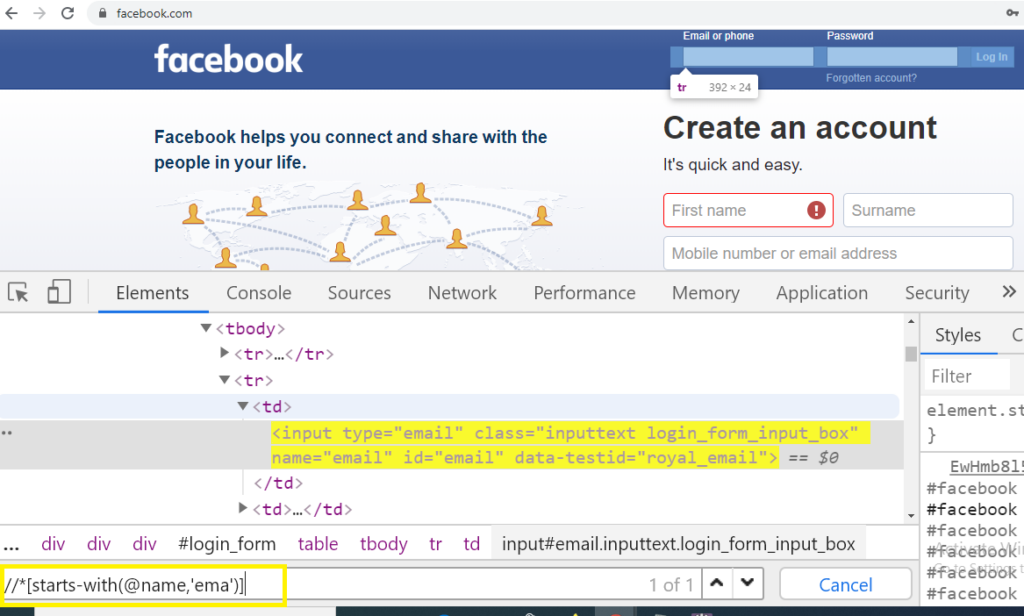
Note: There is difference in contains() and start-with() function is that in contains() function we can provide the value of attribute name from start, mid or from last string but in case of start-with() function we need to provide the value of attribute from the start of string till any length.
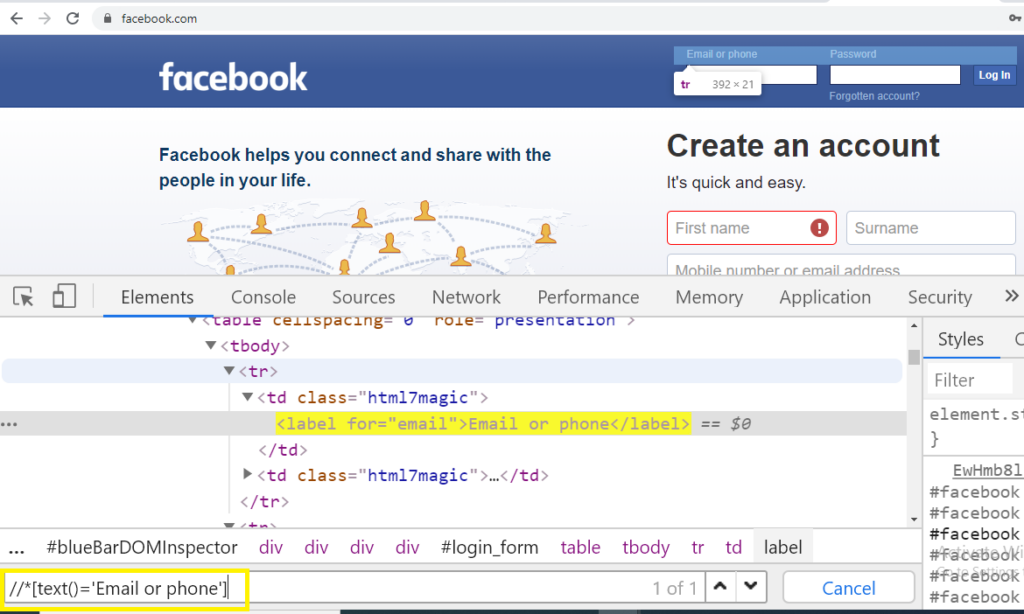
3) Text(): The function is used to locate the element using the exact text in the web page. We provide the text present in Web page as a value for the attribute name text and the element in the web page is uniquely identified.Below is the syntax for the text() method.
//*[text()=’Value’]
4) Or & AND: OR expression is used to provide the conditions to the attributes and its value to agree on certain set of condition. Its means there should be atleast one condition true, so that the element be located in web page.Below is the syntax for the OR expression:
//*[@attributeName=’value1′ or @attribute=’value2′]

AND function is used to provide the condition to which both the condition should be true to locate the element on Web page.Below is the syntax for AND function.
//*[@attributeName=’value1′ and @attribute=’value2′]
Object identification on webdriver defined methods
Selenium Webdriver interacts with webpage through object identification. Identification of any web element is performed by reading its source code and finding the unique value of the defined webelement.
Identification of object in selenium performed using findElement() and findElements().
There are few object identification techniques in webdriver .
- ) Locating Element By Id-> To locate element on the basis of id, perform below scenarion.
- Firstly open an application (for ex: www.facebook.com)
- Move to login page and click to F12 button on you keyboard . The source code will open
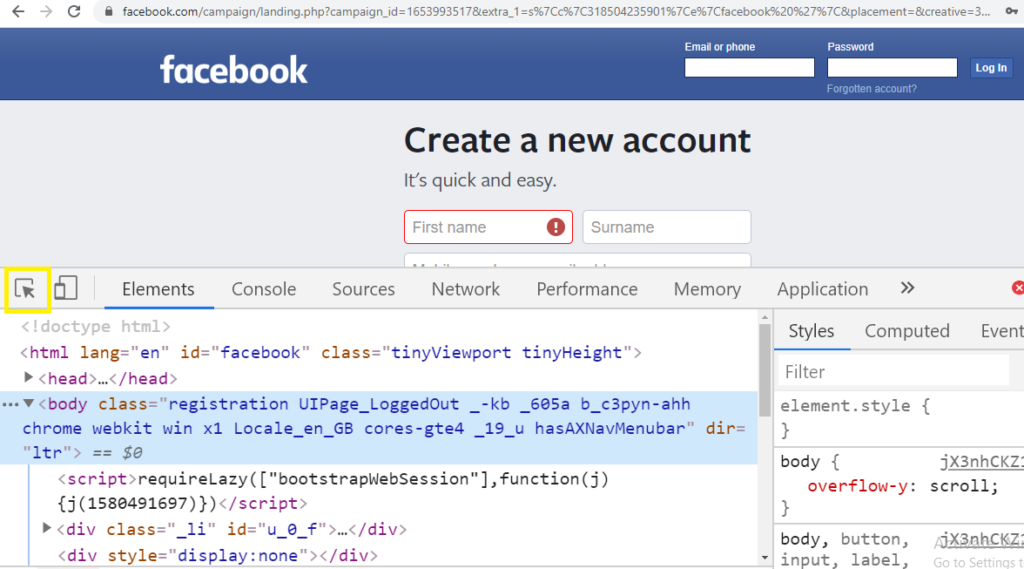
- Now click to arrow on the source code window on top (highlighted in yellow).
- Now after click take the mouse cursor to the text box on “Email or phone” and click the source code for the text box will be displayed down. Now view the tag for id and copy its value “Email”.
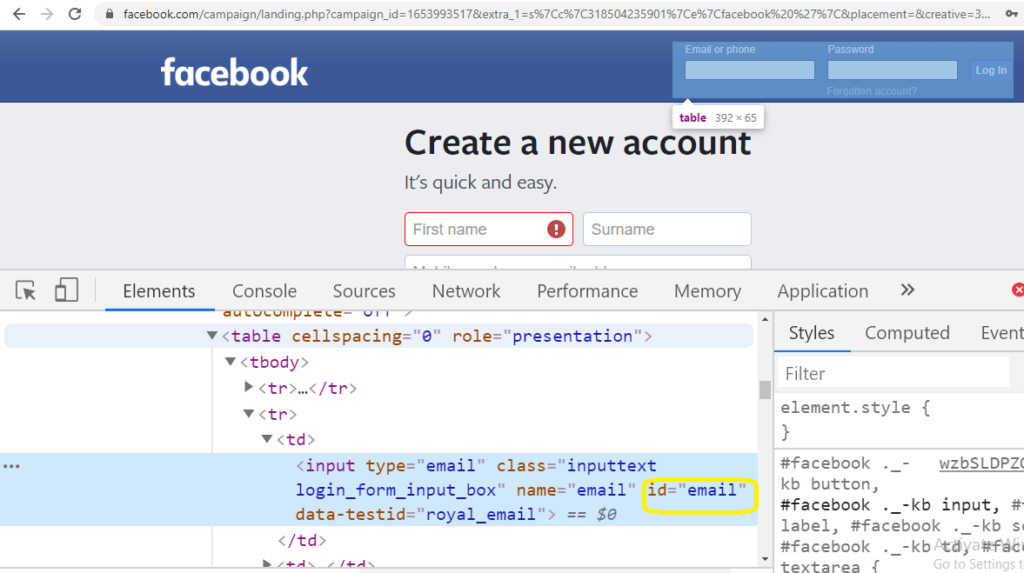
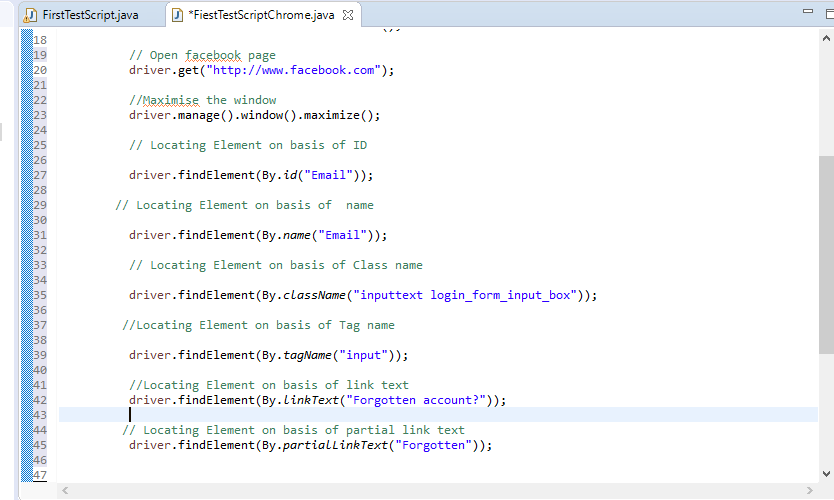
- In the automation test case write below code to locate element on basis of id:
driver.findElement(By.id(“Email”));

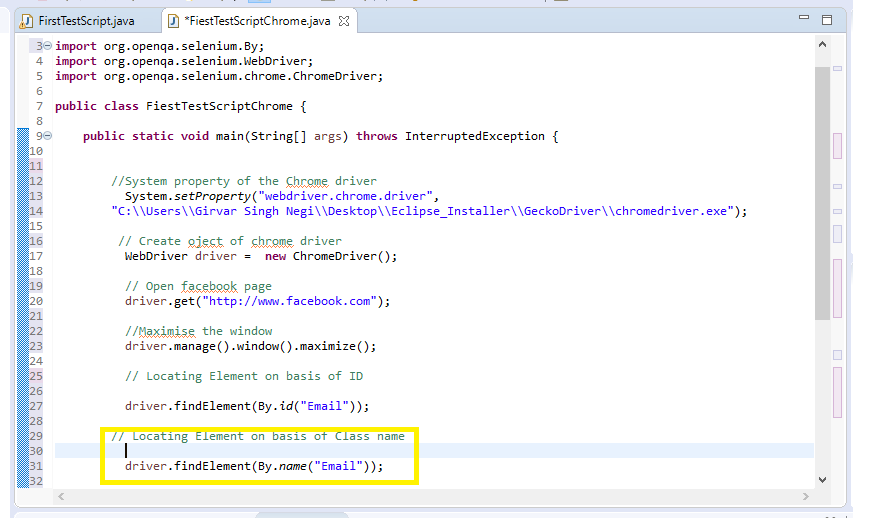
2) Locating Element By Name: Similar way as we identified or located the element by id, we perform the same steps an able to locate the element on basis of Name for the unique identification.
In the automation test case object location by name is performed using below code:
driver.findElement(By.name(“Email”));
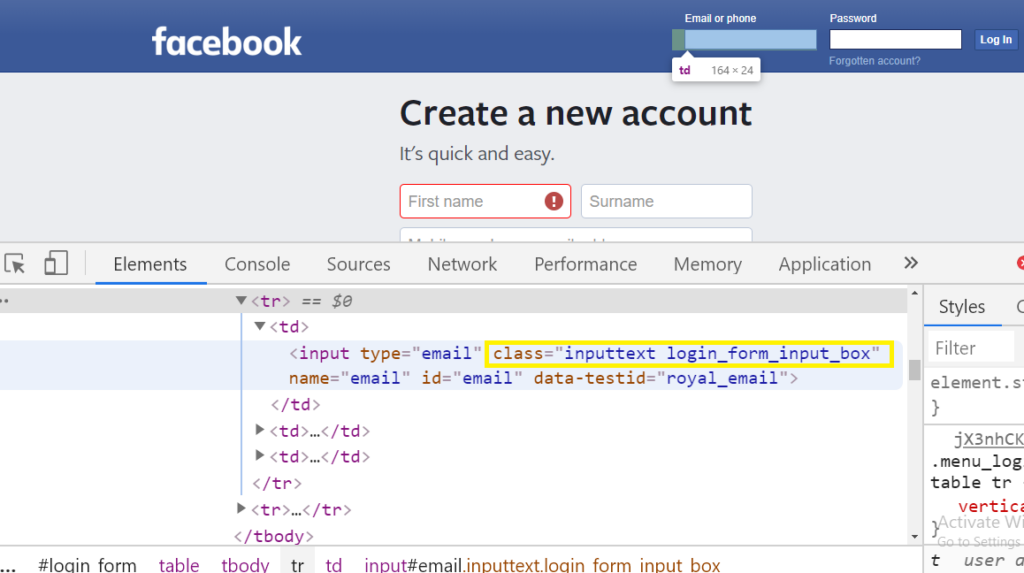
3) Locating Element By Class Name: Object identification using Class Name is performed by using blow line of code and using the same technique as above.
In the automation test case object location by Class Name is performed using below code:
driver.findElement(By.className(“inputtext login_form_input_box”));
4) Locating Element By Tag Name: Object identification using Tag Name is performed by using blow line of code and using the same technique as displayed in case of ID.
In the automation test case object location by Tag Name is performed using below code:
driver.findElement(By.tagName(“input”));
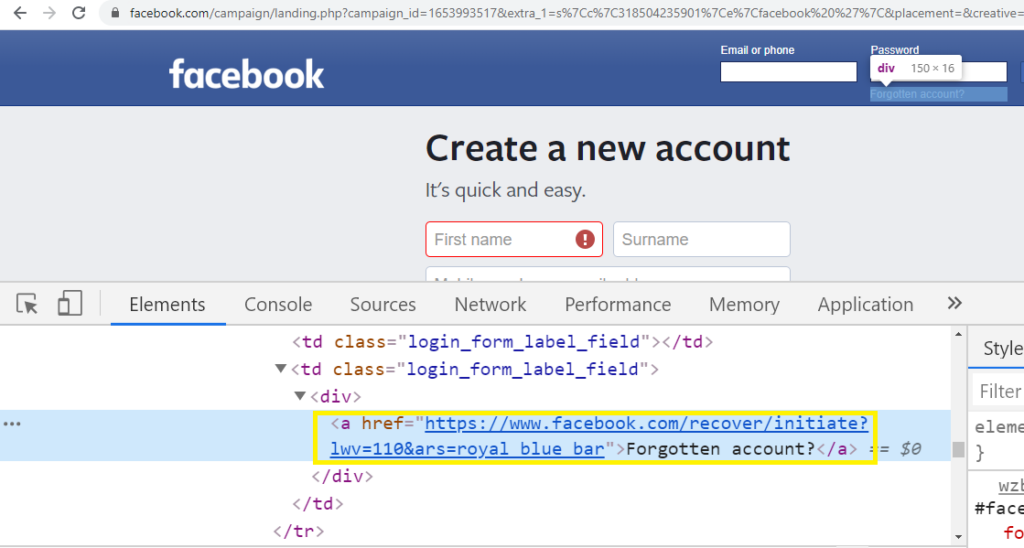
5) Locating Element By Link Text: Object identification for the link text is identified for the link visible in Web page generally it is present in <a href tag and ends with </a>.
In the automation test case object location by Link Text is performed using below code as per the below example :
driver.findElement(By.linkText(“Forgotten account?”));
5) Locating Element by Partial Link Text: If we want of locate any element in a web page by providing the partial link value. So this can be done by Partial Link Text command as below.
// Locating Element on basis of partial link text
driver.findElement(By.partialLinkText(“Forgotten”));
Running Test Case in Chrome Browser
Previous Topic,Running Test Case in Chrome Browser is simple as running in the other browser, difference is we need to provide the chrome driver on the path.
Running Test Case in Chrome Browser?
To Run the Test on chrome Browser follow the below steps one by one.
Step 1) Click to Click Here link to open the latest chrome driver installation version and click on chrome driver as per the chrome version on your system
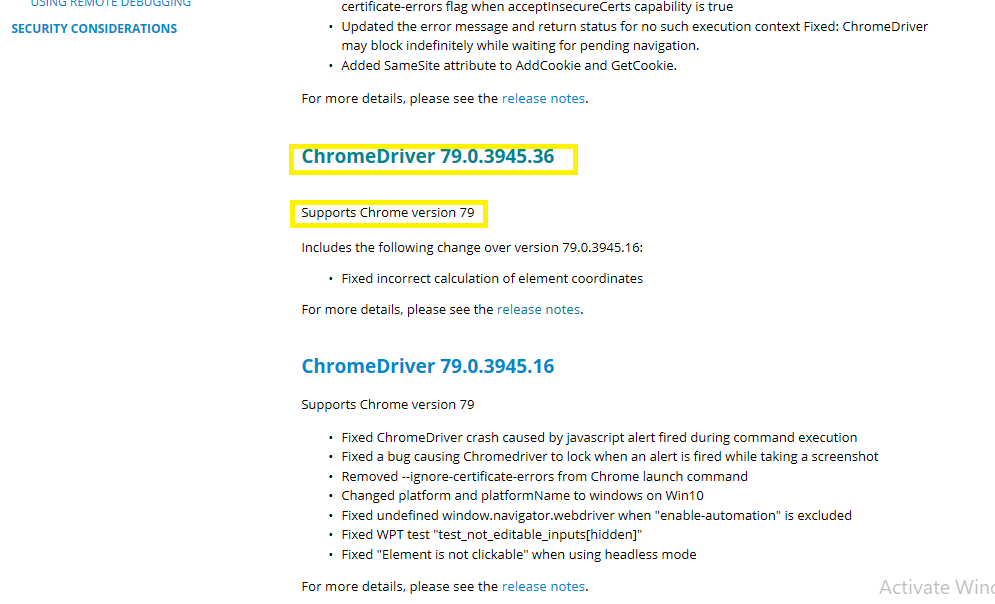
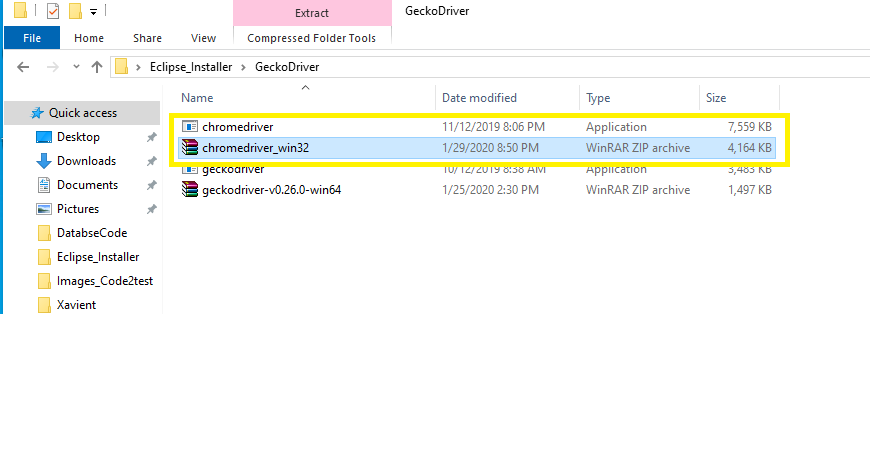
Step 2) Click on the chrome driver link as per configuration of OS on you system. Lets say i have window OS so in that click click to chromedriver_win32.zip.
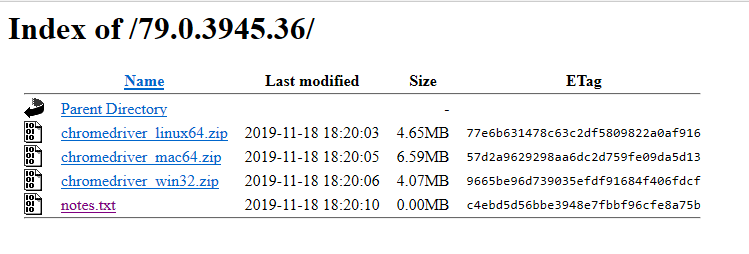
Step3) Now download the Zip to any of you preferred location and unzip it.
Step 4) Open the eclipse and create a class and copy the below code.

Cope the below code:
package SeleniumArchitecture;
import org.openqa.selenium.WebDriver;
import org.openqa.selenium.chrome.ChromeDriver;
public class FiestTestScriptChrome {
public static void main(String[] args) throws InterruptedException {


    //System property of the Chrome driver( provide the local path of chrome driver here)
      System.setProperty("webdriver.chrome.driver",
    "C:\\Users\\xxxx\\Desktop\\Eclipse_Installer\\GeckoDriver\\chromedriver.exe");

     // Create oject of chrome driver
      WebDriver driver =  new ChromeDriver();

      // Open facebook page
      driver.get("http://www.facebook.com");

      //Maximise the window
      driver.manage().window().maximize();


      //Wait for 5 sec
     Thread.sleep(5000);
     //Quit driver instance
     driver.quit();


}}
Step5) Now Run the below code, Right click to java file ->Run as->Java application
How To Download and Install selenium webdriver
Previous Topic, In this tutorial we will learn How To Download and Install selenium webdriver in java.
How To Download and Install selenium webdriver?
- Now after the setup of eclipse and workspace in local system, we will now download the selenium webdriver java click from the link Click Here
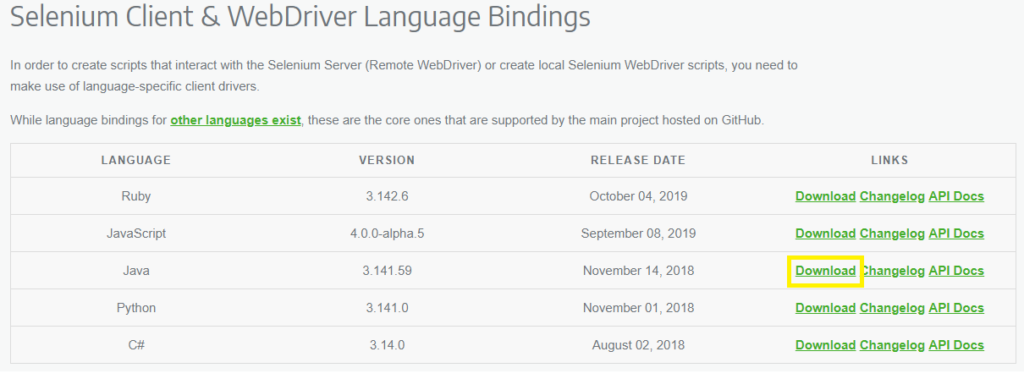
- Save the zip to any preferred location
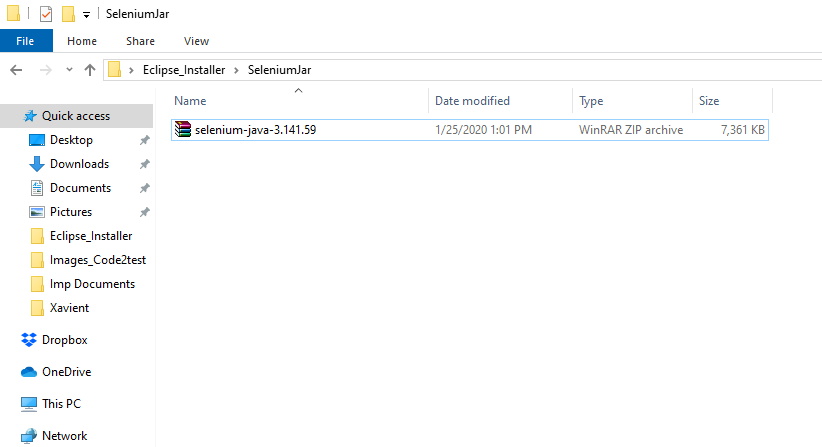
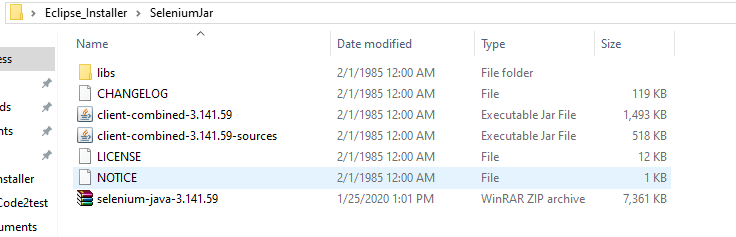
- Once the download of Zip file is completed , Now extract the downloaded zip file to the same location.
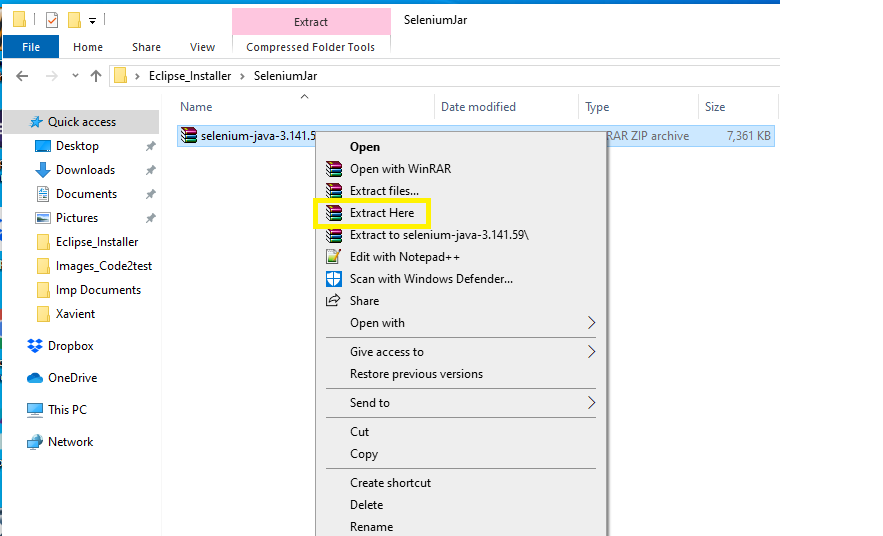
- After click to Extract Here, there will be few files will appear and these configuration files with be needed for the selenium setup
First Test case Firefox (GeckoDriver with selenium)
How to write First Test case Firefox (GeckoDriver with selenium)?
After completing the installation process in previous topic, its time to execute First Test case Firefox (GeckoDriver with selenium) script to understand how GeckoDriver with Selenium works.
Whats is Gecko Driver?
Gecko Driver:When we talk about Gecko it is coined to Gecko web browser which is developed by Mozilla foundation. Gecko driver provides a bridge between selenium and Firefox browser.Gecko acts as proxy between W3C webdriver compatible client and Gecko based web browser.
Mechanism if GeckoDriver with browser
Higher version of Selenium ex (selenium3) uses Marionette for launch Firefox instead of default(Where .exe is not been provided).
Marionette works as default for selenium 3. Selenium uses W3C protocol for send request to gecko driver.
Download Gecko Driver with below steps:
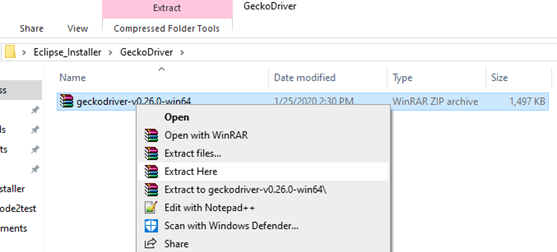
- To download Gecko driver click to Click Here , Click to the gecko driver link for the release compatible to you system config for ex(window, linux, IOS).
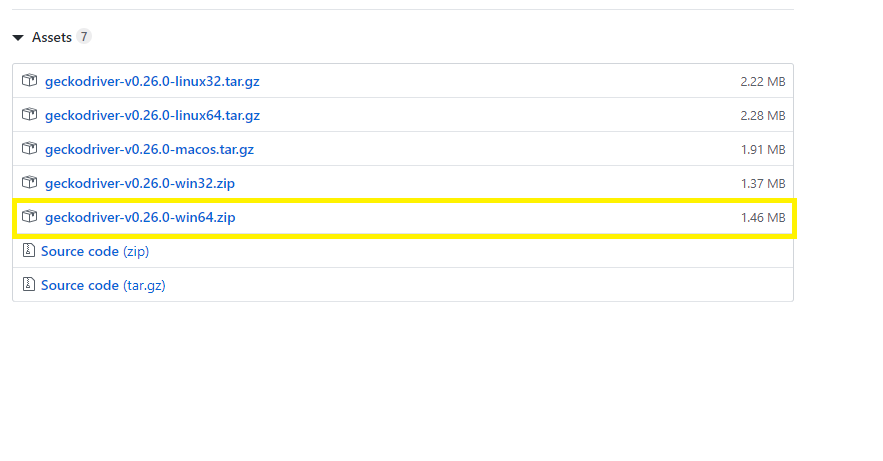
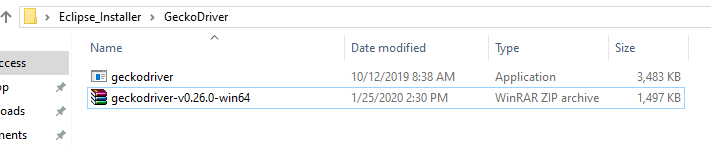
- Once the geckodriver zip file is downloaded, unzip the file on you specific folder
Now Create a New Java Project with below steps:
- Open the Eclipse and select File->New->Project->Java Project
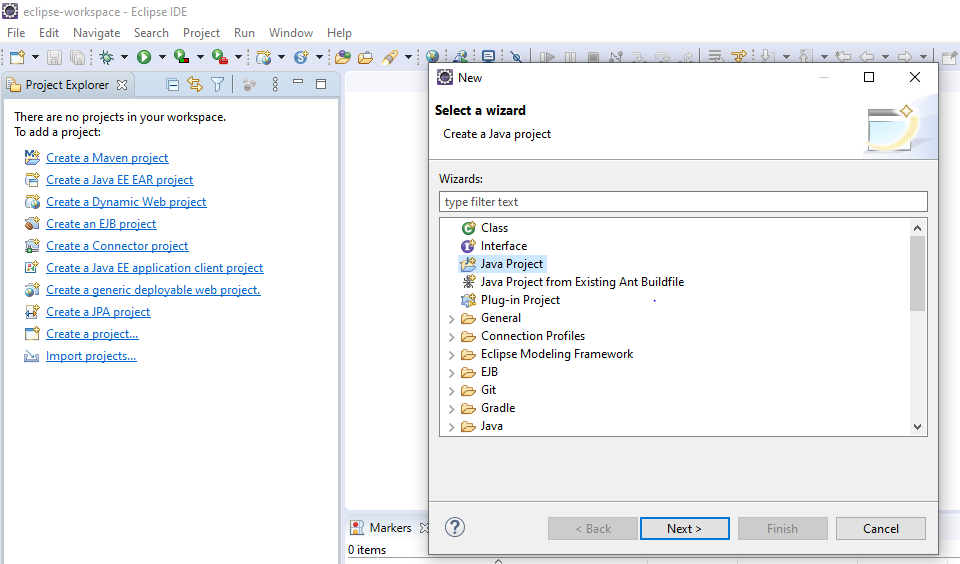
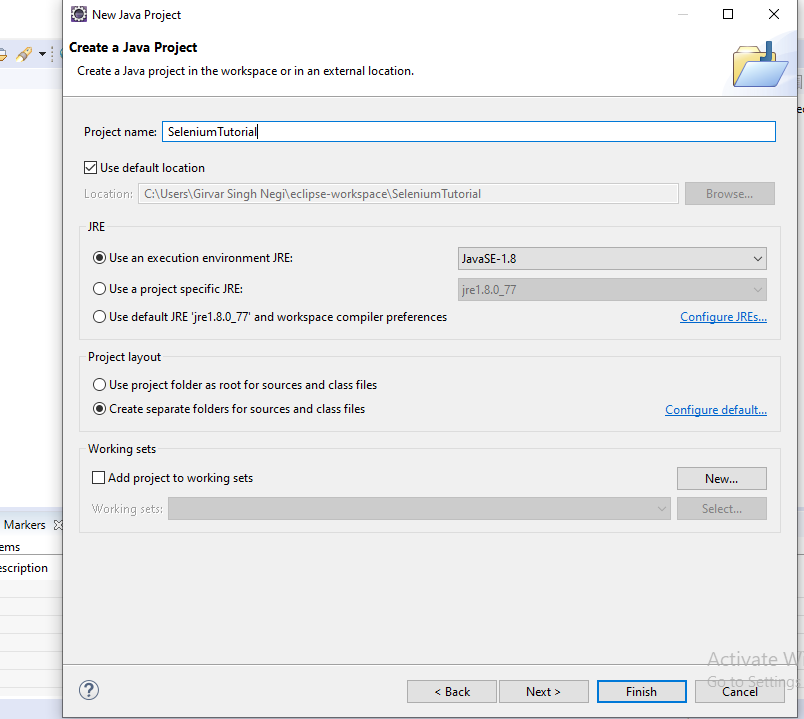
- Enter your project name SeleniumTutorial(mention any name) and then click to finish button at the bottom

- Now create a new package Step->File->New->Package, A window will open enter package name (Selenium Architecture)(you can mention any name) and click to finish button.
- After creating package eclipse project will be displayed on left pane.
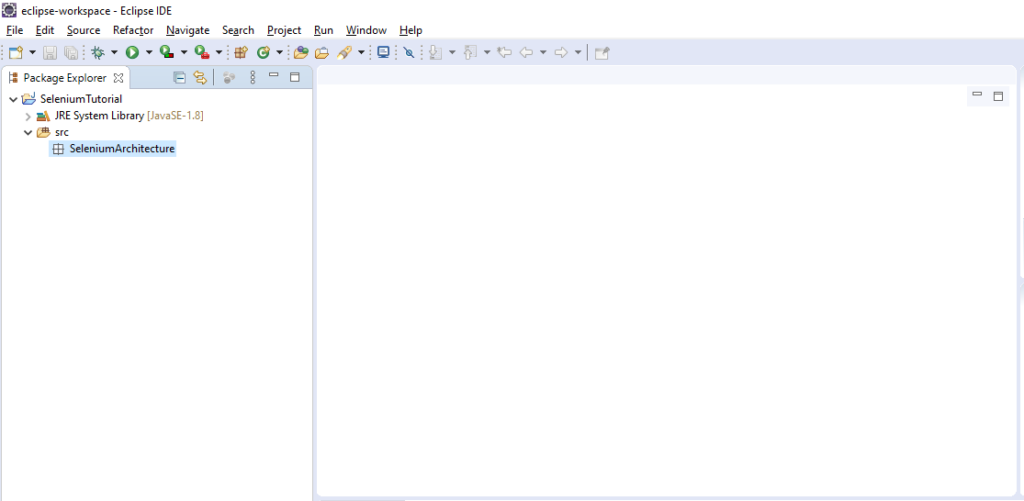
Create a Class in package for this Right Click to you package(SeleniumArchitecture) ->New->Class button.
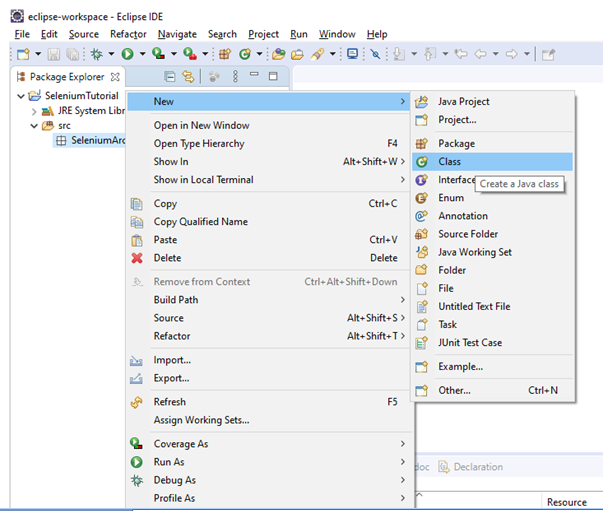
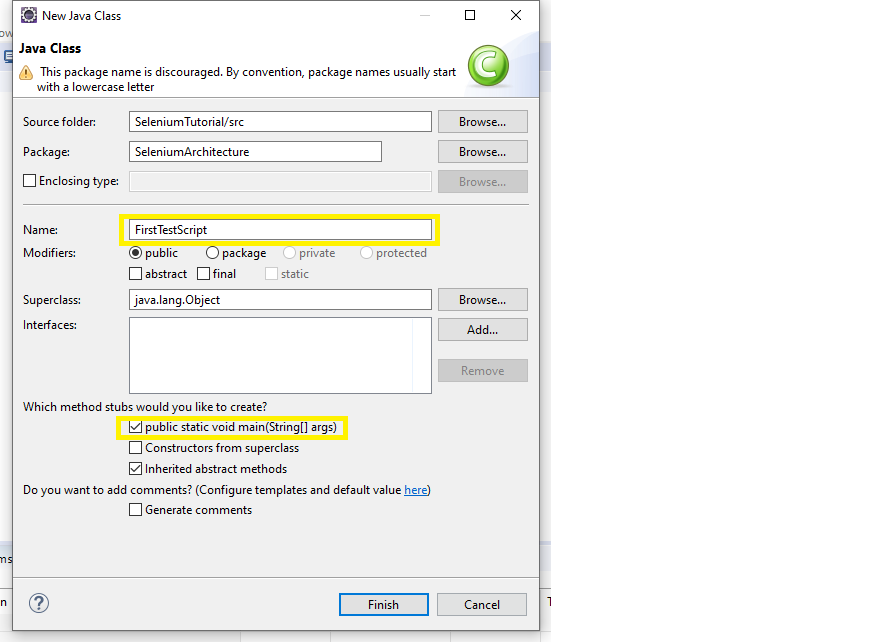
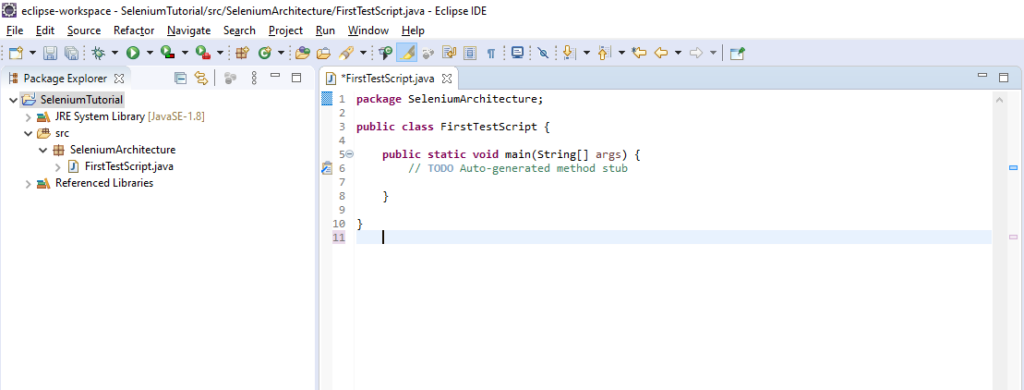
- Once you click to class , Class window will appear enter any name for class as(FirstTestScript) and check the check box for public static void main (as shown in picture).
Add Selenium Webdriver Jar (follow below steps)
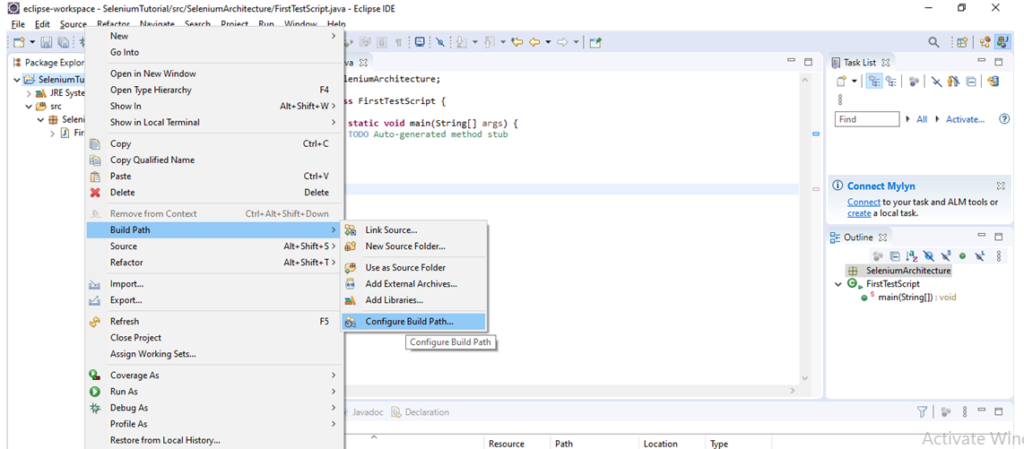
- Right click on the project Selenium Tutorial ->Build path->Configure build path.
- Under Java Build path window->Click on libraries(Menu on top)->click on Add external jars (on right side) a window will open , go to the folder where selenium jar is kept and all the files from lib and outside the lib folder. Now click to apply and close
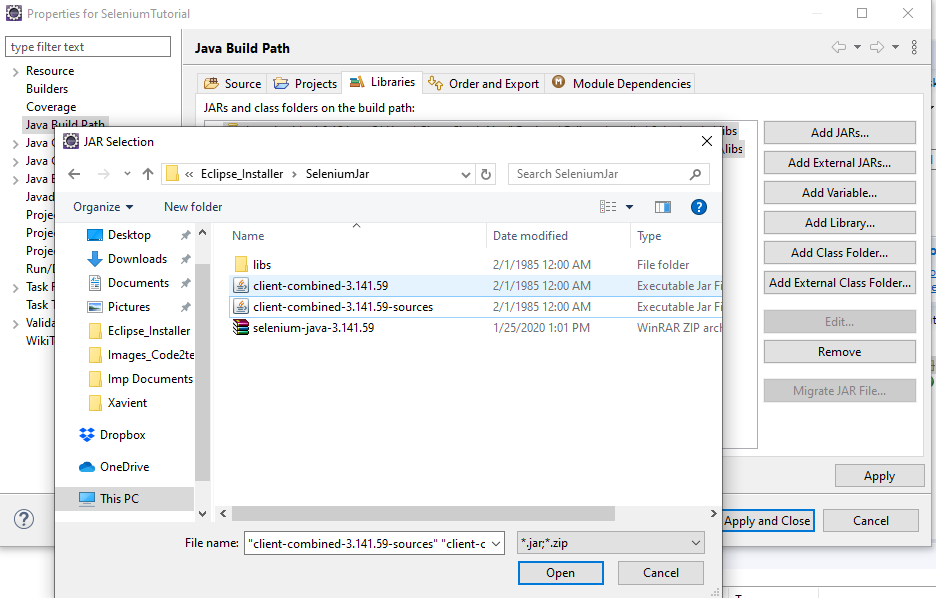
- Jars will be saved on your project.
Setup gecko driver to environmental variable setting with below steps:
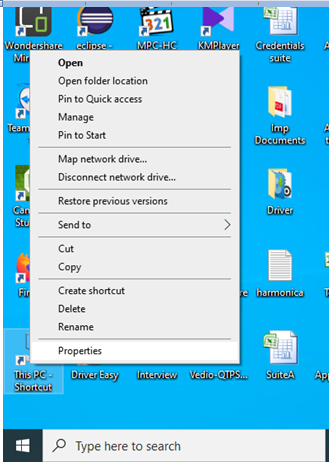
- Go to My computer from your local, right click->select properties menu
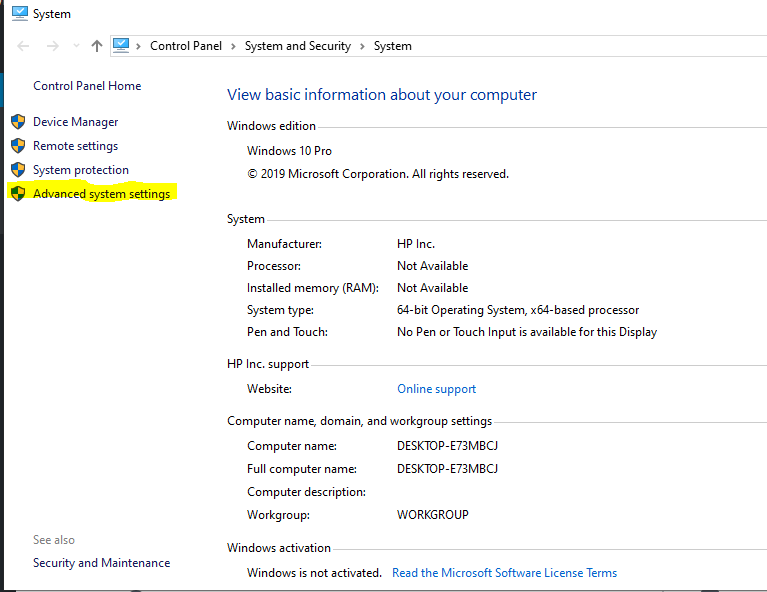
- Click to Advanced system settings.
- Click to Environment variable.
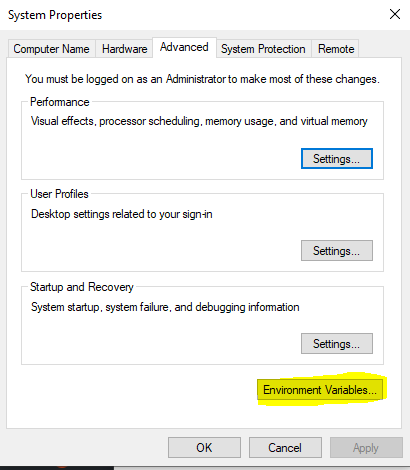
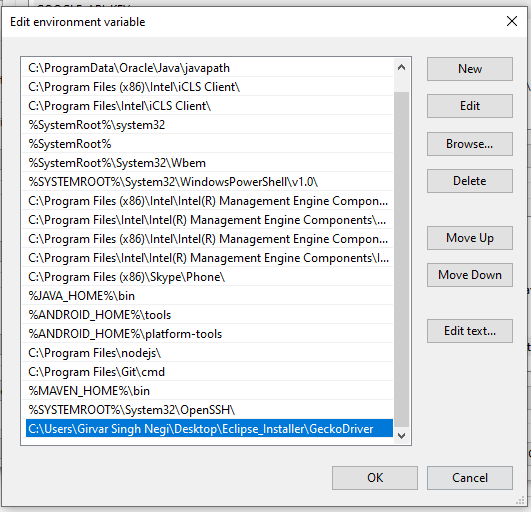
- Under Environment variable window-> System setting-> select Path and click to edit button at bottom and add the location where the Gecko driver is placed after semi colon (we are using window 10 so add the location of gecko driver) and click to OK button as per screenshot.
Now move to scrip and write below code:
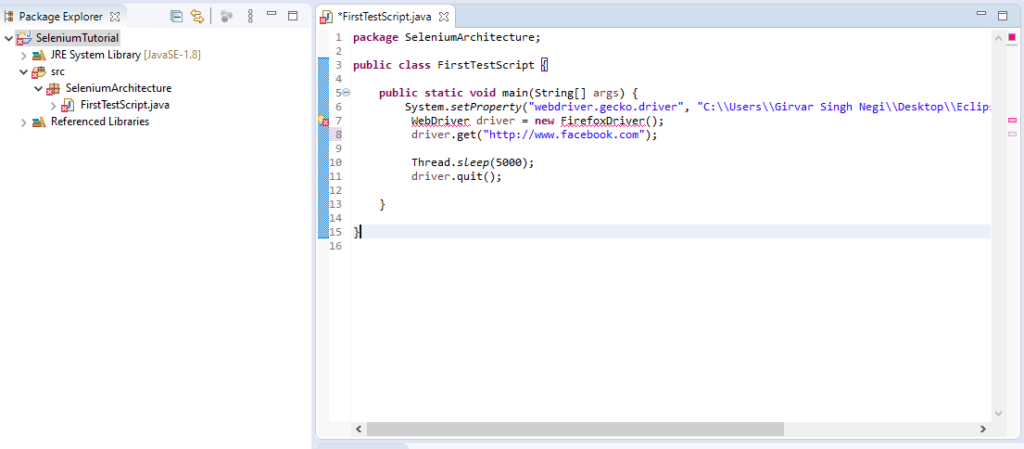
- Code2test be sharing you code for copy to your eclipse below.
package SeleniumArchitecture;
public class FirstTestScript {
public static void main(String[] args) {
    System.setProperty("webdriver.gecko.driver", "C:\\Users\\Tutorial\\Desktop\\Eclipse_Installer\\GeckoDriver\\geckodriver.exe");
     WebDriver driver = new FirefoxDriver();
     driver.get("http://www.facebook.com");

     Thread.sleep(5000);
     driver.quit();
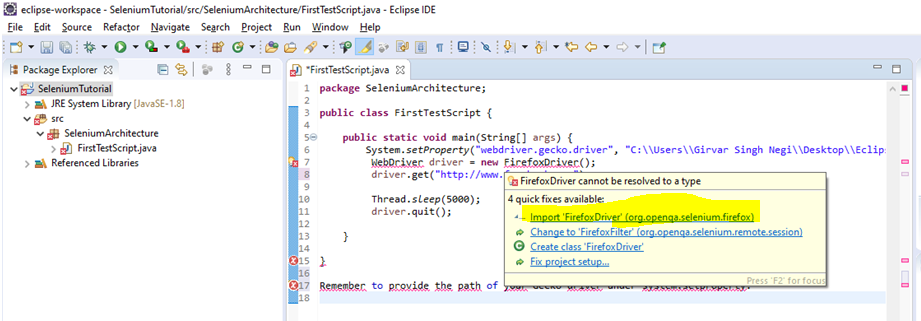
}}- To remove error from line on FirefoxDriver(); just mouse over to it and click to import FirefoxDriver link . Do same with Webdriver and on Thread.sleep(add exception to it)
Now right click to you class file and click to Run as ->Java Project, Firefox browser will open and launch the facebook page.
Download Eclipse and configure
After the installation of Java and environment setup. Next step is how to download eclipse in your local system.
Steps to Download Eclipse are as Below:
- Hit the Url->http://www.eclipse.org/downloads and click to download package link.
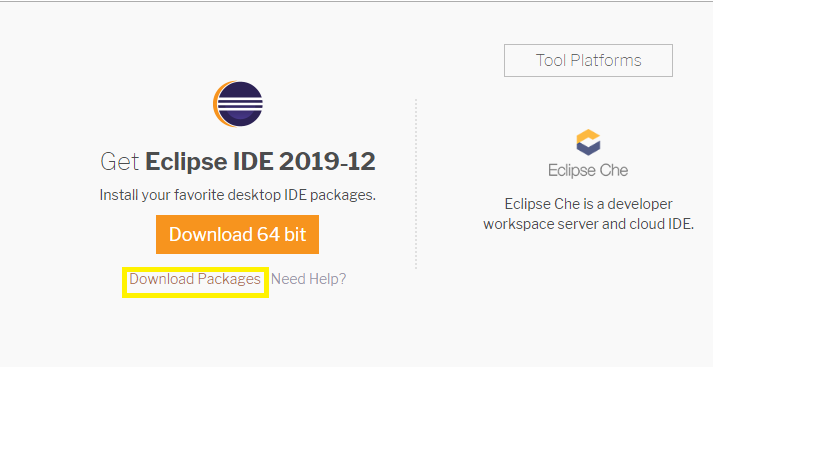
- It will redirect to “Download Package” window. Take the page webpage down and click to ” Eclipse IDE for Java Developers”.
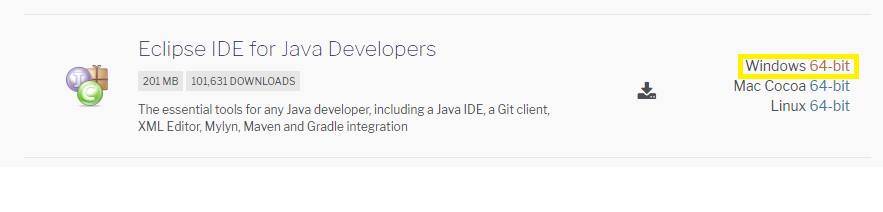
- Click on Window 64-bit (Please select the IDE as per your system configuration)
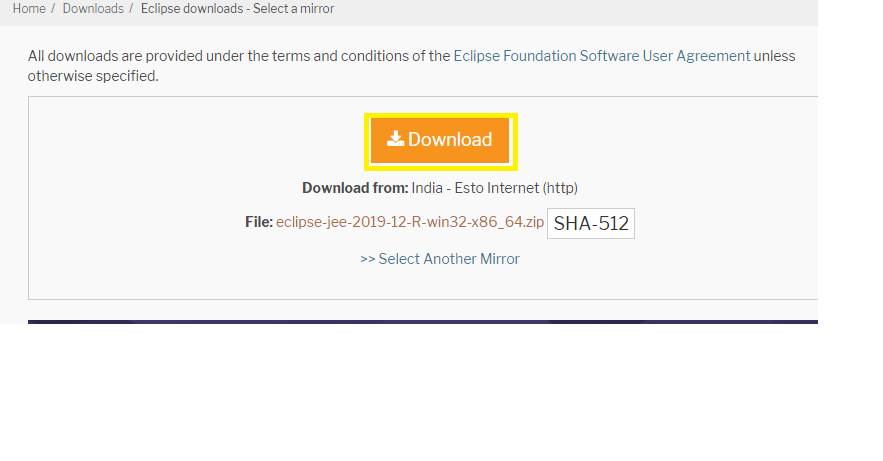
- Now click to Download the zip file to any of your preferred location on you local system and unzip the file.
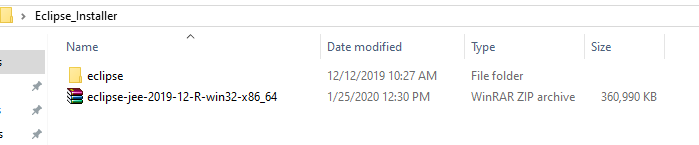
Now open the eclipse .exe file under eclipse folder
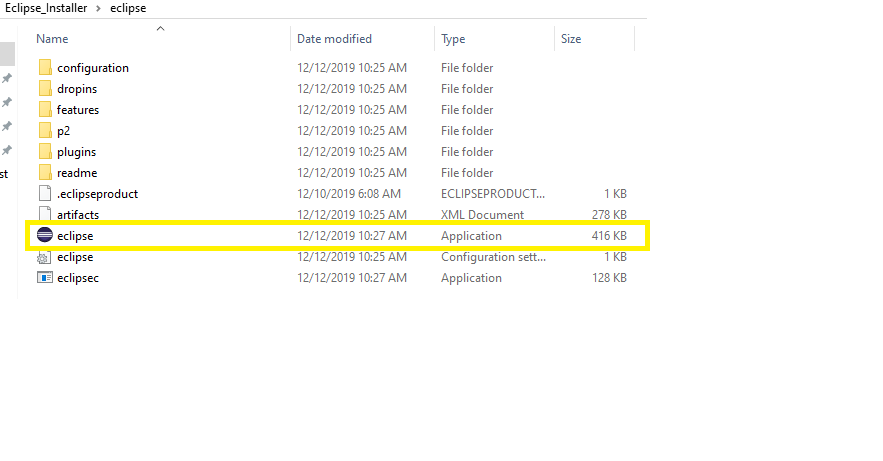
Now create a workspace at any of your preferred location and provide the path to eclipse
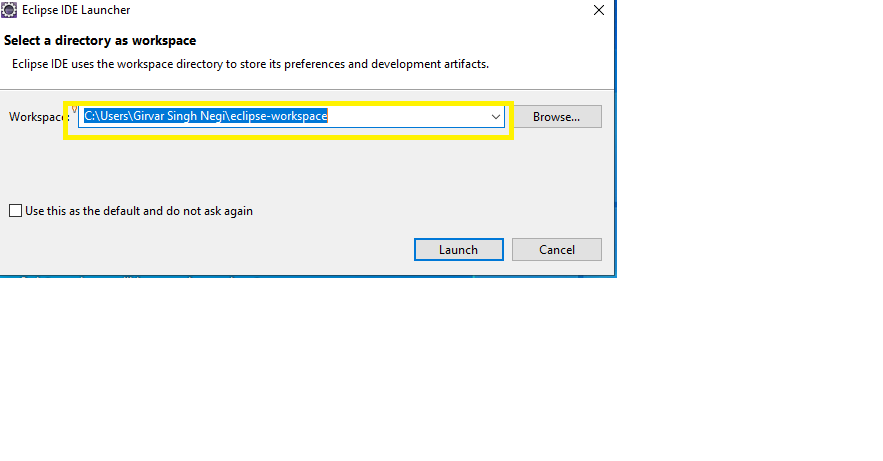
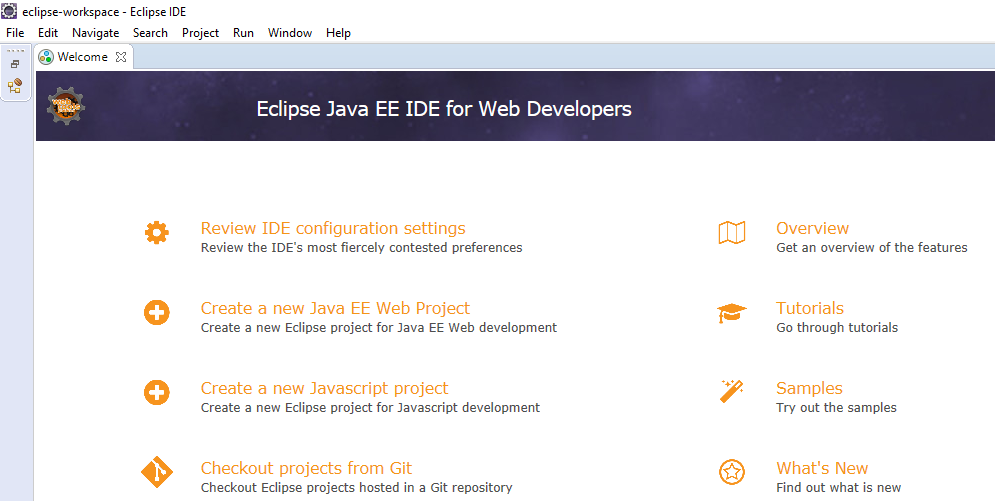
Finally the Eclipse is setup to your system with defined workspace and will display the welcome page for the first time.
So Learners be we me, we will next learn how to setup selenium webdriver in our local system and run our first selenium test case.