Home » Articles posted by code2test.com (Page 3)
Author Archives: code2test.com
Python Arrays
In this tutorial, we will learn Arrays in Python Programming:
In Python, arrays can be implemented using several different data structures, depending on the specific requirements of your program. The built-in list type is the most commonly used and flexible data structure for creating arrays in Python. Lists are ordered, mutable (can be modified), and can contain elements of different data types. Here’s an example of creating and manipulating a list in Python:
# Creating a list
my_list = [1, 2, 3, 4, 5]
print(my_list)  # Output: [1, 2, 3, 4, 5]

# Accessing elements
print(my_list[0])  # Output: 1
print(my_list[2])  # Output: 3

# Modifying elements
my_list[3] = 10
print(my_list)  # Output: [1, 2, 3, 10, 5]

# Appending elements
my_list.append(6)
print(my_list)  # Output: [1, 2, 3, 10, 5, 6]

# Removing elements
my_list.remove(2)
print(my_list)  # Output: [1, 3, 10, 5, 6]
Another data structure commonly used for arrays in Python is the array module, which provides a more memory-efficient way of storing homogeneous data (elements of the same data type) compared to lists. Here’s an example:
import array

# Creating an array of integers
my_array = array.array('i', [1, 2, 3, 4, 5])
print(my_array)  # Output: array('i', [1, 2, 3, 4, 5])

# Accessing elements
print(my_array[0])  # Output: 1
print(my_array[2])  # Output: 3

# Modifying elements
my_array[3] = 10
print(my_array)  # Output: array('i', [1, 2, 3, 10, 5])
In addition to lists and arrays, there are other specialized data structures available in Python for handling arrays, such as NumPy arrays and pandas DataFrames, which offer more advanced functionality for numerical computing and data analysis tasks.
Adding Elements to a Array
To add elements to an array in Python, you can use the append() method or the + operator. Here’s how you can do it:
- Using
append()method:
my_array = [1, 2, 3]  # Initial array
my_array.append(4)    # Add element 4 at the end
print(my_array)       # Output: [1, 2, 3, 4]
In this example, the append() method is called on the array my_array and passed the value 4 to add it to the end of the array.
2. Using the + operator:
my_array = [1, 2, 3] # Initial array
my_array = my_array + [4] # Add element 4 at the end
print(my_array)   # Output: [1, 2, 3, 4]
In this example, the + operator is used to concatenate the original array my_array with another list [4], resulting in a new array with the added element.
Both approaches achieve the same result of adding elements to an array. However, keep in mind that the append() method modifies the original array in-place, while using the + operator creates a new array. Choose the approach that best suits your needs based on whether you want to modify the original array or create a new one.
Accessing elements from the Array python
In Python, you can access elements from an array using their indices. The index represents the position of the element within the array, starting from 0 for the first element. Here’s how you can access elements from an array in Python:
# Define an array
my_array = [10, 20, 30, 40, 50]

# Access elements by index
print(my_array[0])  # Output: 10 (first element)
print(my_array[2])  # Output: 30 (third element)
print(my_array[-1])  # Output: 50 (last element)

# Update elements
my_array[1] = 25
print(my_array)  # Output: [10, 25, 30, 40, 50]

# Slicing arrays
print(my_array[1:4])  # Output: [25, 30, 40] (elements from index 1 to 3)
print(my_array[:3])  # Output: [10, 25, 30] (elements from start to index 2)
print(my_array[2:])  # Output: [30, 40, 50] (elements from index 2 to end)
You can access elements by specifying the index within square brackets []. Negative indices can be used to access elements from the end of the array. You can also update elements by assigning new values to the specified index. Slicing allows you to extract a subset of elements from the array by specifying a range of indices.
Python Tuples
In this tutorial we wil learn tuples in Python:
Tuples are ordered, immutable sequences in Python. They are similar to lists but have some key differences. Here are some important points about tuples
- Creation : Tuples are created by enclosing comma-separated values in parentheses. For example:
my_tuple = (1, 2, 3)
empty_tuple = ()
single_value_tuple = (4,)
2. Accessing Elements : Individual elements of a tuple can be accessed using indexing, similar to lists. The indexing starts at 0. For example:
my_tuple = (1, 2, 3)
print(my_tuple[0])  # Output: 1
3. Immutable Nature:Tuples are immutable, meaning their elements cannot be changed after creation. However, if a tuple contains mutable objects (like lists), those objects can be modified. But you cannot reassign or modify the elements of a tuple directly.
4. Length and Membership: The len() function can be used to get the length of a tuple, and the in keyword can be used to check if an element is present in a tuple.
my_tuple = (1, 2, 3)
print(len(my_tuple))  # Output: 3

if 2 in my_tuple:
    print("2 is present in the tuple.")
5. Tuple Concatenation and Repetition: Tuples can be concatenated using the + operator, and repetition can be achieved using the * operator.
tuple1 = (1, 2, 3)
tuple2 = (4, 5, 6)
concatenated_tuple = tuple1 + tuple2
print(concatenated_tuple)  # Output: (1, 2, 3, 4, 5, 6)

repeated_tuple = tuple1 * 3
print(repeated_tuple)  # Output: (1, 2, 3, 1, 2, 3, 1, 2, 3)
6. Tuple Unpacking: Tuples can be unpacked into individual variables. The number of variables must match the number of elements in the tuple.
my_tuple = (1, 2, 3)
a, b, c = my_tuple
print(a)  # Output: 1
print(b)  # Output: 2
print(c)  # Output: 3
7. Returning Multiple Values: Tuples are commonly used to return multiple values from a function.
def get_name_and_age():
    name = "Alice"
    age = 25
    return name, age

name, age = get_name_and_age()
print(name)  # Output: Alice
print(age)   # Output: 25
Tuples are useful when you want to store a collection of items that should not be modified. They provide a lightweight alternative to lists in scenarios where immutability is desired.
Python Sets
In this tutorial we will learn Sets in Python and its operation:
Python sets are unordered collections of unique elements. They are defined by enclosing a comma-separated sequence of values within curly braces ({}) or by using the built-in set() function.
Here’s an example of creating a set:
fruits = {"apple", "banana", "orange"}
In this example, the fruits set contains three elements: “apple”, “banana”, and “orange”. Notice that the order of the elements in a set is not guaranteed, and duplicates are automatically removed. If you print the set, the order of the elements may vary.
Sets have various operations and methods that can be performed on them. Some commonly used operations include:
1. Adding an element to a set:
fruits.add("mango")2. Removing an element from a set:
fruits.remove("apple")
3. Checking if an element is present in a set:
if "banana" in fruits:
    print("Banana is in the set!")
4. Performing set operations like union, intersection, and difference:
set1 = {1, 2, 3}
set2 = {2, 3, 4}

union_set = set1 | set2  # union
intersection_set = set1 & set2  # intersection
difference_set = set1 - set2  # difference

print(union_set)            # {1, 2, 3, 4}
print(intersection_set)     # {2, 3}
print(difference_set)       # {1}
Sets are mutable, meaning you can add or remove elements from them. However, since sets are unordered, indexing and slicing operations are not supported. To iterate over the elements of a set, you can use a loop or convert it to a list.
Sets are often used when you need to store a collection of unique elements or perform operations such as finding common elements, removing duplicates, or checking membership efficiently.
Python String
In this tutorial, we are going to learn Python String:
In Python, a string is a sequence of characters, enclosed within quotes. Strings can be created using single quotes ('...'), double quotes ("..."), or triple quotes ("""...""" or '''...'''). For example:
string1 = 'Hello, world!'
string2 = "This is a string."
string3 = '''This is a
              multi-line
              string.'''
In addition to creating strings, there are many built-in string methods in Python that allow you to manipulate and modify strings. For example, you can concatenate two strings using the + operator:
greeting = "Hello"
name = "John"
message = greeting + " " + name
print(message) # Output: Hello John
There are many more string methods and functions available in Python, which you can explore in the Python documentation.
Accessing characters in Python String
In Python, you can access individual characters in a string using indexing. Indexing starts from 0 for the first character and goes up to the length of the string minus one. To access a character at a specific index, you can use square brackets [] with the index inside.
For example, let’s say you have a string my_string = "Hello, World!":
my_string = "Hello, World!"
print(my_string[0])  # Output: H
print(my_string[4])  # Output: o
print(my_string[-1])  # Output: !
In the first example, my_string[0] returns the first character of the string, which is “H”. In the second example, my_string[4] returns the fifth character, which is “o”. In the third example, my_string[-1] returns the last character of the string, which is “!”. You can also use negative indexing to access characters from the end of the string, with -1 being the last character, -2 being the second to last character, and so on.
If you want to access a range of characters in a string, you can use slicing. Slicing uses the colon : operator to specify the start and end indices of the substring you want to extract. For example:
my_string = "Hello, World!"
print(my_string[0:5])  # Output: Hello
print(my_string[7:])  # Output: World!
In the first example, my_string[0:5] returns the substring from index 0 to index 4, which is “Hello”. In the second example, my_string[7:] returns the substring from index 7 to the end of the string, which is “World!”.
Reversing a Python String
To reverse a string in Python, you can use string slicing with a step of -1. Here is an example:
my_string = "hello world"
reversed_string = my_string[::-1]
print(reversed_string)

This will output:

dlrow olleh
In this example, [::-1] means “start at the end of the string, move to the beginning, and take each character with a step of -1 (i.e., backwards)”.
String Slicing
String slicing is a feature of many programming languages that allows you to extract a subset of characters from a string. It is a powerful tool for manipulating and analyzing strings, and can be used in a variety of ways.
In Python, for example, you can slice a string using the following syntax:
Syntex:
string[start:end:step]
where start is the index of the first character to include in the slice, end is the index of the first character to exclude from the slice, and step is the number of characters to skip between each character in the slice.
For example, the following code will extract the first three characters from a string:
string = "Hello, World!"
slice = string[0:3]
print(slice)

Output:

Hel
You can also use negative indices to count from the end of the string:
string = "Hello, World!"
slice = string[-6:-1]
print(slice)

Output:

World
You can omit the start or end index to slice from the beginning or end of the string, respectively:
string = "Hello, World!"
slice = string[:5]
print(slice)

slice = string[7:]
print(slice)

Output:
Hello
World!
Finally, you can use a step value to skip characters:
string = "Hello, World!"
slice = string[::2]
print(slice)

Output:
Hlo ol!
Note that the step value can also be negative, in which case the slice will be returned in reverse order:
string = "Hello, World!"
slice = string[::-1]
print(slice)

Output:
!dlroW ,olleH
Deleting/Updating from a String
To delete or update a string in Python, you can use string methods or slicing. Here are some examples:
- Deleting a substring from a string: You can use the
replace()method to delete a substring from a string by replacing it with an empty string. For example:
string = "Hello World"
new_string = string.replace("World", "")
print(new_string) # Output: "Hello "- Updating a substring in a string: You can use slicing to update a substring in a string. For example:
string = "Hello World"
new_string = string[:5] + "Universe"
print(new_string)  # Output: "Hello Universe"
In the above example, the first five characters of the string (“Hello “) are combined with the new substring (“Universe”) to create a new string.
Note that strings are immutable in Python, which means you cannot modify a string in-place. Instead, you must create a new string that contains the desired modifications.
Formatting of Strings
In Python, you can format strings using various methods. Here are some common ways to format strings:
- Using the
%operator: This is an older method available in Python and is similar to the C language’s printf-style formatting.
name = "Alice"
age = 25
print("My name is %s and I am %d years old." % (name, age))

Output:
My name is Alice and I am 25 years old.
2. Using the str.format() method: This method provides more flexibility and is recommended for newer versions of Python (Python 3 onwards).
name = "Alice"
age = 25
print("My name is {} and I am {} years old.".format(name, age))

Output:
My name is Alice and I am 25 years old.
You can also specify placeholders by index or name:
name = "Alice"
age = 25
print("My name is {0} and I am {1} years old. {0} {1}".format(name, age))

Output:
My name is Alice and I am 25 years old. Alice 25
3. Using f-strings (formatted string literals): This is a newer method introduced in Python 3.6, which provides a concise and readable way to format strings.
name = "Alice"
age = 25
print(f"My name is {name} and I am {age} years old.")

Output:
My name is Alice and I am 25 years old.
F-strings allow you to directly include variables and even evaluate expressions within curly braces.
a = 5
b = 3
print(f"The sum of {a} and {b} is {a + b}.")

Output:
The sum of 5 and 3 is 8.
These are just some of the most commonly used string formatting methods in Python. Each approach has its own advantages and can be used based on your preference and Python version.
Python String Built-In Function
Python provides a wide range of built-in functions that can be used to manipulate and operate on strings. Here are some commonly used string built-in functions:
- len(): Returns the length of a string. Example:
s = "Hello, World!"
length = len(s)
print(length)  # Output: 13
2. lower(): Converts all characters in a string to lowercase. Example:
s = "Hello, World!"
lower_case = s.lower()
print(lower_case)  # Output: hello, world!
3. upper(): Converts all characters in a string to uppercase. Example:
s = "Hello, World!"
upper_case = s.upper()
print(upper_case)  # Output: HELLO, WORLD!
4. strip(): Removes leading and trailing whitespace characters from a string. Example:
s = "   Hello, World!   "
stripped = s.strip()
print(stripped)  # Output: Hello, World!
5. split(): Splits a string into a list of substrings based on a delimiter. Example:
s = "Hello, World!"
split_list = s.split(", ")
print(split_list)  # Output: ['Hello', 'World!']
6. join(): Joins the elements of an iterable (e.g., list) into a single string using a specified delimiter. Example:
lst = ['Hello', 'World!']
joined_string = ", ".join(lst)
print(joined_string)  # Output: Hello, World!
7. replace(): Replaces all occurrences of a substring within a string with another substring. Example:
s = "Hello, World!"
replaced = s.replace("Hello", "Hi")
print(replaced)  # Output: Hi, World!
8. find(): Returns the index of the first occurrence of a substring within a string (-1 if not found). Example
s = "Hello, World!"
index = s.find("World")
print(index)  # Output: 7
These are just a few examples of Python’s string built-in functions. There are many more available that can help you manipulate and work with strings effectively.
Data Types in Python
In this tutorial, we are going to learn Data Types in Python.
Python supports several built-in data types, which include:
- Numbers: There are two types of numbers in Python – integers and floating-point numbers.
- Strings: A string is a sequence of characters. Strings are used to represent text in Python.
- Lists: A list is a collection of elements, which can be of any data type. Lists are mutable, meaning they can be changed after creation.
- Tuples: A tuple is similar to a list, but is immutable, meaning it cannot be changed once it is created.
- Dictionaries: A dictionary is a collection of key-value pairs. Each key is associated with a value, and the keys must be unique.
- Sets: A set is an unordered collection of unique elements. Sets are useful when you want to perform operations like union, intersection, and difference on collections.
- Booleans: Booleans represent the truth values True and False. They are used to represent logical values in Python.
- None: None is a special type in Python that represents the absence of a value. It is commonly used to initialize variables or as a placeholder value.
In addition to these built-in data types, Python also allows you to define your own custom data types using classes.
Encapsulation in java
In Java, encapsulation is a mechanism of wrapping data and code together into a single unit, called a class. It is a fundamental principle of object-oriented programming (OOP) and is used to hide the implementation details of a class from its external users.
How to achieve Encapsulation in java
Encapsulation in Java is achieved by declaring the instance variables of a class as private and providing public getter and setter methods to access and modify those variables. This ensures that the state of the object can only be accessed and modified through these methods, which provide a layer of abstraction and control over the data.
Here’s an example of java encapsulation:
public class Person {
    private String name;
    private int age;

    public String getName() {
        return name;
    }

    public void setName(String name) {
        this.name = name;
    }

    public int getAge() {
        return age;
    }

    public void setAge(int age) {
        this.age = age;
    }
}
In this example, the instance variables name and age are declared as private, which means they can only be accessed within the Person class. The public getter and setter methods getName(), setName(), getAge(), and setAge() are provided to access and modify the variables, respectively.
By encapsulating the data in this way, we can ensure that the state of a Person object is only accessed and modified in a controlled way, which makes the class more robust and less prone to errors
How to interact Hidden Element in Cypress
Previous Topic, We have learned locating HTML element in previous Topic. In this session we will be going through How to interact Hidden Element in Cypress.
How to interact Hidden Element in Cypress?
Cypress has the capability to handle hidden elements. In many applications we come up with a scenario where a submenu gets visible on mouse over to the menu option. In other words the submenu gets visible on taking the mouse pointer over the main menu.
For handling such hidden elements. The elements can be invoked using, Cypress has the command (invoke[‘show’])
Lets take an example to under in depth:
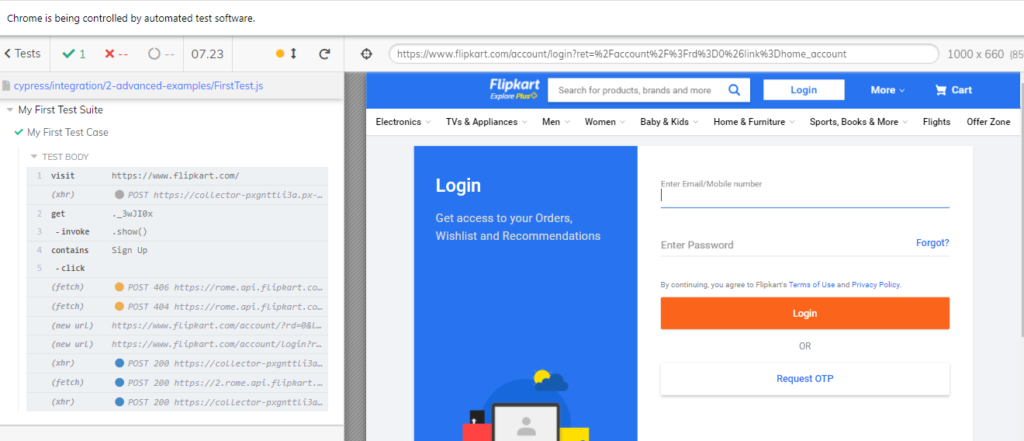
In the below screenshot, We took example to Flipkart website. On mouse over or hovering to Login menu, SignUp submenu get displayed.

However taking the mouse curser to some other location the Sign Up submenu gets disappeared.
Below is the code to handle such scenario using JQuery show:
///<reference types="cypress" />

describe('My First Test Suite', function(){
    it('My First Test Case', function(){

   // launch URL
   cy.visit("https://www.flipkart.com/");
   // show hidden element with invoke
   cy.get('._3wJI0x').invoke('show');
   //click hidden element
   cy.contains('Sign Up').click();

})

})
Expected Output:
Other way of handling Hidden Element in Cypress
Cypress do have other way of handling such hidden methods. In this method we just use click method and pass {force:true} to it. The command looks like click({force:true})
///<reference types="cypress" />

describe('My First Test Suite', function(){
    it('My First Test Case', function(){

   // launch URL
   cy.visit("https://www.flipkart.com/");
   //click hidden element
   cy.contains('Sign Up').click({force:true});

})

})
In the log we see that hidden elements are observed by Cypress and clicked.
How to Locate HTML Elements Using Cypress Locators
Previous Topic , In this tutorial we are going to learn How to Locate HTML Elements Using Cypress Locators. Along with locating elements from Cypress Test Runner with sample example.
How to Locate HTML Elements Using Cypress Locators
Locators plays an important role in automation of web-based applications. The locators identify that the GUI application which is under test, what type of elements is that either its textbox, Button , checkbox etc. As we are working on Cypress it supports only CSS selector. Therefore we will be using CSS selector in all over Cypress automation coding part.
As CSS (Cascading Style Sheets) can be written in multiple ways. Using Id, Class using attribute name and value pair. Above all for more details we can expand the CSS selector in different ways to perform.
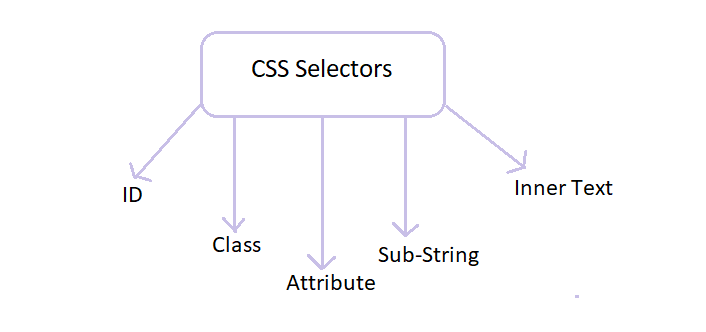
Let discuss in depth why and how to create locators taking the example of Facebook login window to make it more simple.
How to Locate HTML Elements Using Cypress Locators?
Different Locators with examples
1) CSS Selectors ID:
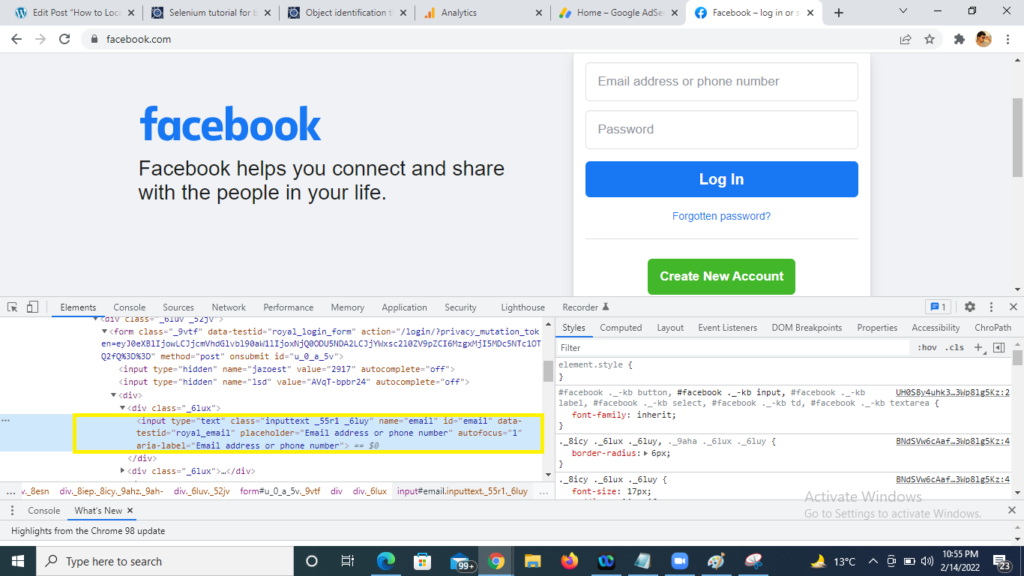
In the above image , we have highlighted the Email address of Facebook login page and we see the HTML on the bottom highlighted in yellow. In CSS the Id attribute is denoted by prefix ‘#‘. The syntax is as below:
| Syntax | Description |
| TagName#ValueofIDAttribute | TagName= HTML tag for which we are looking to create locator #= Hash sign, its the prefix of class ValueofIDAttibute= class value for element being accessed |
Therefore the locator will be: input#email
2) CSS Selectors Class :
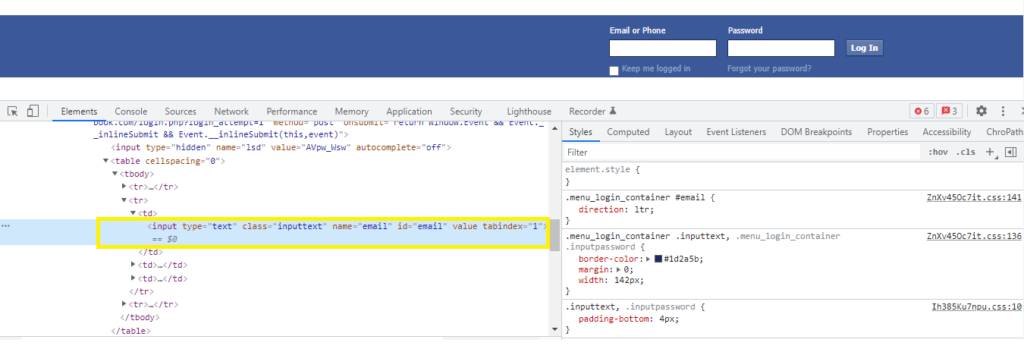
Taking other example for creating the locator for class attribute . In CSS the class attribute is denoted by prefix ‘.’ The syntax to locate HTML for class id is below:
| Syntax | Description |
| TagName.ValueofClassAttibute | TagName= HTML tag for which we are looking to create locator .= Dot sign, its the prefix of class ValueofClassAttibute= class value for element being accessed |
Therefore the locator will be: input.inputtext
3) CSS Selectors Attribute:
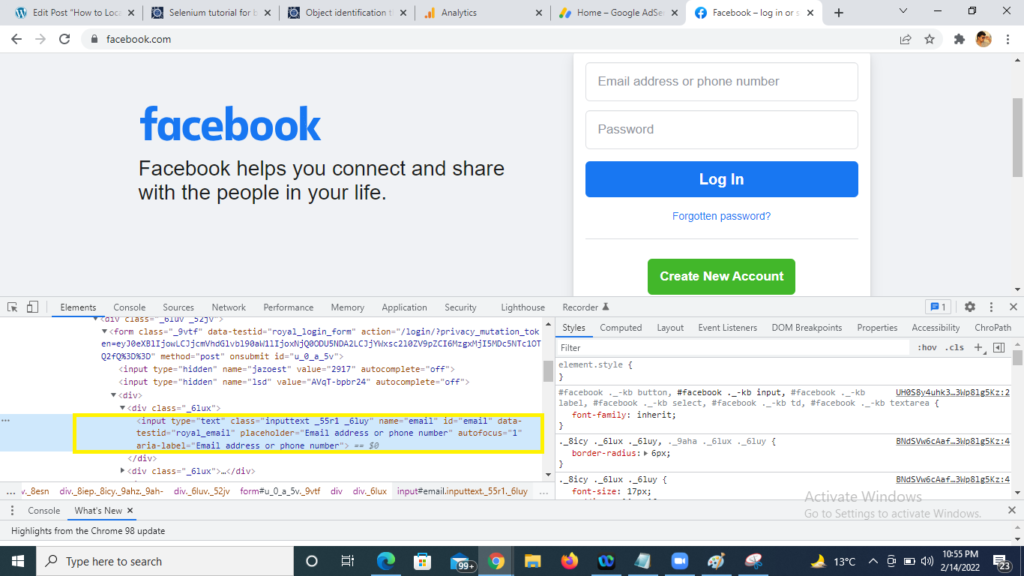
Creating locator using attribute we have to take the combination tag along with attribute name along with it value. The syntax is as below:
| Syntax | Description |
| TagName[AttributeName=AttributeValue] | TagName= HTML tag for which we are looking to create locator AttributeName=Any attribute to be used.Its always preferred to use unique attribute like Id AttributeValue= Value of the attribute selected |
Therefore the locator will be: input[name=email]
How to use Sub-String and Inner text to find locators in Cypress?
4) CSS Selectors Sub-String:
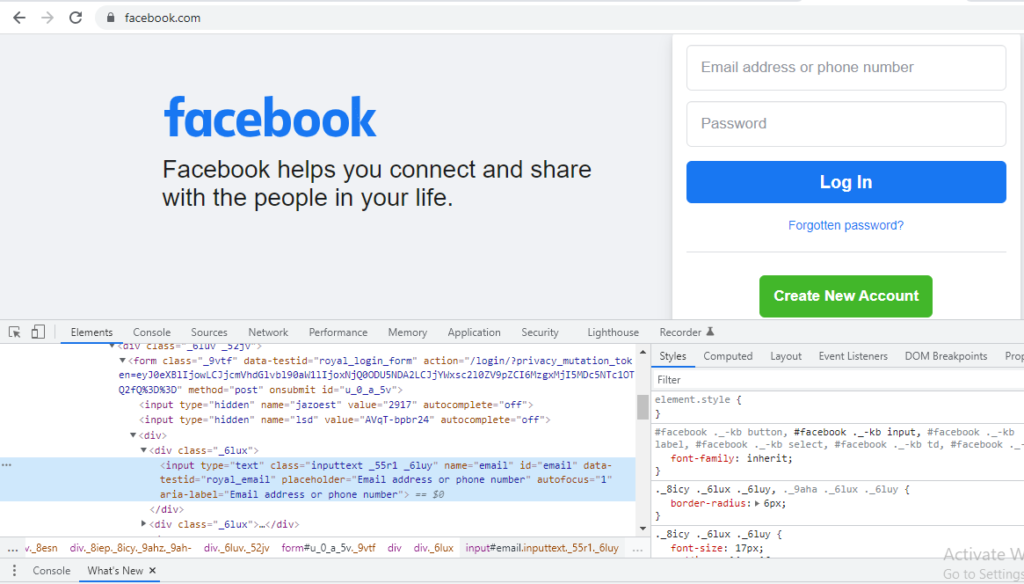
However we have learned the locators like ID, class and attribute. Finding HTML element by Sub-string is also quite easy. The symbol ‘^’ represents starts-with in CSS locator or prefix. Suppose in a Web page we want to locate Email whose name attribute is not static, its dynamic, the start 3 text is always same but the next part is dynamic and changes every time the page gets refresh, so in this case with the help of static string we can locate the element in CSS locator using Sub-String .The Syntax is as below:
| Syntax | Description |
| TagName[AttributeName^=’AttributeValue’] | TagName=HTML tag for which we are looking to create locator AttributeName=Any attribute to be used. Its always preferred to use unique attribute like Id ^=Represents matching a string with words starts-with or prefix AttributeValue=Value of the attribute selected |
Therefore the locator will be: input[name^=em]
5) CSS Selectors Inner-Text:
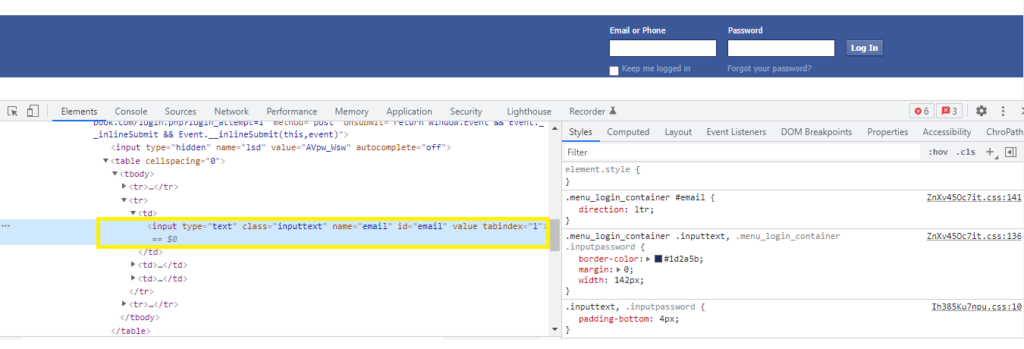
The symbol ($) represents ends-with or Suffix in css locator. Suppose in a Web page we want to locate email text box whose type attribute is not static, its dynamic, the last 3 text is always same but the first part is dynamic and changes every time the page gets refresh, so in this case with the help of static string we can locate the element in css locator using starts-with (). Syntax is tagName[attributeName$=’attributeValue’]
| Syntax | Description |
| TagName[TttributeName$=’AttributeValue’] | TagName=HTML tag for which we are looking to create locator AttributeName=Any attribute to be used. Its always preferred to use unique attribute like Id $=Represents matching a string with words ends-with or suffix AttributeValue=Value of the attribute selected |
Therefore the locator will be: input[name$=ail]
Note: For easy in capturing the CSS and xpath. Chrome provides a plugin ChroPath. That make creating and getting the locator very easily. In further tutorials we will use this plugin.
How To find locators using Cypress Selector Playground?
Imagine , If any automation tool provides you the feature get and verify the locators with in the tools itself. Isn’t that cool? Cypress automation provides you the same feature to get and verify the locators like CSS to make ease in automation with a functionality known as Open Selector Playground.
Steps to get and validate CSS locators is below:
1) Open the Cypress Test Runner and Run any of your existing script.

2) Select the toggle button and enable ‘open Selector Playground’ highlighted on the top.

3) Once the ‘open Selector Playground’ is enabled click to any of the element on the UI (ex: CATEGORIES). The CSS gets generated on the top.
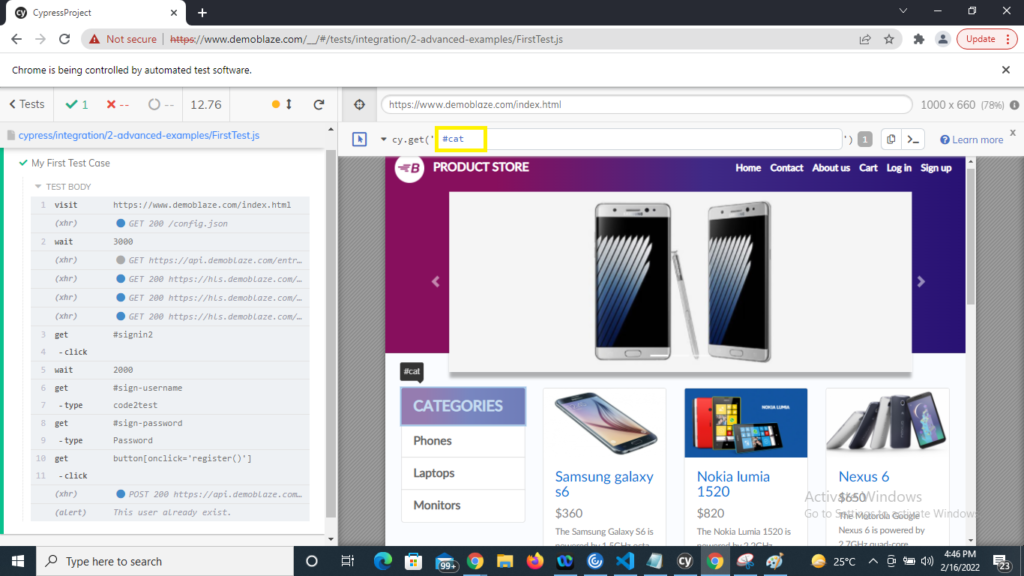
4) To validate the element click to arrow button as in screenshot, the element gets highlighted in UI.
