Home » Articles posted by code2test.com (Page 5)
Author Archives: code2test.com
Introduction of Rest Assured
Previous Topic, In this tutorial we will learn the overview and Introduction of Rest Assured API and the advantage.
What is Rest Assured?
Rest Assured provides the capability to test your Rest Representation State Transfer services using java and integrate with build tools like maven, Ant etc. Rest Assured Api has different method that helps to trigger your request payload and get the expected response.
Introduction of Rest Assured
Further with the received payload or in other words the output , we can get the required data and validate our automation as per the requirement.
Suppose you are looking for online hotel booking, and login to OYO rooms. As during the hotel search you come up with all the available hotels on the place along with the details of the available rooms from a defined time interval.As we are aware that all the hotels are not belongs to OYO ownership, so how the OYO manages to show them all. The answer is due to exposed APIs of these hotels providers.
If we are required to test this type of application UI before the development or during the development its not possible, so testing API is very important and testing repeatedly with different sets of data or parameterized data sets.
Advantage of Rest Assured
1) The major advantage of rest assured is it removes the writing of complex code for http connection, send the request and receives a readable response.
2) Rest Assured works on the basis of 3 principles, Given(), When() and Then(), which makes easy to provide the parameter and receive the readable code.
3) Being Rest Assured as java API, the integration with other tools becomes quite easy, it can easily connect with maven , testng etc.
Working Principle of Rest Assured
Rest Assured works on the basis of 3 principles Given(), When(), Then()
1) Given(): Given Keyword are the pre-requisites or the request parameter that is passed like header, query Parameter, request body.
2) When(): When keyword keeps the resource url, for the specific service to work with.
3) Then(): Under then keyword, we provide the assertions and matcher conditions or in other words all the validation work is performed to this keyword.
So, in next tutorial we are going to setup the Rest Assured and try with a sample application.
SoapUI Test Suite & Test Case
Previous Topic, After the installation of SoapUI Tool, we will now focus on creating , SoapUI Test Suite & Test Case , To understand better.
Understanding SOAP protocol
SOAP stands for Simple Object Access Protocol, its basically a XML based protocol which helps to communication between different systems and platform.
In this protocol a XML based WSDL is been developed by developers, which is in a form of request body with defined format structure and it it to server, the same format is been received as a response or output.
Structure of SOAP Request format
Soap request is basically a simple XML structure with the combination of different elements, which combines to create a proper request body. The elements of SOAP Request are:
1 ) Envelope : its basically defined at the start and the end of the element request and response body
2 ) Header: its basically used in the start of XML structure to initiate with different elements.
3) Body: It contains the message body and has attribute with different parameter followed by values associated with it.
How to Create Project in SoapUI?
To understand better, lets take a sample soap project and create step by step.
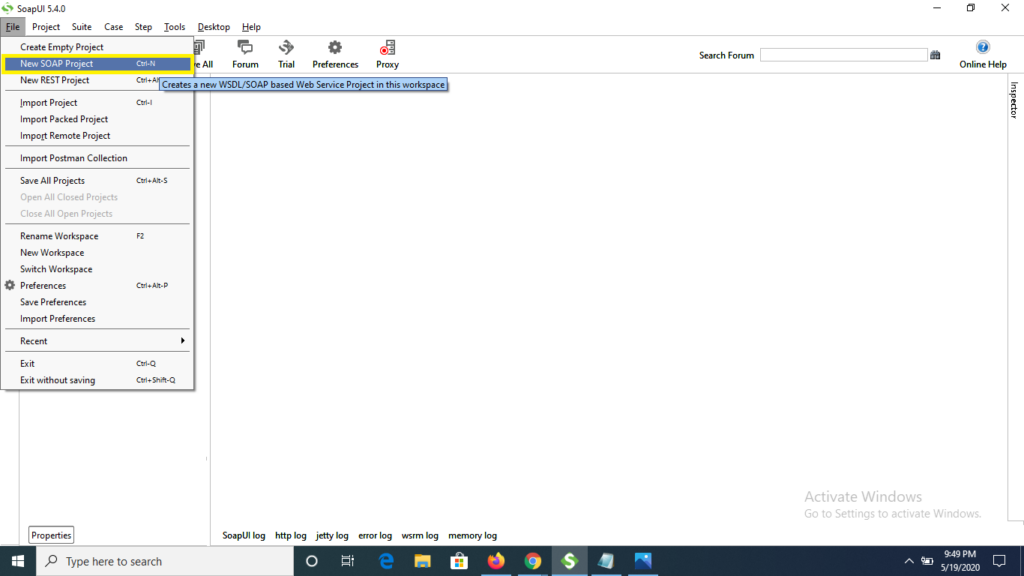
Step 1) Open the SoapUI tool, click to File and select “NEW SOAP Project” from the options.
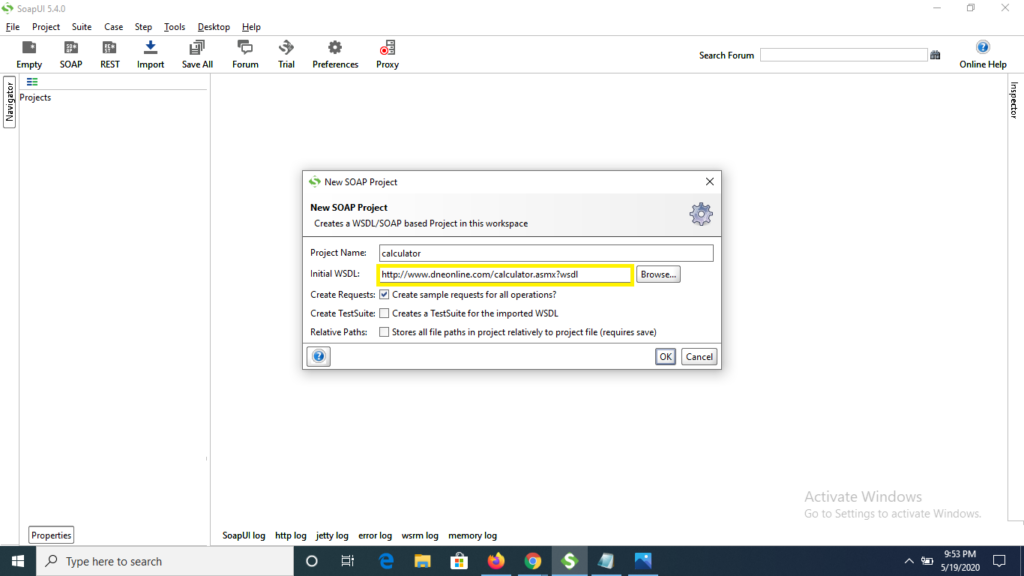
Step 2) Now enter the WSDL url-> http://www.dneonline.com/calculator.asmx?wsdl inside the Initial WSDL text field, the Project name will be auto filled as Calculator, and finally click to OK button
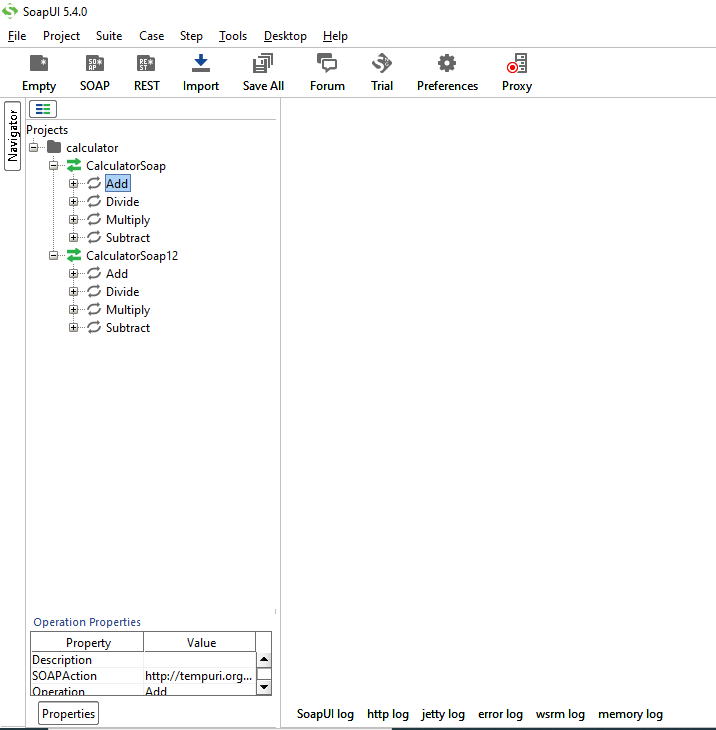
Step 3) Now we see that a project name Calculator along with two operations are getting displayed in SoapUI
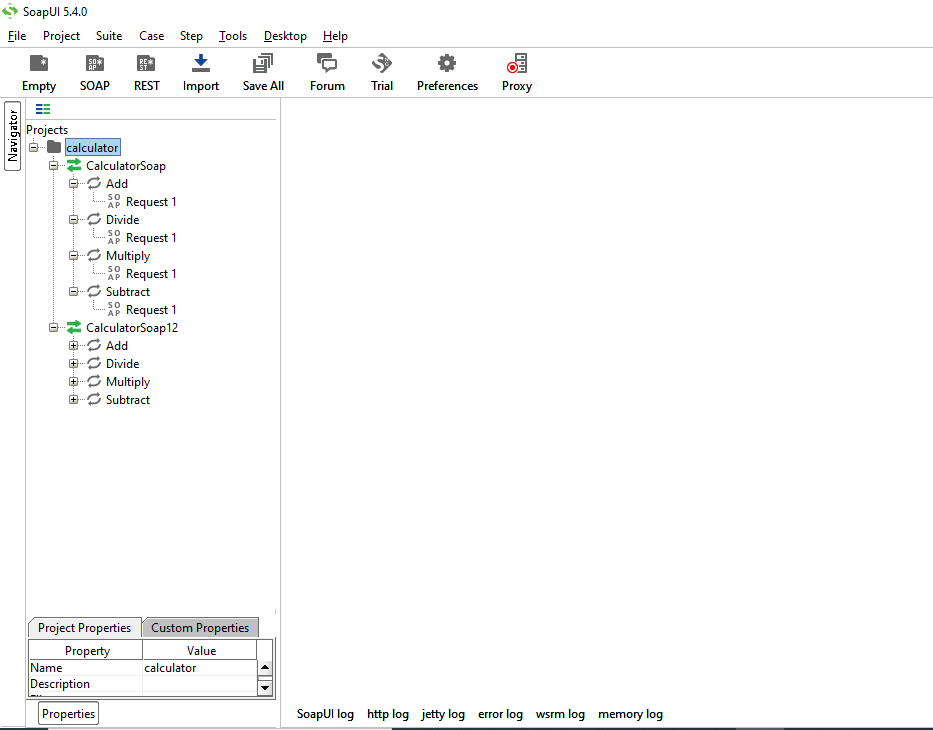
Step 4) On click to + or expand icon we see that single request with name as Request 1 is been attached with operations.
How to create Test Suite in SoapUI?
Creating Test suite is quite simple in soapUI , just follow the below steps and we are updated with Test suite
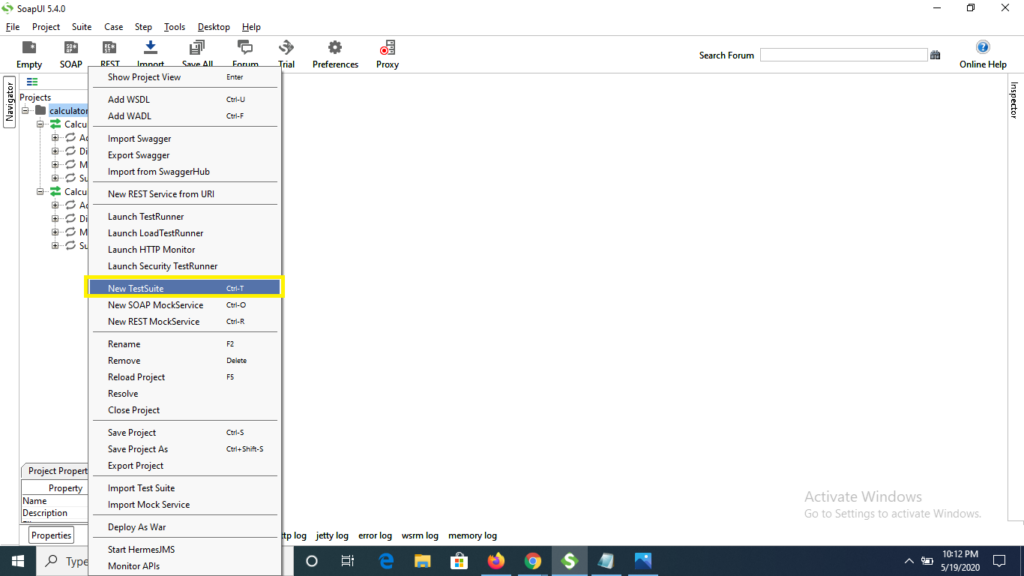
Step 1) Right click on the project (Calculator) and from the multiple options select New Test Suite.
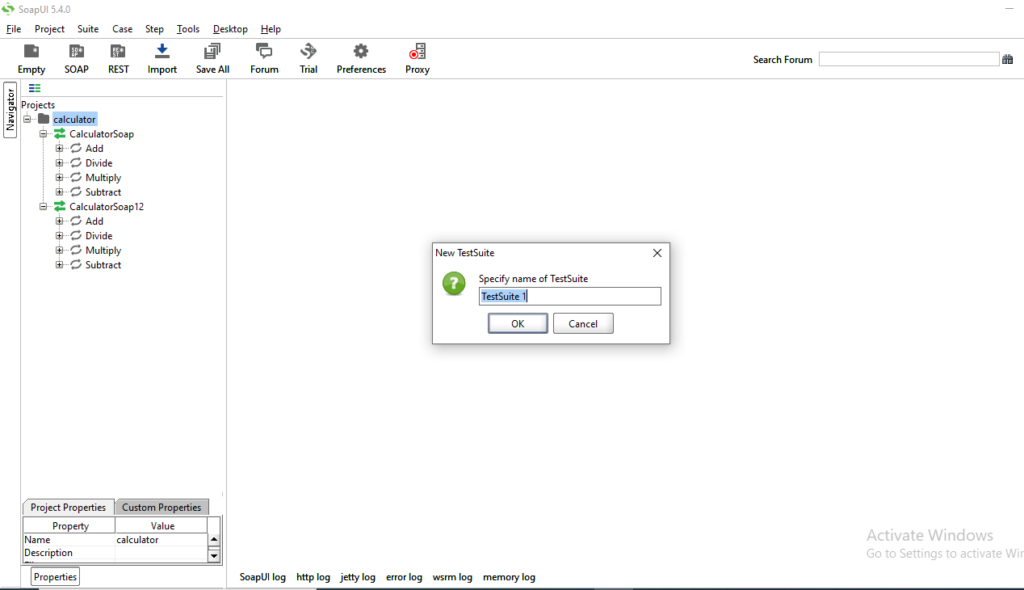
Step 2) Now specify the test suite name and click to OK button
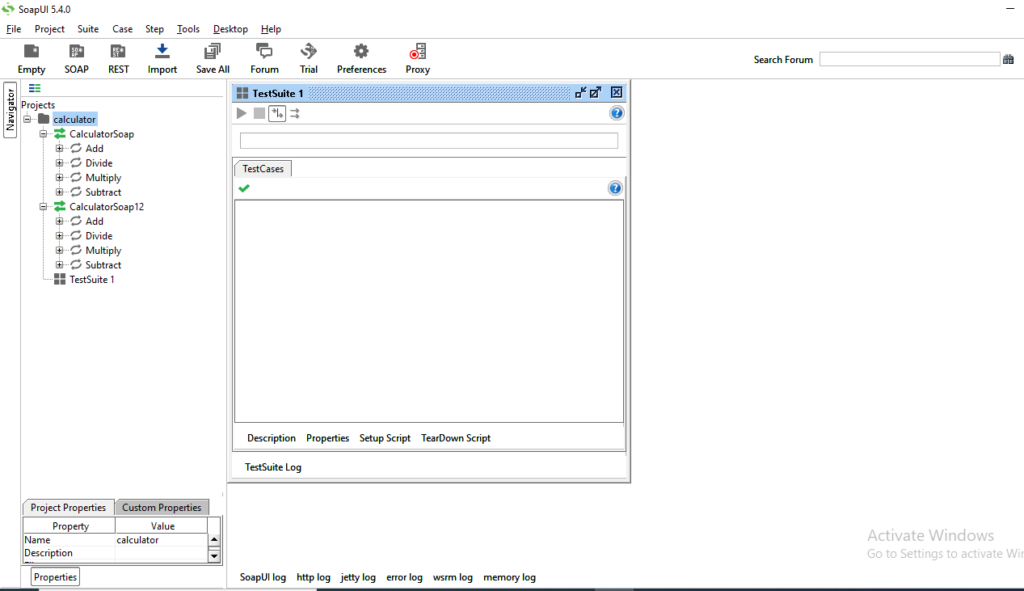
Step 3) The Test Suite with name as “TestSuite1” is created inside calculator project and the test suite window is been displayed on the right with no current test case initially.
How to create Test Case in SoapUI?
Below is the steps to create Test Case under Test Suite in SoapUI.
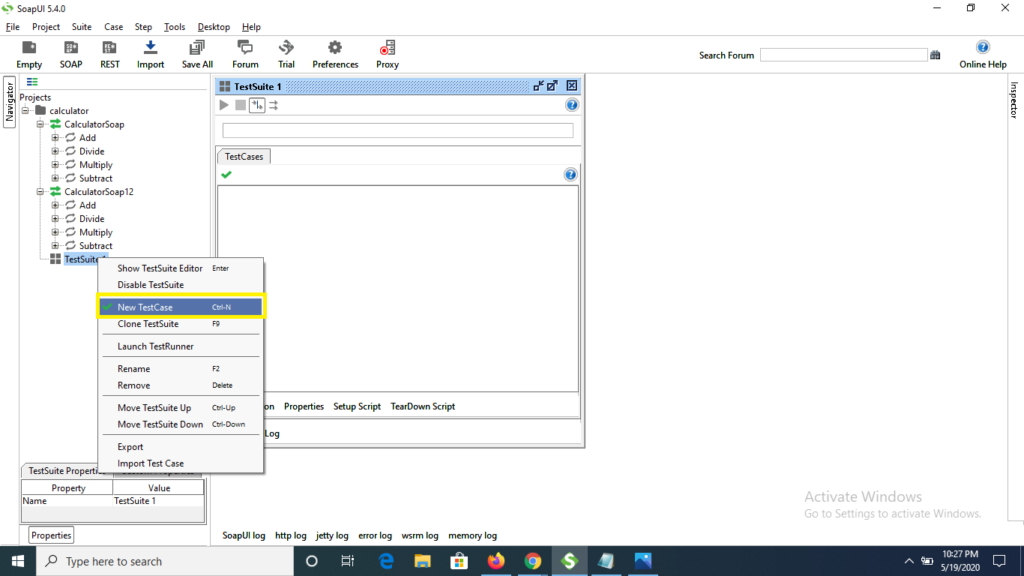
Step 1) As we are aware that multiple test cases can be created inside a test suite similarly, we can create as many test case in this suite (TestSuite1) by right-click under TestSuite1 and choosing to Test case option.
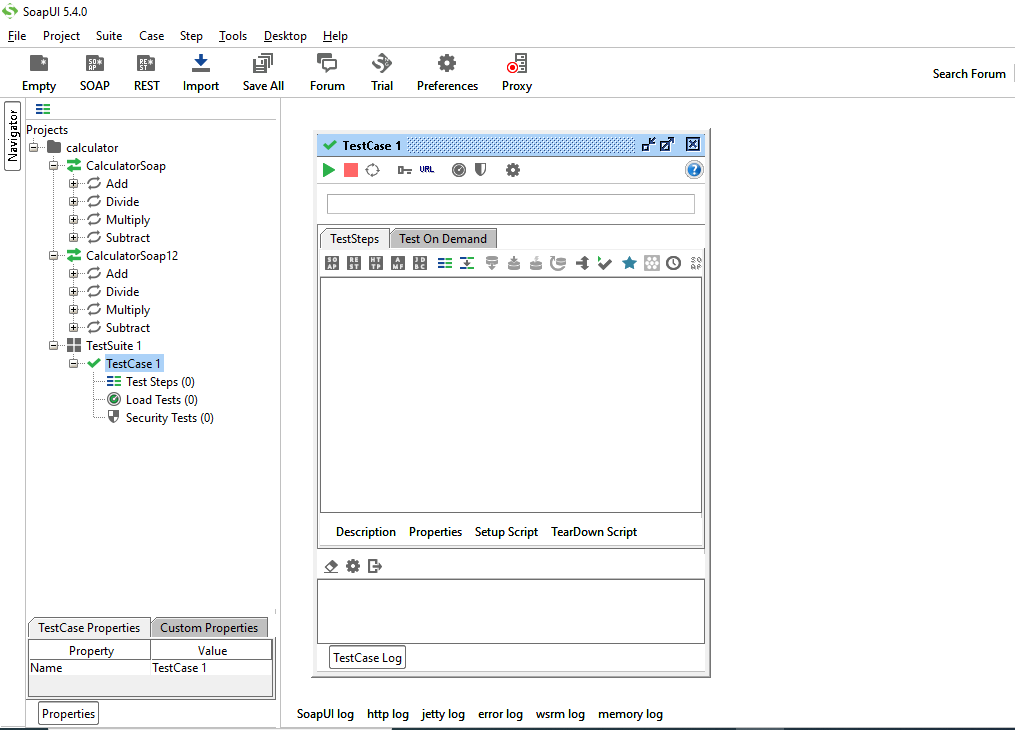
Step 2) Specify the test case name inside the New Test Case window and click to OK button
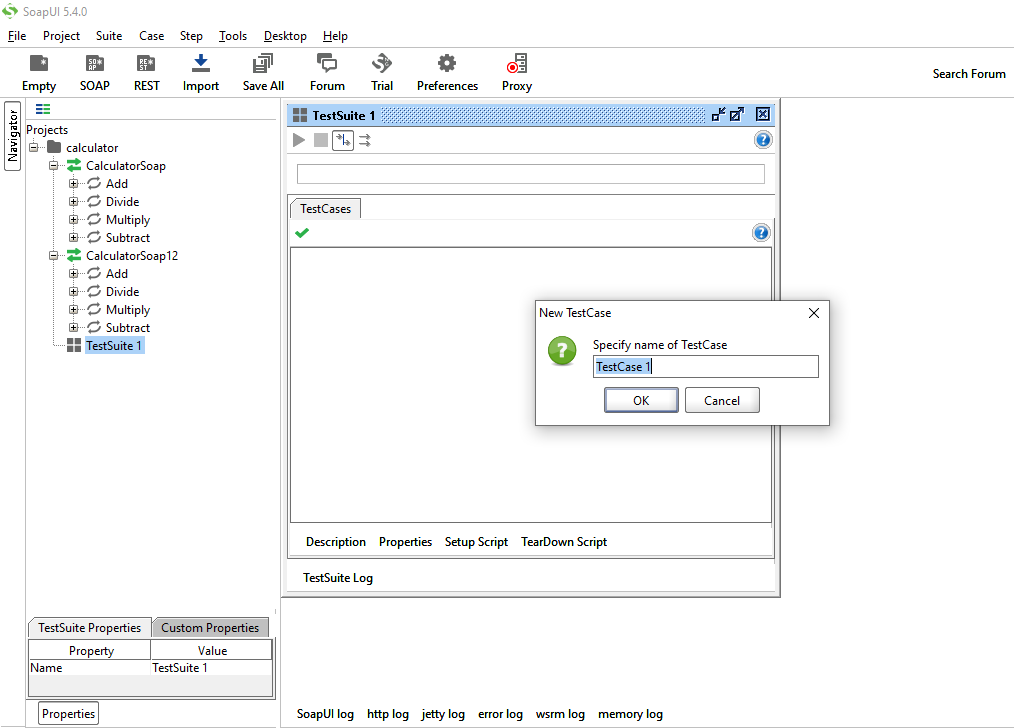
Step 3) As see that the TestCase 1 is been added inside TestSuite, as initially we see that there are zero (0) test steps and also zero (0) Load step inside Load Tests and similarly zero security test step inside Security Tests
How to create Test Steps in SoapUI?
Step for creating the Test Steps are below.
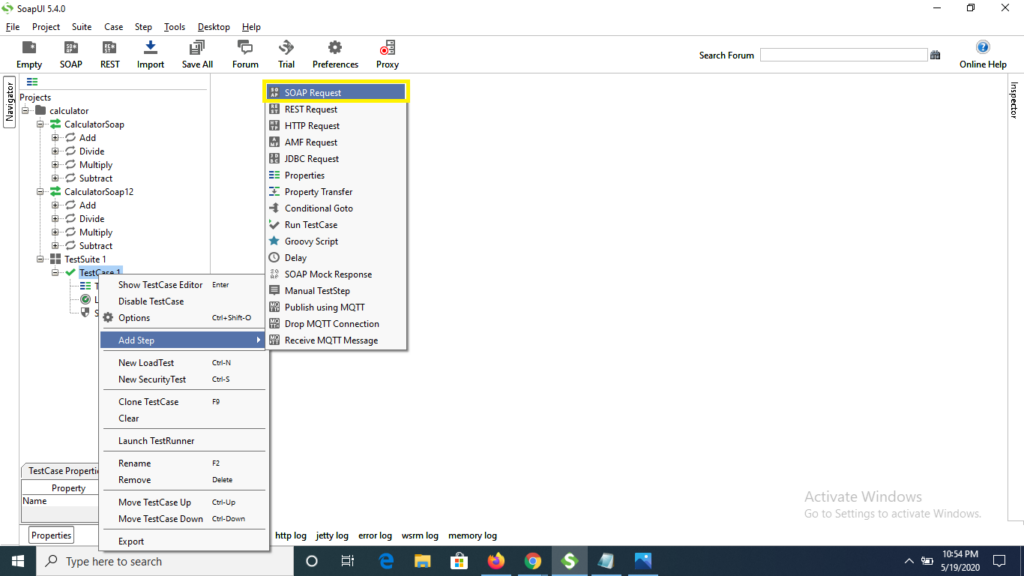
Step 1) Right click to TestCase1, select Add Step and inside multiple options choose Soap Request.
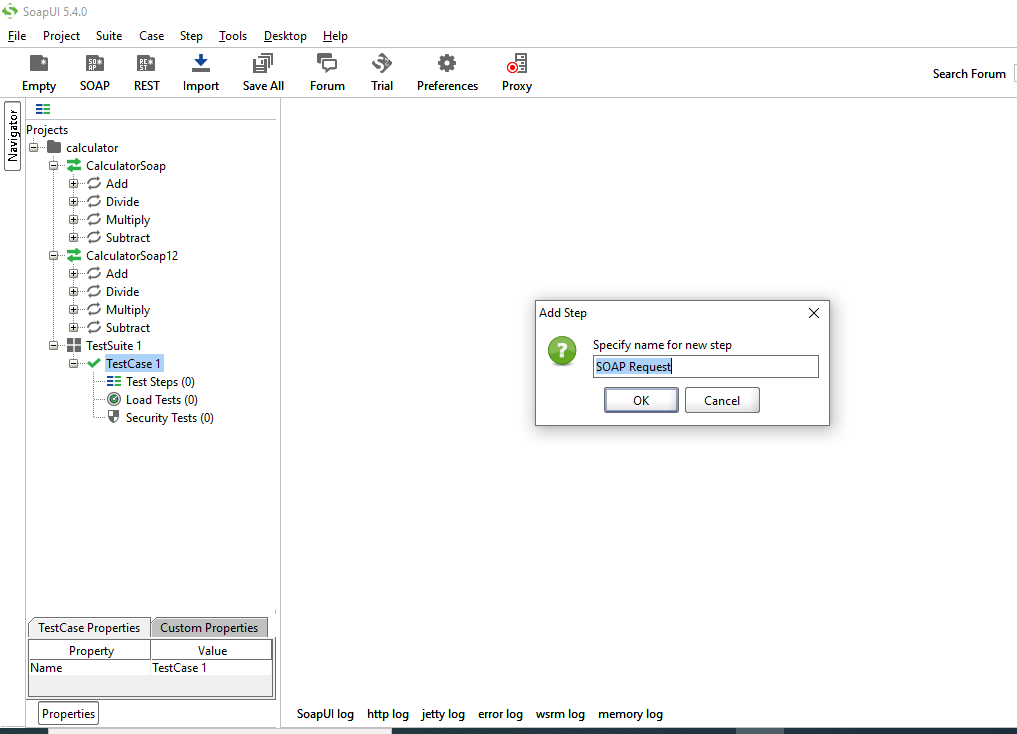
Step 2) Specify the test step name as below and click to OK button.
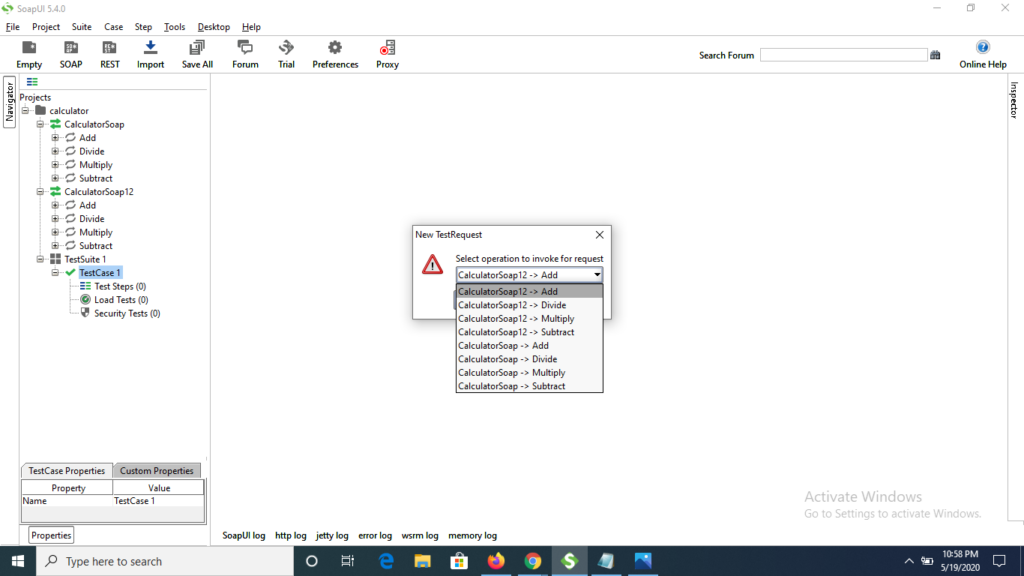
Step 3) Under New TestRequest window, there will display a list to test steps from TestSuite: CalculatorSoap and CalculatorSoap12, select any of test step from the list box (we are selecting Add from CalculatorSoap test suite) and click to OK button
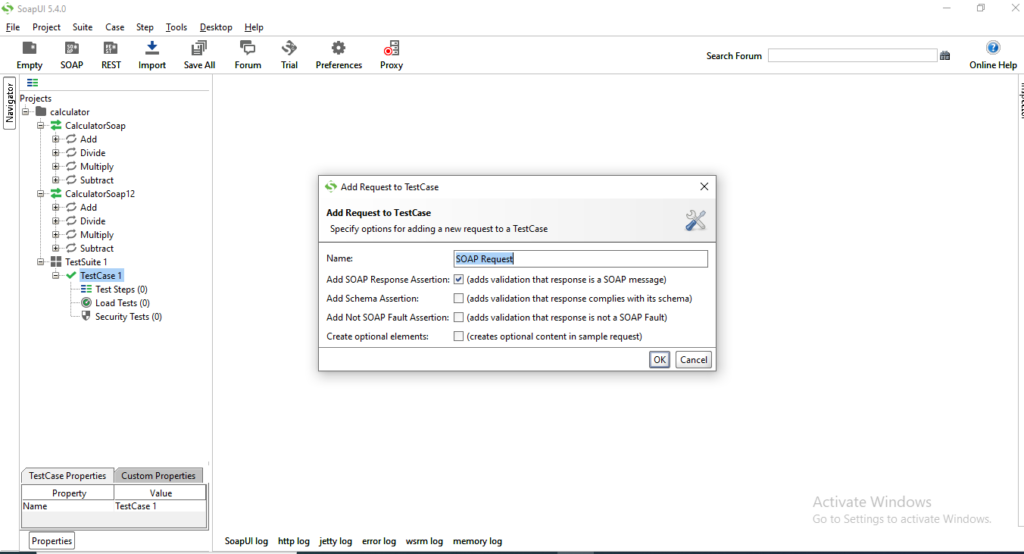
Step 4) Click to OK button under Add Request to Test Case window.
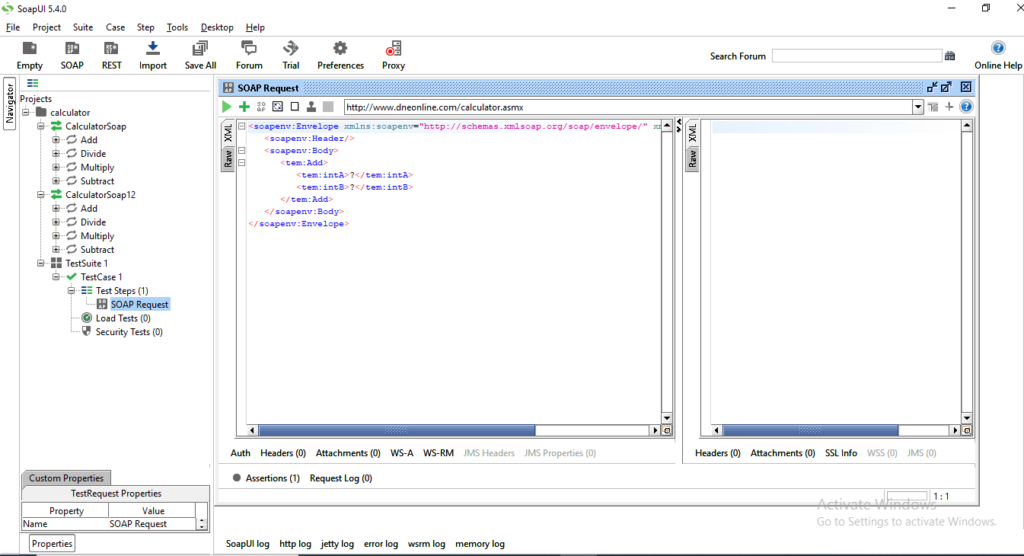
Step 5) We see that the Test Step as Soap Request is created and a XML is displayed on the right side of the pane.
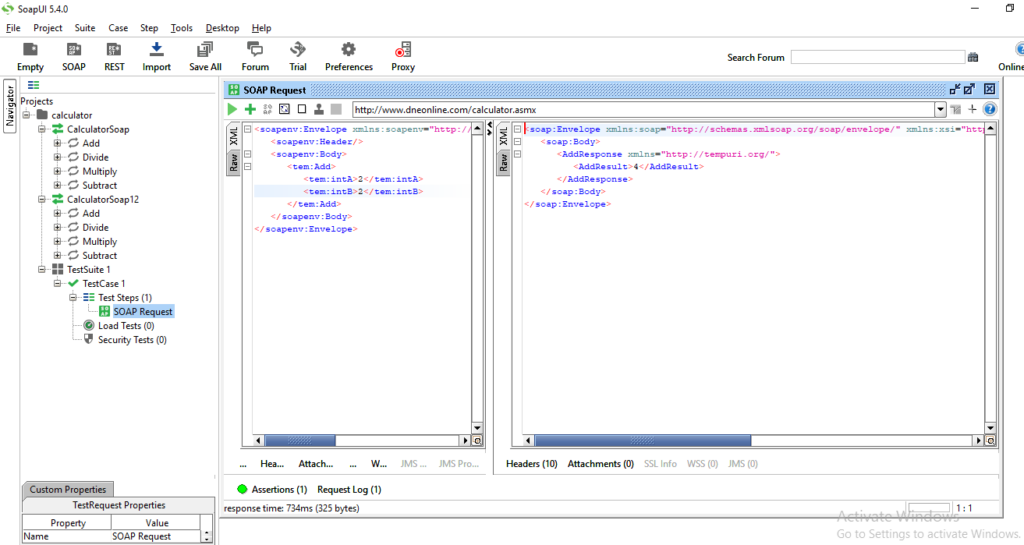
Step 6) Now pass intA value as 2 and intB value as 2, and click to Submit request arrow button at the top of the Soap Request window.
Conclusion:
As a result as we have entered the intA value as 2 and intB value as 2 inside the XML Soap Request body and hit to Submit request button, SoapUI tool took sometime to get the response from the server and displayed the output on right side in the form of XML structure with result as 4 in AddResult tag.
How To Install SoapUI in Windows
In this tutorial we are going to learn How To Install SoapUI in Windows platform? also we will go step by step installation process, so that it can be easily configured in to local system.
How To Install SoapUI in Windows?
To install SoapUI tool in to the system, we need to get the setup file from SoapUI official website and download its free version configuration.There we can also find the SoapUI pro version, its paid tool but we can have its trial version available.
Over to this tutorial we are taking the free version and begin the installation process step by step. Lets discuss the installation process.
Step 1) Open the official website for soapUI, click to navigate.

Step 2) Now click to Tools list box and select SoapUIopen Source tool link from the options.

Step 3) Once the window gets opened, click to Download SoapUI open Source link to start the installation.

Step 4) Choose the location for the installation of of SoapUI file
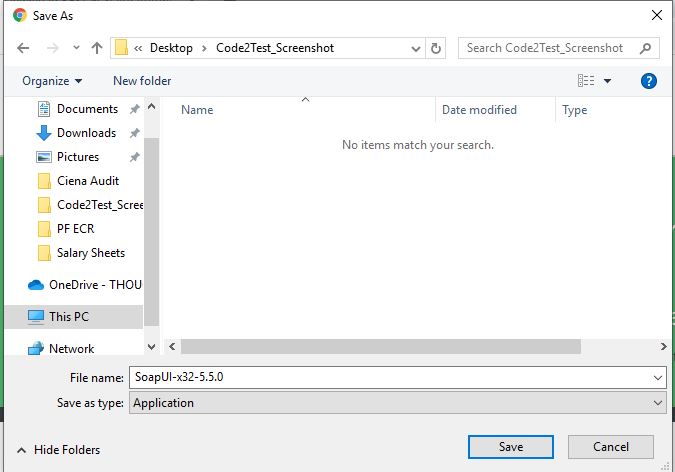
Step 5) Click to save button and the SoapUI .exe file gets starts to download in its defined location.
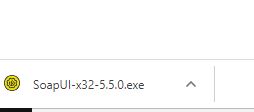
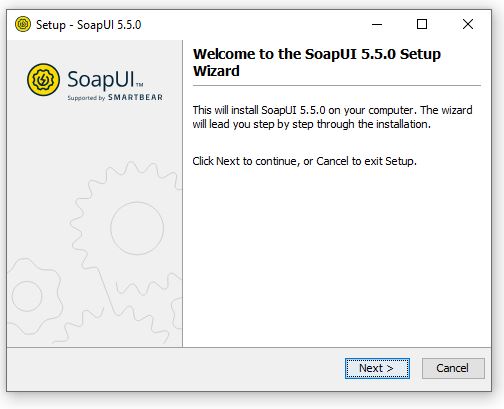
Step 6) Double click to the .exe file and setup gets started to install to your local window
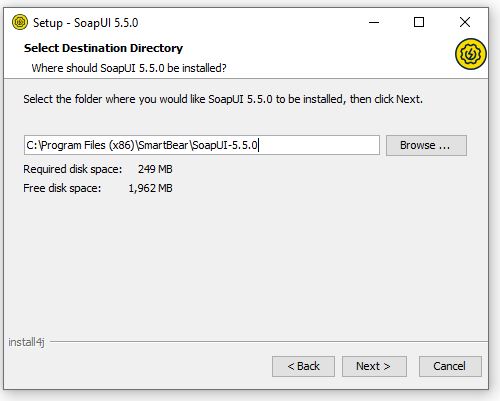
Step 7) Keep the installation file to its default location and click to Next button
Step 8) Click to Next button
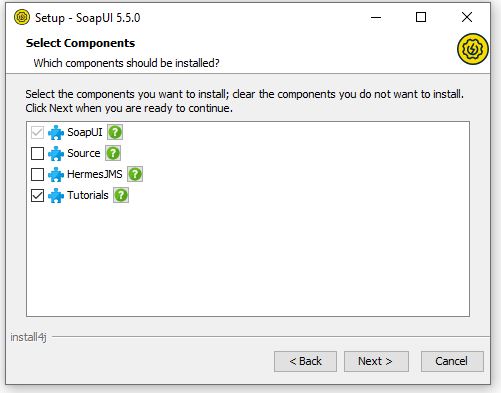
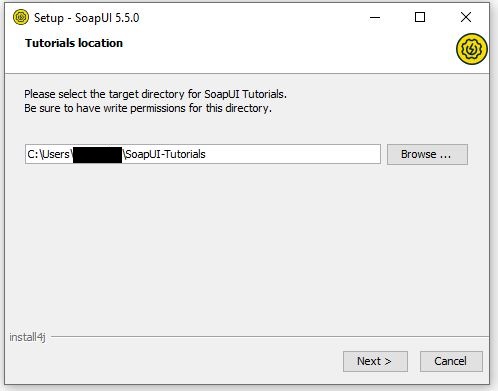
Step 9) Click to Next button for default location
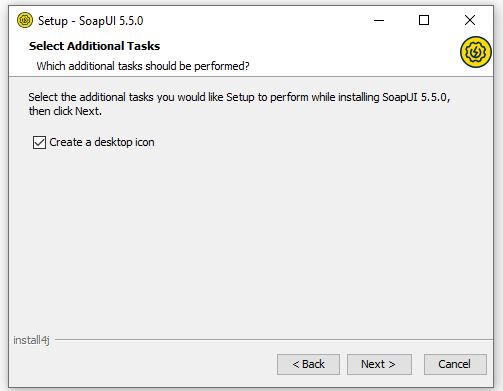
Step 10) Next button and a desktop icon for SoapUI will be created
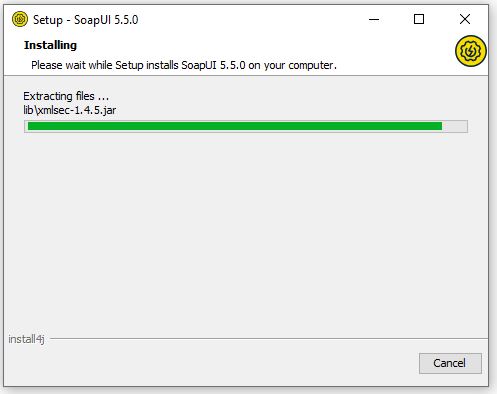
Step 11) Wait till the installation gets completed.
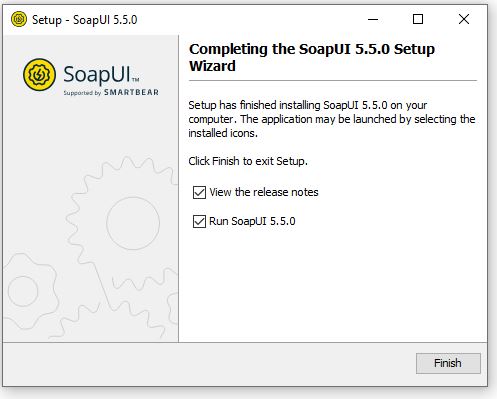
Step 12) We are now done with the installation part, click to finish button.
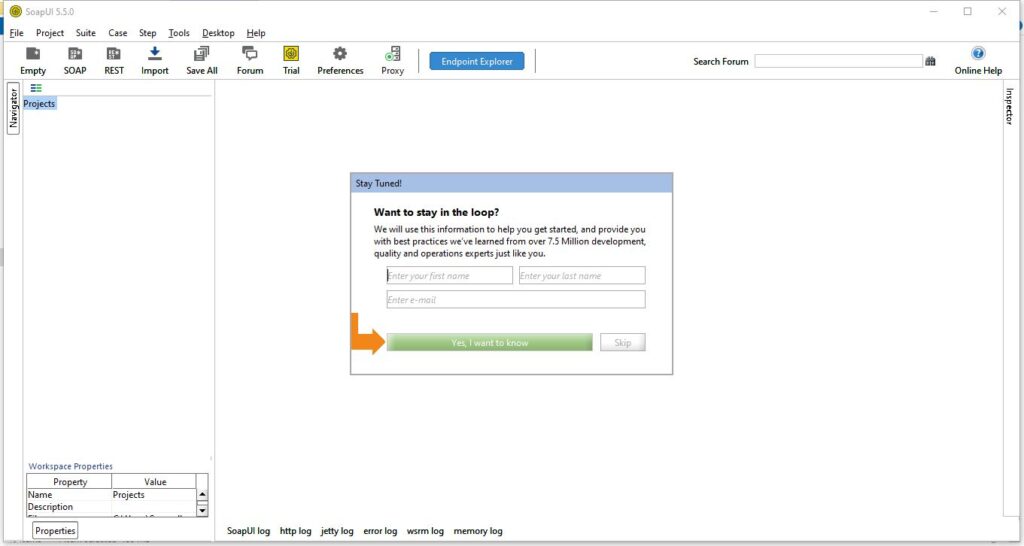
Step 13) We see the home window of SoapUI, we are now good to go for writing the scripts.
Conclusion:
So following the aboce steps we can install the SoapUI free version tool easily step by step and once the installation gets completed, we can starts writing out test script.
What is Human Resource?
What is Human Resource? Human Resource is a term which is used to describes all the People who make the workforce of an organization. It includes every employee from top to bottom. Each individual who works for the organization is a Human Resource.
The overall Profitability of the organization depends on the employees and to increase their productivity it is important to keep them motivated. In order to keep them motivated Organizations have created HR Department which manages the resources from Joining till exit.
What is Human Resource Department and its roles and responsibilities?
The HR Department is a set of people who work towards benefiting and managing the workforce of the organization. This department is one of the most important to run business, and is very important for HR Management.
HR Management activities:
- Labor Law Compliance/ Statutory Compliance
- Employee Benefit Administration
- Managing Employee Data
- Talent Acquisition/ Recruitment
- Employee On-boarding
- Employee Off-boarding/ Exit Process
- Training & Development
- Performance Management
- Automation of HR Processes
- Payroll and Compensation
- HR Policies
It is said that HR is all about Managing Events and Celebrating Festivals, But it is more than that. The Responsibilities of HR Department are more Diversified than they seem to be. We will be discussing the Roles and responsibilities of HR Department thoroughly is next pages.
Automating Hybrid Apps with Appium
Previous Topic, In the tutorial we are going to learn Automating Hybrid Apps with Appium. Before going further lets understand with is Hybrid Apps.
What are Hybrid App?
Hybrid apps are the apps that are coded in same technology as web application and mobile web application and pushed in a native container on mobile device. Its basically a sandwich approach web technology and native app.
In automation testing point of view, while automation the hybrid app, we come up with two approaches, native app and web view. When ever we have to switch from native to web platform. We need to change the context and continue with scripting or execution.
How to change context from Native to Web view in Hybrid app?
During the automation creation or execution, whenever there is a need to change the context, it can be performed getContextHandles() method, within the driver instance which returns a Set contains all the context within the hybrid app.
If we want to switch to any context, we can iterate and get in to webview and perform the action that is done with in web application.
Automating Hybrid Apps with Appium

To Automate the Hybrid apps in mobile application, download app “WebView Test” from playstore and consider the scenario below:
- Launch the hybrid application “WebView Test” on your device.
- Click to website icon on the top right.
- Enter the website name “facebook.com”
- Input the User name in the user text box
- Enter the password under password textbox.
- Close the application.
Code for the above scenario.
public static DesiredCapabilities capabilities=null;
public AndroidDriver<AndroidElement> adriver=null;
File app =new File(System.getProperty("user.dir")+"\\apks\\WEBVIEWTEST.apk");

capabilities =new DesiredCapabilities();
capabilities.setCapability("deviceName","Redmi");			//capabilities.setCapability(MobileCapabilityType.BROWSER_NAME, "Chrome");
capabilities.setCapability("platformVersion","9 PKQ1.181203.001");			capabilities.setCapability("platformName","Android");			capabilities.setCapability("chromedriverExecutable","C:\\Users\\XXXXX\\Desktop\\Eclipse_Installer\\GeckoDriver\\chromedriver.exe");
capabilities.setCapability("noReset","true");
capabilities.setCapability("fullReset","false");						capabilities.setCapability("appium:chromeOptions",ImmutableMap.of("w3c",false));
capabilities.setCapability("app", app.getAbsolutePath());

try {
System.out.println("Opening Hybrid Application");
adriver = new AndroidDriver<AndroidElement>(new URL("http://0.0.0.0:4723/wd/hub"), capabilities);
Thread.sleep(3000);
AndroidElement browsrIcon =adriver.findElement(MobileBy.AndroidUIAutomator("new UiSelector().resourceId(\"com.snc.test.webview2:id/action_go_website\")"));
browsrIcon.click();

AndroidElement inputUrl=adriver.findElement(MobileBy.AndroidUIAutomator("new UiSelector().resourceId(\"com.snc.test.webview2:id/input_url\")"));

inputUrl.sendKeys("facebook.com");
Thread.sleep(2000);

AndroidElement goButton=adriver.findElement(MobileBy.AndroidUIAutomator("new UiSelector().resourceId(\"android:id/button1\")"));

goButton.click();

Set<String> contextNames =adriver.getContextHandles();
Iterator<String> itr=contextNames.iterator();
while(itr.hasNext()){

System.out.println(itr.next());
}

adriver.context((String) contextNames.toArray()[1]); 				adriver.findElement(By.id("email")).sendKeys("code2test.com");				adriver.findElement(By.id("pass")).sendKeys("TestingSite");
adriver.close();
} catch (Exception e) {
e.printStackTrace();
}
}
Code Description of above code:
Step 1) Add the below capabilities on the Appium Automation script:
//Create the object of Desired Capability
capabilities =new DesiredCapabilities();
//Define the Device name
capabilities.setCapability(“deviceName”,”Redmi”);
//Define the platform version
capabilities.setCapability(“platformVersion”,”9 PKQ1.181203.001″);
//Define Platform name
capabilities.setCapability(“platformName”,”Android”);
//provide the chrome driver exe path saved in local system with same version as the browser version in mobile device
capabilities.setCapability(“chromedriverExecutable”,”C:\Users\Girvar Singh Negi\Desktop\Eclipse_Installer\GeckoDriver\chromedriver.exe”);
//Define Browser name
capabilities.setCapability(MobileCapabilityType.BROWSER_NAME, “Chrome”);
//Define the string for chrome option
capabilities.setCapability(“appium:chromeOptions”,ImmutableMap.of(“w3c”,false));
Step 2) Create the object the android Driver passing host, port number along with capabilities as a parameter
adriver = new AndroidDriver(new URL(“http://0.0.0.0:4723/wd/hub”), capabilities)
Step 3) Inspect the element of browserIcon on the top right and click to the element using AndroiduiAutomator.
AndroidElement browsrIcon =adriver.findElement(MobileBy.AndroidUIAutomator(“new UiSelector().resourceId(\”com.snc.test.webview2:id/action_go_website\”)”));browsrIcon.click();
Step 4) Now inspect the text box under browsericon window and enter the website name as “facebook.com” using sendKeys method
AndroidElement inputUrl=adriver.findElement(MobileBy.AndroidUIAutomator(“new UiSelector().resourceId(\”com.snc.test.webview2:id/input_url\”)”)); inputUrl.sendKeys(“facebook.com”);
Step 5) Now call the method getContextHandles() from driver instance which returns Set, capture the set in an instance variable contextNames.
Set<String> contextNames =adriver.getContextHandles();
Step 6) Iterate the set using Iterator and move to next element by next() using while loop.
Iterator itr=contextNames.iterator();
while(itr.hasNext()){ System.out.println(itr.next());
}
Step 7) Convert the contextNames in to Array and move get the 1 st index from context Names(which is web view)
adriver.context((String) contextNames.toArray()[1]);
Step 8) Inspect the email text box and password text box and insert the value.
- adriver.findElement(By.id(“email”)).sendKeys(“code2test.com”); adriver.findElement(By.id(“pass”)).sendKeys(“TestingSite”);
Step 9) Close the browser.
adriver.close();
Mobile WebApplication Automation with Appium
Prevoius Topic, We are going to learn to perform Mobile WebApplication Automation with Appium, in this tutorial, but before we start let understand about WebApplication Automation.
What is WebApplication Automation in Mobile?
Web Application are the browser specific application, which are hosted in web with specific address or domain name. When we open the browser in mobile device and run our automation test, we call it as web application Automation testing in mobile device.
The mobile device has native applications, hybrid application along with have the provision to open the web application through browser. But to automate the web application is a bit different as what we performed earlier for mobile application.
The locator or the objects for mobile apps(native & hybrid) is different then the locators or objects in mobile web application because of different platform.
The locators in Mobile application is inspect in the same way as we did in Selenium, and also to create or execute the automation script for web application in mobile browser, we need to add few more capabilities .
How to perform Mobile WebApplication Automation with Appium?
To perform the Web apps automation, let consider a scenario and after writing the code, we will see, what are the capabilities are been added and setting performed.
Scenario:
- Open the facebook application in Mobile browser.
- Under “Create an Account “, Enter first name and last name.
Code:
Note: There are few Reference variable that are predefined these are:
public static DesiredCapabilities capabilities=null;
public AndroidDriver adriver=null;
capabilities =new DesiredCapabilities();
capabilities.setCapability("deviceName","Redmi");
//capabilities.setCapability(CapabilityType.BROWSER_NAME,"");
capabilities.setCapability("platformVersion","9 PKQ1.181203.001");
capabilities.setCapability("platformName","Android");
capabilities.setCapability("chromedriverExecutable","C:\Users\XXXXX\Desktop\Eclipse_Installer\GeckoDriver\chromedriver.exe");
capabilities.setCapability(MobileCapabilityType.BROWSER_NAME, "Chrome");
capabilities.setCapability("appium:chromeOptions",ImmutableMap.of("w3c",false));
try {
System.out.println("Opening the browser------------>");
adriver = new AndroidDriver(new URL("http://0.0.0.0:4723/wd/hub"), capabilities);
Thread.sleep(3000);
adriver.get("https://www.facebook.com/");
adriver.findElement(By.xpath("//input[@name='firstname']")).sendKeys("Code2test.com");
adriver.findElement(By.xpath("//input[@name='lastname']")).sendKeys("WebView Automation");
adriver.quit();
} catch (Exception e) {
e.printStackTrace();
}Code Description of above code:
Step 1) Add the below capabilities on the Appium Automation script:
//Create the object of Desired Capability
capabilities =new DesiredCapabilities();
//Define the Device name
capabilities.setCapability(“deviceName”,”Redmi”);
//Define the platform version
capabilities.setCapability(“platformVersion”,”9 PKQ1.181203.001″);
//Define Platform name
capabilities.setCapability(“platformName”,”Android”);
//provide the chrome driver exe path saved in local system with same version as the browser version in mobile device
capabilities.setCapability(“chromedriverExecutable”,”C:\Users\Girvar Singh Negi\Desktop\Eclipse_Installer\GeckoDriver\chromedriver.exe”);
//Define Browser name
capabilities.setCapability(MobileCapabilityType.BROWSER_NAME, “Chrome”);
//Define the string for chrome option
capabilities.setCapability(“appium:chromeOptions”,ImmutableMap.of(“w3c”,false));
Step 2) Create the object the android Driver passing host, port number along with capabilities as a parameter
adriver = new AndroidDriver(new URL(“http://0.0.0.0:4723/wd/hub”), capabilities)
Step 3) Now open the facebook application on mobile browser
adriver.get(“https://www.facebook.com/”);
Step 4) Now inspect the element for first name using xpath and send the string “Code2tes.com” under First name text box
adriver.findElement(By.xpath(“//input[@name=’firstname’]”)).sendKeys(“Code2test.com”);
Step 5) Inspect the element for last name and send the string under last name text box and at the end close the browser.
adriver.findElement(By.xpath(“//input[@name=’lastname’]”)).sendKeys(“WebView Automation”); adriver.quit()
Conclusion:
So with the below tutorial, we have learned how to automated the web browser application using mobile device and inspect and work with the element on mobile web.
Appium Zoom with Multi TouchAction in Android
Previous Topic, This tutorial we are going to learn Appium Zoom with MultiTouchAction in Android. Before going further lets understand Zoom in appium.
What is Zoom Action in Mobile Device?
Zoom action is an event to maximize and minimize the window for any image, web page etc so that it is more visible and clear to the user.
or in other words during the in zoom action the coordinates (x,y) from a specific point changes ,is being moved to other point location results in the change in co ordinates, which magnifies the window and makes it more clear to the user.
The zoom action is performed manually with the help of multiple touch(more than two), so that the area to be zoom out or in can be made larger or smaller , the action can be performed by double touch, triple touch or multi touch. Lets understand how to perform in Appium.
How to to perform Appium Zoom with MultiTouchAction in Android?
Appium provides the capability to perform zoom action or multi touch action using MultiTouchAction class. With the help of MultiTouchAction class, we are capable to add different AndroidTouchAction and perform action simultaneously.
For each touch action, we individually perform action ( move the co ordinates from on place to another) creating different object and finally add them using MultiTouchAction using add method.
Lets understand it more in depth by taking a scenario:
Step1) Open the application “MultiTouch Tester” (if you do not have please download it from playstore).
Step 2) Now point two touch gesture and move both the points to other location by changing the coordinates(try to zoom).
Step 3) close the application.
Dimension dim=adriver.manage().window().getSize();
int width=dim.width;
int height =dim.height;

int firstTouchXcoordinate_Start =(int)(width*.5);
int firstTouchYcoordinate_Start =(int)(height*.4);

int firstTouchXcoordinate_End =(int)(width*.1);
 int firstTouchYcoordinate_End =(int)(height*.1);

 int secondTouchXcoordinate_Start =(int)(width*.5);
 int secondTouchYcoordinate_Start =(int)(height*.6);

 int secondTouchXcoordinate_End =(int)(width*.9);
 int secondTouchYcoordinate_End =(int)(height*.9);

 TouchAction touch1=new TouchAction(adriver);
 TouchAction touch2=new TouchAction(adriver);

 touch1.longPress(PointOption.point(firstTouchXcoordinate_Start, firstTouchYcoordinate_Start))
 .waitAction(WaitOptions.waitOptions(Duration.ofMillis(2000)))
 .moveTo(PointOption.point(firstTouchXcoordinate_End, firstTouchYcoordinate_End));

 touch2.longPress(PointOption.point(secondTouchXcoordinate_Start, secondTouchYcoordinate_Start))
 .waitAction(WaitOptions.waitOptions(Duration.ofMillis(2000)))
 .moveTo(PointOption.point(secondTouchXcoordinate_End, secondTouchYcoordinate_End));

 MultiTouchAction multi=new MultiTouchAction(adriver);
 multi.add(touch1).add(touch2).perform();
Code Description of above code:
Step1) Firstly get the size of the window and extract the width and height of the window
Dimension dim=adriver.manage().window().getSize();
int width=dim.width;
int height =dim.height;
Step 2) Get the (x,y) coordinates of source point of the First touch gesture and (x,y) co ordinates of destination point of the coordinates
int firstTouchXcoordinate_Start =(int)(width.5); int firstTouchYcoordinate_Start =(int)(height.4);
int firstTouchXcoordinate_End =(int)(width.1); int firstTouchYcoordinate_End =(int)(height.1);
Step 3) Get the (x,y) coordinates of source point of the Second touch gesture and (x,y) co ordinates of destination point of the coordinates
int secondTouchXcoordinate_Start =(int)(width.5); int secondTouchYcoordinate_Start =(int)(height.6);
int secondTouchXcoordinate_End =(int)(width.9); int secondTouchYcoordinate_End =(int)(height.9);
Step 4) Now create the 2 object of TouchAction class passing the driver as parameter for 2 touch action named as touch1 and touch2.
TouchAction touch1=new TouchAction(adriver);
TouchAction touch2=new TouchAction(adriver);
Step 5) Now in first Touch gesture longPress the drag element from starting element taking (x,y) co ordinate and wait for 2 seconds or 2000 milliseconds and then move to the destination element by (x,y) co ordinate.
touch1.longPress(PointOption.point(firstTouchXcoordinate_Start, firstTouchYcoordinate_Start))
.waitAction(WaitOptions.waitOptions(Duration.ofMillis(2000)))
.moveTo(PointOption.point(firstTouchXcoordinate_End, firstTouchYcoordinate_End));
Step 6) Now in Second Touch gesture longPress the drag element from starting element taking (x,y) co ordinate and wait for 2 seconds or 2000 milliseconds and then move to the destination element by (x,y) co ordinate.
touch2.longPress(PointOption.point(secondTouchXcoordinate_Start, secondTouchYcoordinate_Start))
.waitAction(WaitOptions.waitOptions(Duration.ofMillis(2000)))
.moveTo(PointOption.point(secondTouchXcoordinate_End, secondTouchYcoordinate_End));
Step 7) Now create the object of MultiTouchAction and through refence variable add the two touch action and perform.
MultiTouchAction multi=new MultiTouchAction(adriver);
multi.add(touch1).add(touch2).perform();
Conclusion: So we can not perform Appium zoom action with multi gesture using MultiTouchAction and add mulitple touch to it.
Drag And Drop Action using Appium
Previous Topic, We are going to learn Drag And Drop Action using Appium in this tutorial using Touch Action.
What is Drag And Drop Action?
Drag And Drop are the two action that are performed simultaneously for moving the element from one place to another specific or defined place.
During the drag and drop event, an element changes its place or in other words its x and y co-ordinates and placed to another place with new x and y co-ordinates.
The movement of the element is done by providing a container which captures an object and changes its DOM structure and DOM gets refresh during run time , results in change in locator element along with its attributes and values.
How to Perform Drag And Drop Action using Appium?
Appium provides a set of commands to perform drag and drop operation with in mobile application. Touch Action Class provides the method to longpress the element , which is to be dragged and moveTo method helps in dropping the element to its destination location on the basis of x and y co-ordinates.

Lets consider a scenario to perform drag and drop action in appium.
Scenarion:
- Open the “Drag & Drop” in mobile device (if not installed, recommend you install from playstore).
- Select the Literature
- Answer the question by dragging the first Option and dropping it to Square bracket(???).
- close the application.
AndroidElement literature =driver.findElement(MobileBy.AndroidUIAutomator("new UiSelector().text(\"LITERATURE\")"));

literature.click();

AndroidElement dragElement =driver.findElement(MobileBy.AndroidUIAutomator("new UiSelector().resourceId(\"dragdrop.stufflex.com.dragdrop:id/chooseA\")"));

AndroidElement dropElement =driver.findElement(MobileBy.AndroidUIAutomator("new UiSelector().resourceId(\"dragdrop.stufflex.com.dragdrop:id/answer\")"));

int middleXCoordinate_dragElement =dragElement.getLocation().x + (dragElement.getSize().width/2);

int middleYCoordinate_dragElement =dragElement.getLocation().y + (dragElement.getSize().height/2);

int middleXCoordinate_dropElement =dropElement.getLocation().x + (dropElement.getSize().width/2);

int middleYCoordinate_dropElement =dropElement.getLocation().y + (dropElement.getSize().height/2);

TouchAction  action =new TouchAction(adriver);
action.longPress(PointOption.point(middleXCoordinate_dragElement, middleYCoordinate_dragElement))
.waitAction(WaitOptions.waitOptions(Duration.ofSeconds(3)))
.moveTo(PointOption.point(middleXCoordinate_dropElement, middleYCoordinate_dropElement))
.release()
.perform();
Code Description:(drag and Drop)
Step 1) Inspect the element Literature using AndroidUIAutomator
AndroidElement literature =driver.findElement(MobileBy.AndroidUIAutomator(“new UiSelector().text(\”LITERATURE\”)”));
Step 2) Click to the element (Literature)
literature.click();
Step 3) Inspect the first Answer element using AndroidUIAutomator, for which the drag event has to be performed.
AndroidElement dragElement =driver.findElement(MobileBy.AndroidUIAutomator(“new UiSelector().resourceId(\”dragdrop.stufflex.com.dragdrop:id/chooseA\”)”));
Step 4) Inspect the Element of Square (???) , where the drop operation has to be performed.
AndroidElement dropElement =driver.findElement(MobileBy.AndroidUIAutomator(“new UiSelector().resourceId(\”dragdrop.stufflex.com.dragdrop:id/answer\”)”));
Step 5) Identify the mid point (x,y) co-ordinated of the draggable element by taking the location of the axis + half the size of the element.
int middleXCoordinate_dragElement =dragElement.getLocation().x + (dragElement.getSize().width/2);
int middleYCoordinate_dragElement =dragElement.getLocation().y + (dragElement.getSize().height/2);
Step 6) Identify the mid point (x,y) co-ordinated of the drop element by taking the location of the axis + half the size of the element.
int middleXCoordinate_dropElement =dropElement.getLocation().x + (dropElement.getSize().width/2);
int middleYCoordinate_dropElement =dropElement.getLocation().y + (dropElement.getSize().height/2);
Step 7) Create an Object of Touch Action, which contains the methods for longPress and moveto event.
TouchAction action =new TouchAction(driver);
Step 8) Now longPress the drag element (answer field) from starting element taking (x,y) co ordinate and wait for 2 seconds and then move to the destination element by (x,y) co ordinate.
action.longPress(PointOption.point(middleXCoordinate_dragElement, middleYCoordinate_dragElement))
.waitAction(WaitOptions.waitOptions(Duration.ofSeconds(2)))
.moveTo(PointOption.point(middleXCoordinate_dropElement, middleYCoordinate_dropElement))
.release()
.perform();
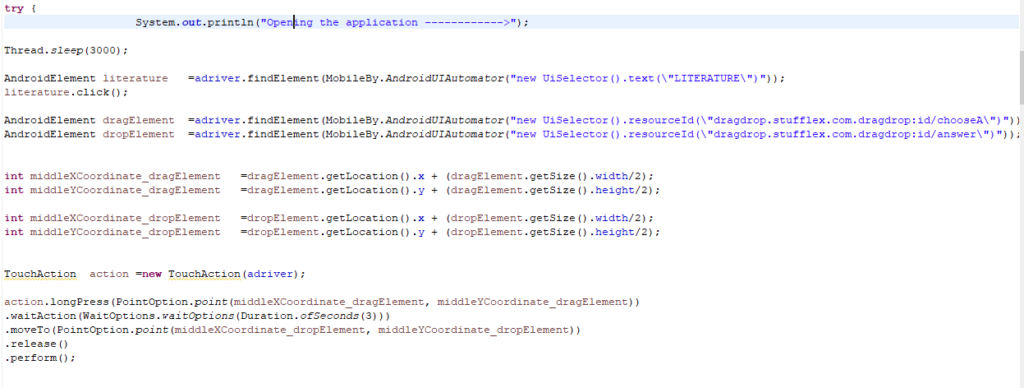
Code In Eclipse look like below screenshot:
Facebook-> https://www.facebook.com/code2test/?modal=admin_todo_tour
Vertical And Horizontal swipe/scroll in Appium
Previous Topic, We are going to learn the Vertical And Horizontal swipe/scroll in Appium in this tutorial. So lets start.
What is Swipe/Scroll in mobile device?
Swipe/Scroll is a touch Action which is performed in mobile device to move the mobile screen from top to bottom or bottom to top , so that the user can view the hidden elements of mobile application and perform action or event accordingly.
Vertical and horizontal scrolling/swipe are the two different approaches by which user move the application with in screen.
In vertical swipe/scroll, mobile application is moved from top to bottom by touch action and vice versa, where x co ordinates remains the same but y co ordinates changes simultaneously.
Similarly in horizontal swipe/scroll, mobile application on device is moved from left to right Or right to left, where x co-ordinates changes but y co-ordinates remains the same.
Note: In this Tutorial we will be take the example of Flipkart moble application to understand in depth and inspect its locator.
How to perform Vertical And Horizontal swipe/scroll in Appium

1 ) Vertical Scrolling: As we discussed above what is vertical scrolling, now we will discuss, how can we perform through Appium, Below is the code for vertical scrolling in appium.
TouchAction  action =new TouchAction(driver);
Dimension size	=driver.manage().window().getSize();
int width=size.width;
int height=size.height;
int middleOfX=width/2;
int startYCoordinate= (int)(height*.7);
int endYCoordinate= (int)(height*.2);

action.press(PointOption.point(middleOfX, startYCoordinate))
.waitAction(WaitOptions.waitOptions(Duration.ofSeconds(2)))
.moveTo(PointOption.point(middleOfX, endYCoordinate)).release().perform();
Code Description:(Vertical Scrolling)
Step 1) We have created the object of TouchAction by passing driver as a parameter.
TouchAction action =new TouchAction(adriver);
Step 2) Get the size of the mobile application window and extract its height and width and store it in a variable.
Dimension size =driver.manage().window().getSize();
int width=size.width;
int height=size.height;
Step 3) Now get the x co-ordinates of the middle of mobile application and store it in a variable by dividing the width by 2.
int middleOfX=width/2;
Step 4) Now take the start y co ordinate and end y co ordinate from where the swipe/scroll is to be
int startYCoordinate= (int)(height.7);
int endYCoordinate= (int)(height.2);
Step 5) Now press the element from starting element taking (x,y) co ordinate and wait for 2 seconds and then move to the destination element by (x,y) co ordinate.
action.press(PointOption.point(middleOfX, startYCoordinate))
.waitAction(WaitOptions.waitOptions(Duration.ofSeconds(2)))
.moveTo(PointOption.point(middleOfX, endYCoordinate)).release().perform();
How to perform Horizontal Swipe/Scroll in Appium?
2) Horizontal Scrolling: we have dicussed the horizontal scrolling above, now lets perform horizontal scrolling in appium.
List<AndroidElement> e=adriver.findElements(MobileBy.AndroidUIAutomator("new UiSelector().resourceId(\"com.flipkart.android:id/banner_image\")"));
AndroidElement firdelement=e.get(0);
AndroidElement secondElement=e.get(1);
AndroidElement thirdElement=e.get(2);

int midOfY =thirdElement.getLocation().y +(thirdElement.getSize().height/2);
int fromXLocation=thirdElement.getLocation().x;
int toXLocation=firdelement.getLocation().x;

TouchAction  action =new TouchAction(adriver);
action.press(PointOption.point(fromXLocation, midOfY))
.waitAction(WaitOptions.waitOptions(Duration.ofSeconds(3)))
.moveTo(PointOption.point(toXLocation, midOfY))
.release()
.perform();
Code Description:(Horizontal Scrolling)
Step 1) Firstly inspect the elements of banner image at the top (as they all have common attribute value, so take all element on list.
List e=adriver.findElements(MobileBy.AndroidUIAutomator(“new UiSelector().resourceId(\”com.flipkart.android:id/banner_image\”)”));
Step 2) Get all the 3 android elements by their index.
AndroidElement firdelement=e.get(0);
// AndroidElement secondElement=e.get(1);
AndroidElement thirdElement=e.get(2);
Step 3) Now get the y co-ordinates till the mid of the image element by adding the location of y and half the size of image,
int midOfY =thirdElement.getLocation().y +(thirdElement.getSize().height/2);
Step 4) Now get the x coordinates of the element from which the swipe to be performed and the x coordinates to which the swipe is drived.
int fromXLocation=thirdElement.getLocation().x;
int toXLocation=firdelement.getLocation().x;
Step 5) Now press the element from starting element taking (x,y) co ordinate and wait for 2 seconds and then move to the destination element by (x,y) co ordinate.
action.press(PointOption.point(fromXLocation, midOfY))
.waitAction(WaitOptions.waitOptions(Duration.ofSeconds(2)))
.moveTo(PointOption.point(toXLocation, midOfY))
.release()
.perform();
How to Perform Horizontal Swipe/Scroll in Appium | Touch Action| Android device
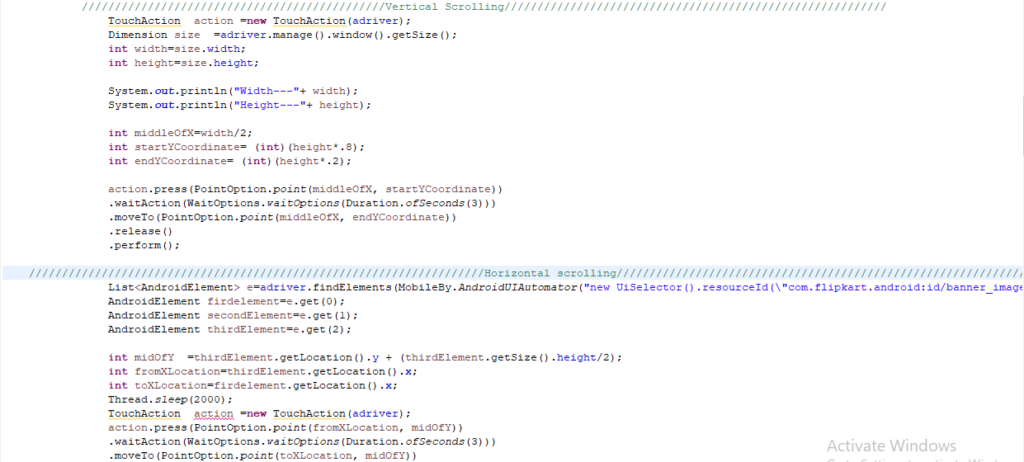
Code in Eclipse will look as below screenshot:
Conclusion:
So in this tutorial we have learned to perform vertical and horizontal scrolling in appium using the touch action with multiple commands.
TouchAction : Tap And longPress in Appium
Previous Topic, In this tutorial we will learn touch Action commands like “TouchAction : Tap And longpress in Appium“
How to perform TouchAction : Tap And longpress in Appium?
In Appium client library, Touch Action is a class which extends Object class and implements PerformsAction Interface.

Touch action class has multiple events to perfrom actions on mobile devices like tap, release, press, longpress,cancel, moveto,wait etc.
In this tutorial we will be performing Tap, Press and long press on mobile application through appium client library, let start now.
1 ) Tap: In mobile application Tap method works same as click method in UI. We provide the co ordinates of x and y as a parameter to point on the element where the tap for an element is to be performed.
We call PointOption.point() method and pass in tap method to perform tap operation. Find below the code.
//defining the locator
AndroidElement e =driver.findElementByXPath(" ");

//Finding the x and y coordinates
int x=e.getLocation().x;
int y=e.getLocation().y;

//Creating the object of Touch Action
TouchAction  action =new TouchAction(adriver);

//Calling the tap method and passing the x and y co ordinates
action.tap(PointOption.point(x, y)).perform();
So on the above code we have firstly created or defined the locator of the mobile element , after that we extracted the x and y co ordinates of the element.
Finally we have created the object of Touch Action and called the tap method providing the x and y co-ordinates using PointOption.point(x,y) method followed by performed method.
How to perfrom Press and LongPress in Appium?
2 ) Press: Press action in mobile application is, pressing of element to a certain time period or wait, so that the element could perform an event. For ex sometimes in an application we come up with scenario where pressing on any element displays mutiple listing or changes the UI of an application or an event gets triggered.
Syntex of Press without wait is below:
//defining the locator
AndroidElement e =driver.findElementByXPath(" ");

//Finding the x and y coordinates
int x=e.getLocation().x;
int y=e.getLocation().y;

//Creating the object of Touch Action
TouchAction  action =new TouchAction(adriver);

//Calling the press method and passing the x and y co ordinates
action.press(PointOption.point(x, y)).perform();
Syntex of Press with wait command and release the press is below:
action.press(PointOption.point(x, y)).waitAction(WaitOptions.waitOptions(Duration.ofSeconds(2))).release().perform();In the above code press with wait command, we firstly press an element in mobile application and then provide a wait of 2 seconds using WaitOptions.waitOptions() method and after 2 second release the press from the element.
3 ) LongPress: Longpress method is just simply pressing the UI element for a longer time span so that the specific element can trigger an even and perform action.
The longPress works same as press method with wait for certain seconds, the difference is that the longpress is a customised method where the wait is not implicitly defined.
Syntex for the LongPress method is below:
//defining the locator
AndroidElement e =driver.findElementByXPath(" ");

//Finding the x and y coordinates
int x=e.getLocation().x;
int y=e.getLocation().y;

//Creating the object of Touch Action
TouchAction  action =new TouchAction(adriver);

//Calling the longPress method and passing the x and y co ordinates
action.longPress(PointOption.point(x, y)).perform();
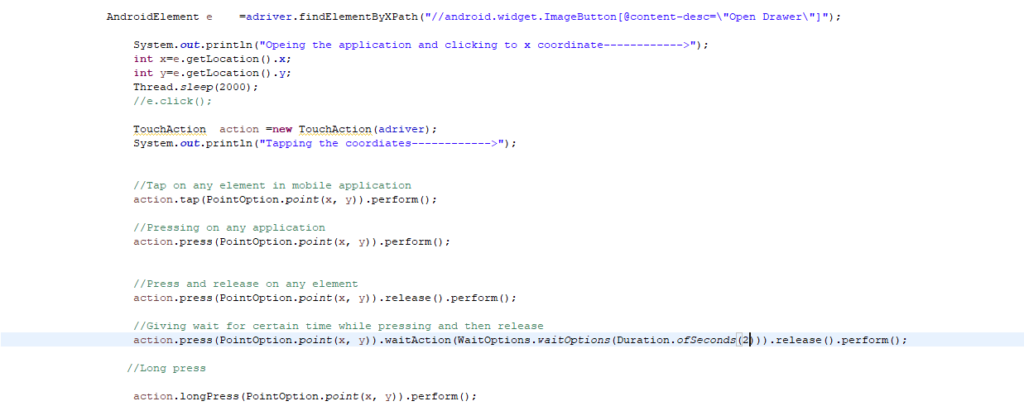
So using the above code, we are good to perform longpress on mobile application to any element with the help of x and y co-ordinates. The code in the eclipse will look like as below screenshot.
Conclusion:
So we have come with the final conclusion that, we can perform Touch Action on the mobile android device with events like tap, press, long press with the above mentioned code and syntex using Touch Action class.