Home » Articles posted by code2test.com (Page 9)
Author Archives: code2test.com
Maven Installation in Eclipse
Installation of maven can be performed through command line along with through eclipse IDE, in this tutorial we will learn to install maven through Eclipse ide.
Steps to install Maven through Eclipse are below.
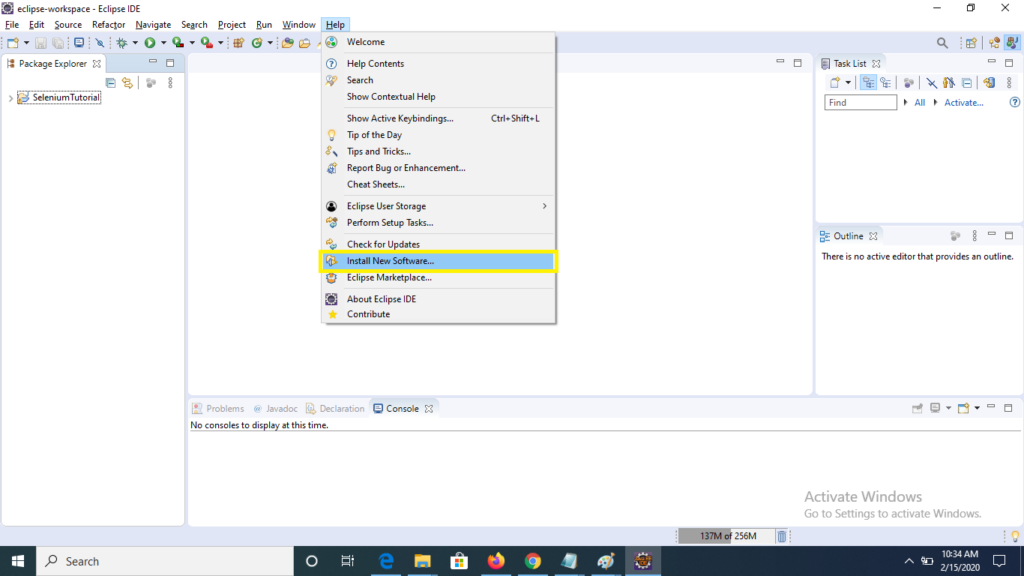
1) Initially click to Help menu on the top of eclipse ide and select “Install New Software” option from the list.
2) Now click to Add button on the top right after click to new will open.

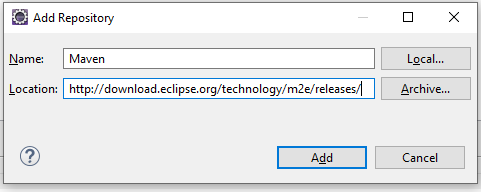
3) A new window “Add Repository ” will get open, now type “Maven” under name text box and enter ” http://download.eclipse.org/technology/m2e/releases/ ” under location text box, click to add.
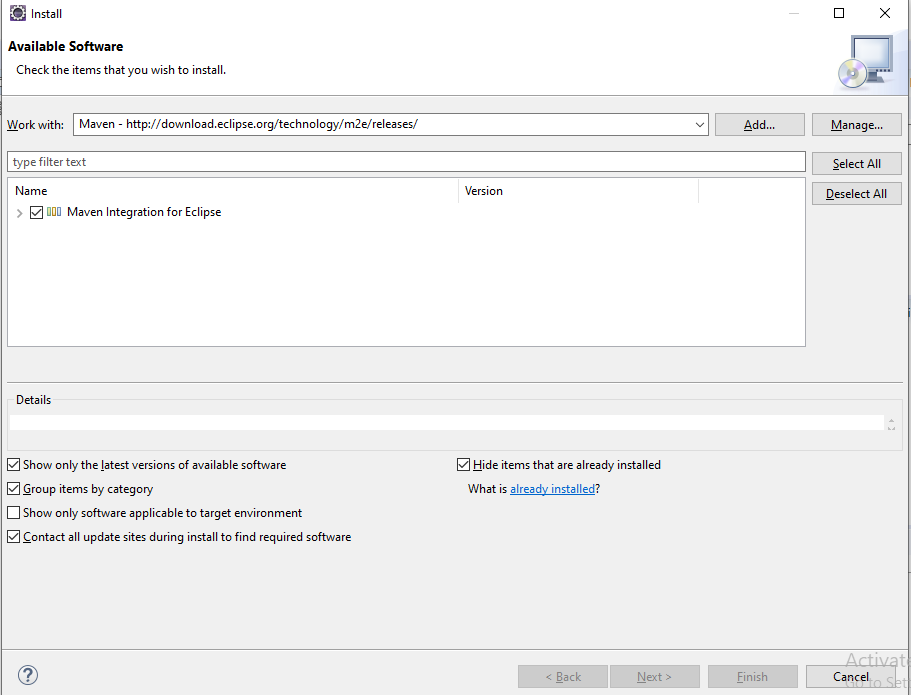
4) Now check the check box for “Maven Integration for Eclipse” and click to Next button on the bottom.
5) Now process with start for download and will take few minute.
6) Now a window displaying the default setting will be displayed, just click to Next button.
7) Now next window is of “Review License” will appear, this will contain terms and condition of the agreement, accept the license and click to “Finish” button.
8) Window for the installation of software will appear and will take few minutes, will till it completes.
9) A window for Software updates will appear, asking to start eclipse click to Yes to start system it will help to reflect the changes performed to your eclipse.
So, Through this process you can install maven to your eclipse IDE, In next tutorial we will learn to install maven through Command Line.
What is Maven and Why Maven?
Maven: is basically a build tool that helps developers a complete build lifecycle. Maven provided a solution to build multiple project, deploy those project and manage multiple jars with in a single structured environment.
The Maven provide a structure to a project for different build which can be reusable, structured and easy manageable. Maven is a project management tool which is basically based on POM (Project Object Model),which helps in maintaining a build, dependency of multiple jars and documentation, it is advanced than ANT (which is again a build tool).
Problem when not using maven
- Multiple jar management: In a project there are multiple jars that are used for different work or different activity, searching every jar, downloading and building it to every project becomes a huge task.
- Building and deployment: the build related task for ex :build report, execution of junit methods and library are tough and deployment is not easy manageable.
- Project structure: Correct structure must be initiated at initial level, if project structure is not well defined then the project will not be executable.
Maven helps in managing below:
- Builds
- Documentation
- Reporting
- Dependencies
- Releases
Maven Central Repository:
Maven has its central repository https://mvnrepository.com/, when the dependencies is been defined in pom.xml, maven first looks all its jars in local user at .M2 folder if the jars are not available in .M2 folder it downloads all the jars from the central repository, where all the jars are available for download.

Home Page
Code2Test provides the best tutorials and complete solution in terms of Automation Testing and language, here you find lot of contents and tutorials on different technology which are on trends and been used by big company for their QA business. Code2Test makes you learn with fun through sharing code base, live example,screenshot on code and vedio to make the learing experience go broad and in depth.
We Provide in depth knowledge
The tutorials available have in depth knowledge from the base to advance level, so that the learner can get a proper command on the topic covered and can expand his/her knowledge to a broader level .
Code Sharing with every topic with live example
After the advance level explanation of every topic, we share the code base so that learner can run a code practically had have hand on experience on the topic so that the doubts can be cleared.
Live Examples with each topic
There is Live examples covered with scenarios of related topic, so that the related topics can be more clear and applied on real world where its applicable.
Webdriver-Browser Commands
Webdriver browser commands are those commands in selenium webdriver from where we can perform any browser operation with defined set of method.
The Method which is called using (.) from reference variable of browser object (can be any chrome,firefox, ie etc) have method with parameter and it return with particular return type or void(no return type).
Lets discuss the Webdriver-Browser commands in details.
1) get command: This method loads a new URL or Webpage on the existing web browser and return void (no return type).The method is displayed void.
Command– driver.get();
Code: driver.get(“http://www.google.com”); String URL = “https://code2test.com”;
driver.get(URL);
2) getTitle(): In Webdriver , the get title retrieves the title of the current web page as it don not accept any parameter and returns a string.
Code: driver. getTitle(“http://www.google.com”);
3) getCurrentUrl(): This method return String, it basically retrives the Url of the current web page treats it as a string .
Code: String CurrentUrl = driver.getCurrentUrl();
4) getPageSource(): In Webdriver, getPageSource() method helps to extract the sourcecode of your current web page present in browser.
Code: driver. getSourceCode();
5) close():
Blogs
Blocks in all technology
Object identification through css in selenium
CSS: It stands for “Cascading Style Sheets”, the css is provided in Dom structure for styling, alignment,colouring etc. helps to style a web page. Due to its mechanism it provides a unique approach for object identification in test automation in selenium along with other tools.
Advantage of using Css selector:
- Faster than xpath
- most browser support
- its concise than xpath
- ease to implement
Let discuss the Css locator in depth.
- name Attribute: On Dom structure name attribute is mostly used to represent an element on webpage. In Css name attribute is located using below syntax: css=tagName[name=’value’]
For css locator for the Email text box in facebook page is:
input[name=’email’]
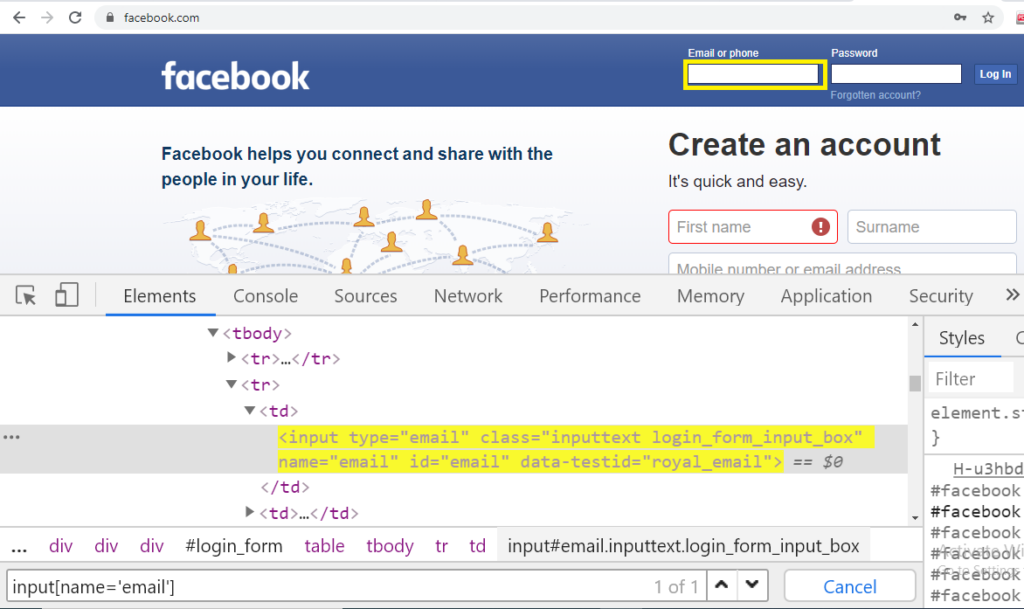
2) class Attribute: In Css dot (.) represents the class attribute.So in Css class attribute represents by the syntax: css=td.attributeValue.
Css locator for the Emai or phone text in facebook page is:
td.html7magic
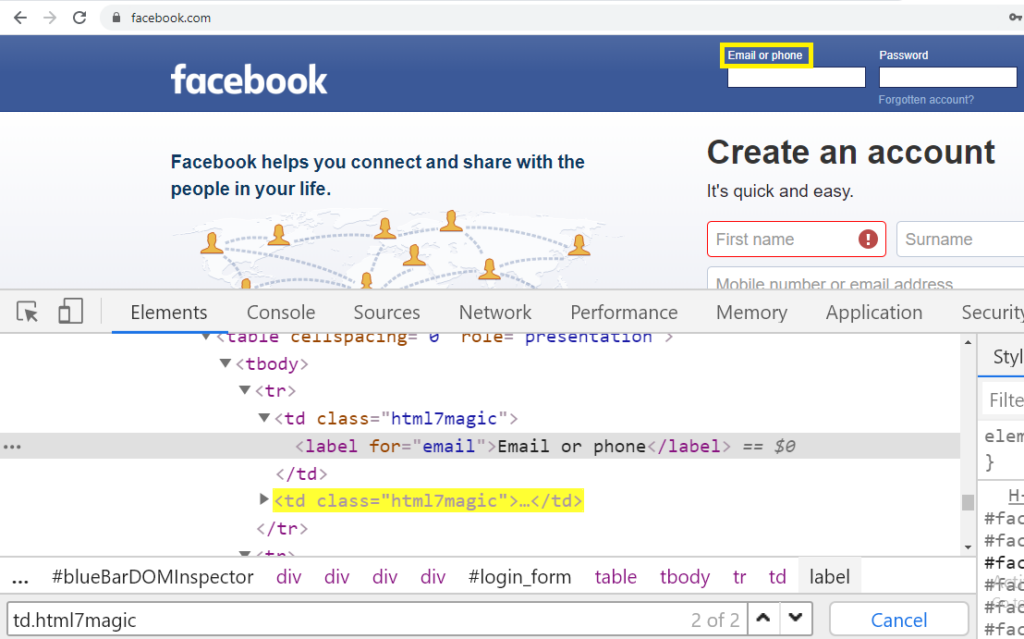
Note: The Css locator for class locator will not work if the ending tag for an attribute is not available and also will not work if there is space in the text of value of and attribute.
3) id attribute: In Css selector Hash (#) represents the id attribute.The basic syntax for id attribute in Css is-> tagName#attributeValue
Css locator for the Emai or phone text in facebook page is using id is:
input#email
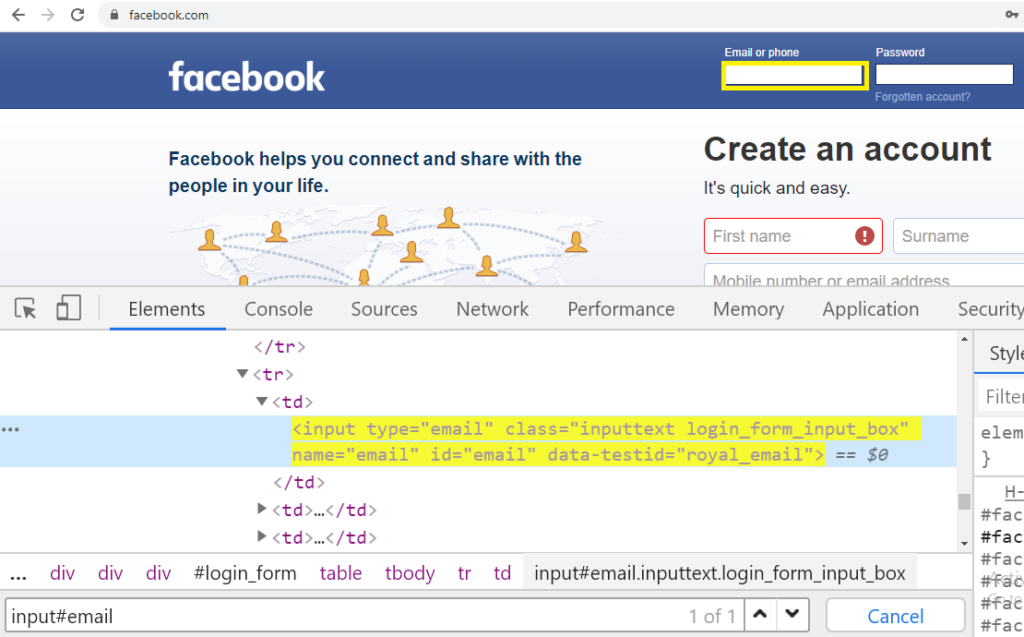
Functions used with Css Locator are below:
1) contains(): “ * ” symbol represents contains function in css locator.This function helps the css locator to locate the element having particular string available in any of attribute value defined.The syntax for contains function is tagName[attributeName*=’attributeValue’]
Css locator for the Emai text Box in facebook page using contains :
input[id*=’em’]
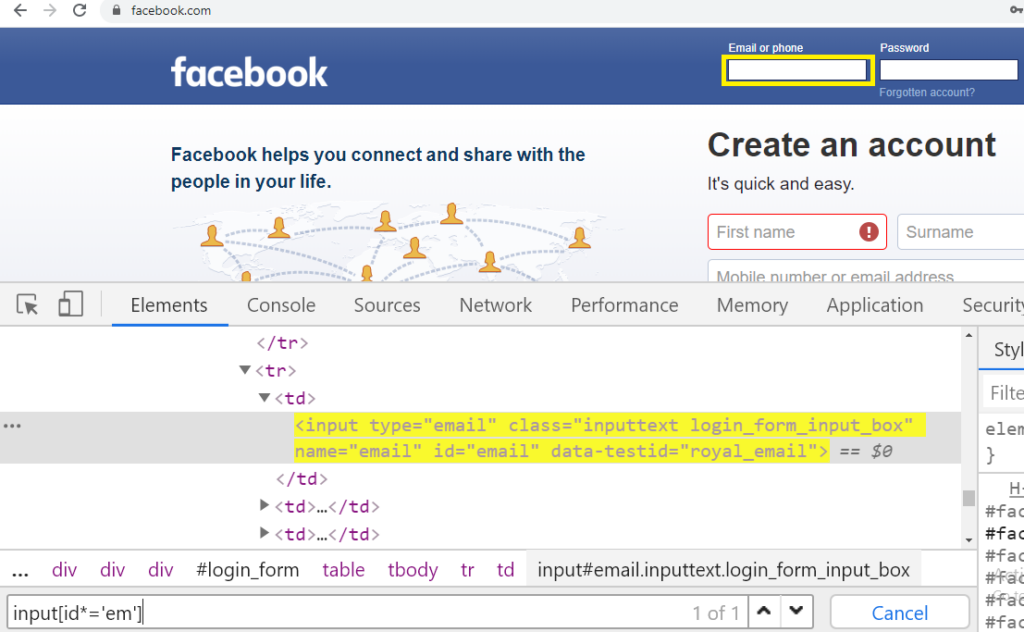
2) starts-with(): The symbol (^) represents starts-with in css locator. Suppose in a Web page we want to locate Email whose type attribute is not static, its dynamic, the start 3 text is always same but the next part is dynamic and changes every time the page gets refresh, so in this case with the help of static string we can locate the element in css locator using starts-with ().The syntax is tagName[attributeName^=’attributeValue’]
Css locator for the password text Box in facebook page starts-with :
input[type^=’pas’]
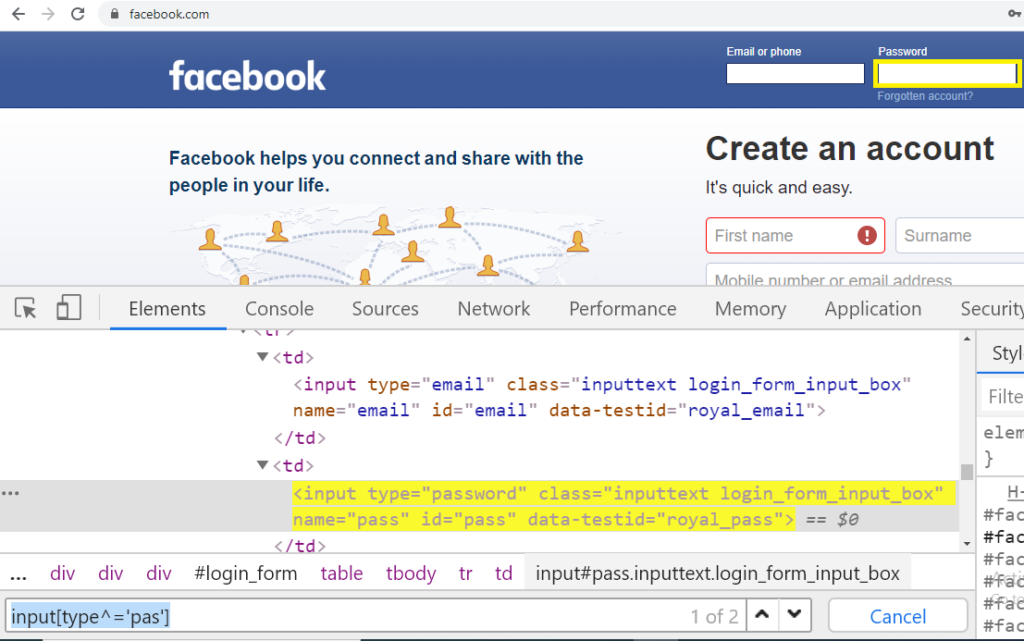
3) ends-with: The symbol ($) represents ends-with in css locator. Suppose in a Web page we want to locate password text box whose type attribute is not static, its dynamic, the last 3 text is always same but the first part is dynamic and changes every time the page gets refresh, so in this case with the help of static string we can locate the element in css locator using starts-with ().The syntax is tagName[attributeName$=’attributeValue’]
Css locator for the password text Box in facebook page starts-with :
input[type$=’word’]
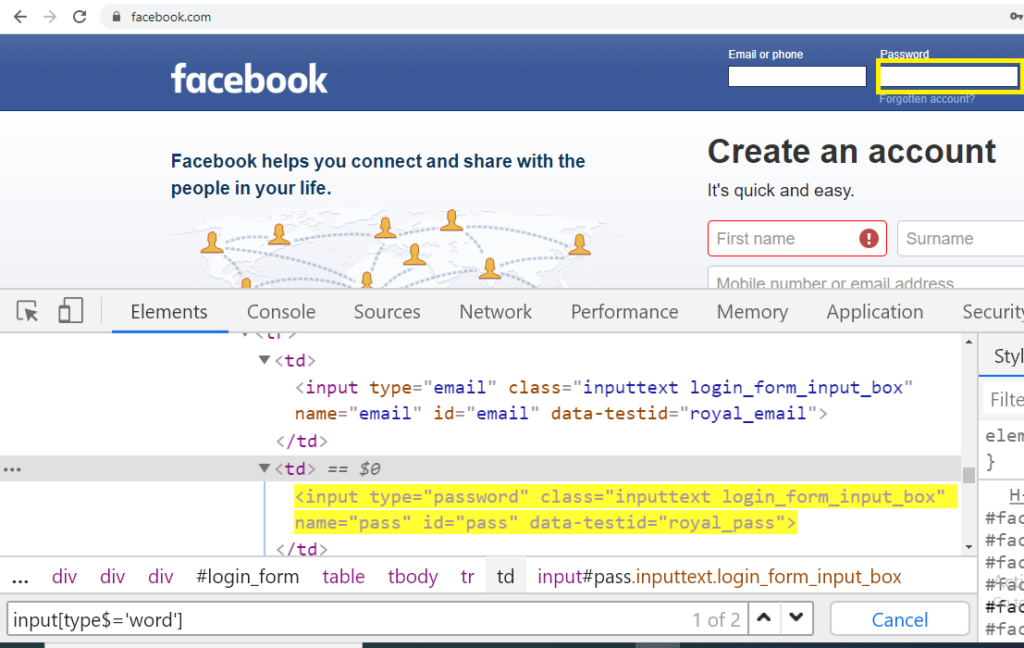
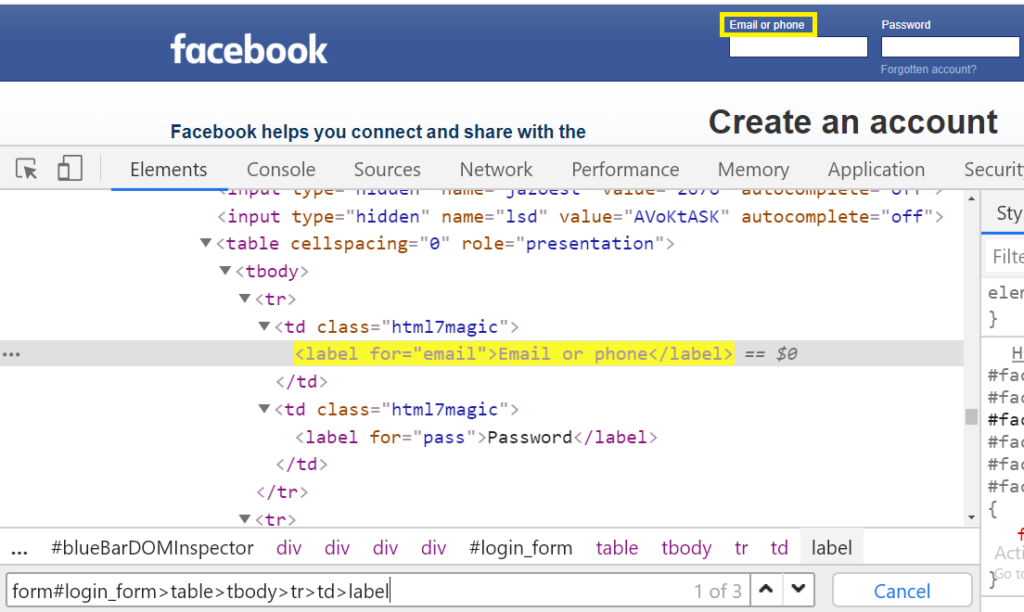
Object identification for parent child hierarchy using Css locator:
parent immediate child: (>) represents parent immediate child relationship. In similar condition for xpath (/) is used to represent direct or immediate child for ex:
XPATH: html/body/span/input
CSS : html >body> Span > input
Css locator forEmail or phone text in facebook page is below :
form#login_form>table>tbody>tr>td>label
How to Select value from dropdown using selenium
Previous topic, In this tutorial we will learn select value from dropdown & multiple selection using selenium webdriver.
Dropdown List box in selenium Webdriver can be handled using Select class. Select class in selenium provided the provision to select and deselect the options from the listbox using three approaches they are: by index , by value and Visible Text, Lets discuss the different approached of selection of option from drop down list box one by on.
How to select value from dropdown using selenium webdriver?
To understand, it lets take a scenario:
- Open the url “www.facebook.com“
- Under Create my option enter First name
- Enter email
- Enter password
- Under Birthday list box-> select date
- Birthday list box-> select month
- Birthday list box-> select year
1) selectByIndex: We can select the option from the list box on the basis of Index (starts with “0”). To provide the index for a list box selection, firstly we create the object of Select class and pass the web element as a parameter. Below is the syntax.
Select selectData=new Select(WebElement );
selectData.selectByIndex(int);
Code for the above scenario with explanation for each line of code in comments:
  // Create object of chrome driver
     WebDriver driver =  new ChromeDriver();
     Thread.sleep(3000);
    driver.get("https://www.facebook.com/");


          Thread.sleep(3000);

          // Locate the element for first name and enter "Rahul" on text box
           driver.findElement(By.xpath("//input[@name='firstname']")).sendKeys("Rahul");

         // Locate the element for email and enter "rahul@gmail.com" on text box
           driver.findElement(By.xpath("//input[@name='reg_email__']")).sendKeys("rahul@gmail.com");

        // Locate the element for password and enter "Rahul123" on text box
           driver.findElement(By.xpath("//input[@name='reg_passwd__']")).sendKeys("Rahul123");

           // Locate the element for day list box
           WebElement  date =driver.findElement(By.xpath("//select[@name='birthday_day']"));

           //Create the object for Select class and pass Webelement as parameter
           Select selectData=new Select(date);

           //Select 5 index from the date list box
           selectData.selectByIndex(5);

        // Locate the element for month list box
           WebElement  month =driver.findElement(By.xpath("//select[@name='birthday_month']"));

         //Create the object for Select class and pass Webelement as parameter
           Select selectMonth =new Select(month);

         //Select 5 index from the month list box
           selectMonth.selectByIndex(5);


        // Locate the element for year list box
           WebElement  Year =driver.findElement(By.xpath("//select[@name='birthday_year']"));

         //Create the object for Select class and pass Webelement as parameter
           Select selectYear =new Select(Year);

         //Select 5 index from the month list box
           selectYear.selectByIndex(5);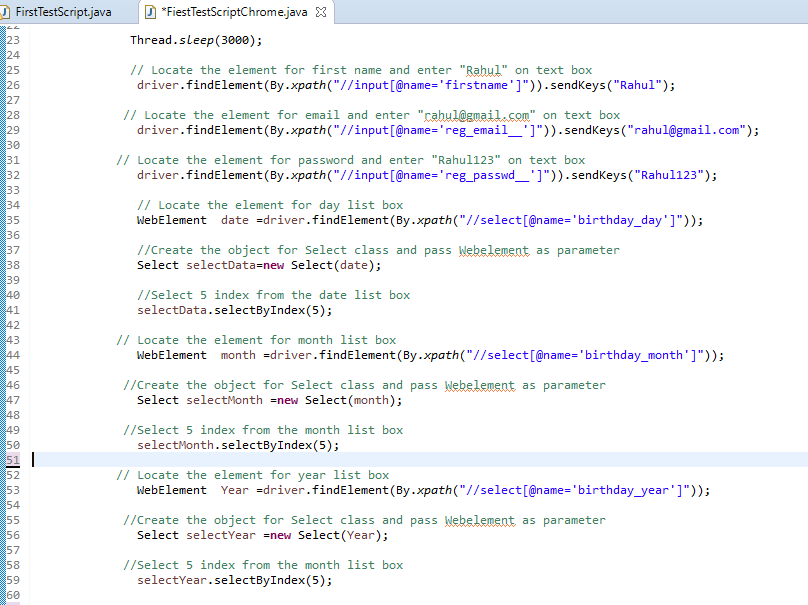
2) selectByValue: Another way of selecting the options from dropdown list box is by providing the value under option tag. refer screenshot for reference below.Value highlighted in yellow
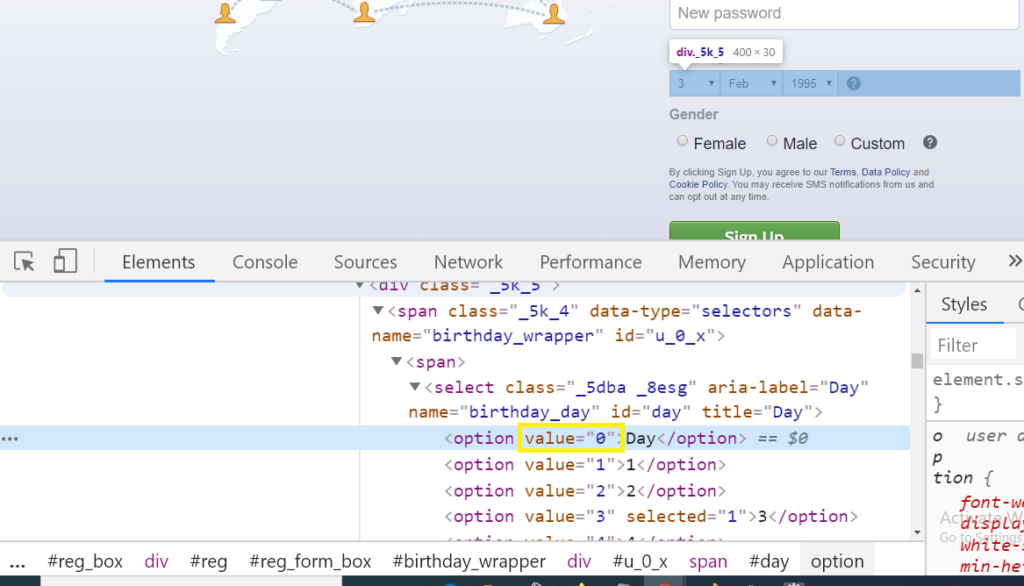
The syntaxfor the selectByValue is:
Select value=new Select(date);
value.selectByValue("String");
Code of the above scenario as given below:
//System property of the Chrome driver
               System.setProperty("webdriver.chrome.driver","C:\Users\XXXX\Desktop\Eclipse_Installer\GeckoDriver\chromedriver.exe");
 // Create oject of chrome driver
          WebDriver driver =  new ChromeDriver();
          Thread.sleep(3000);

          driver.get("https://www.facebook.com/");

          driver.manage().window().maximize();
          Thread.sleep(3000);

          // Locate the element for first name and enter "Rahul" on text box
           driver.findElement(By.xpath("//input[@name='firstname']")).sendKeys("Rahul");

         // Locate the element for email and enter "rahul@gmail.com" on text box
           driver.findElement(By.xpath("//input[@name='reg_email__']")).sendKeys("rahul@gmail.com");

        // Locate the element for password and enter "Rahul123" on text box
           driver.findElement(By.xpath("//input[@name='reg_passwd__']")).sendKeys("Rahul123");

           // Locate the element for day list box
           WebElement  date =driver.findElement(By.xpath("//select[@name='birthday_day']"));

           //Create the object for Select class and pass Webelement as parameter
           Select selectData=new Select(date);

           //Select 5 as value from the date list box
           selectData.selectByValue("5");

        // Locate the element for month list box
           WebElement  month =driver.findElement(By.xpath("//select[@name='birthday_month']"));

         //Create the object for Select class and pass Webelement as parameter
           Select selectMonth =new Select(month);

         //Select 5 as value from the month list box
           selectMonth.selectByValue("5");

        // Locate the element for year list box
           WebElement  Year =driver.findElement(By.xpath("//select[@name='birthday_year']"));

         //Create the object for Select class and pass Webelement as parameter
           Select selectYear =new Select(Year);

         //Select 2015 as value from the month list box
           selectYear.selectByValue("2015");
3) selectByVisibleText: Last approach for selecting the options from dropdown list box is using the Text on the list box. By this approach we can directly select he option on entering the text as displayed in web application. Syntax is mentioned below:
 Select text=new Select(month);
 text.selectByVisibleText("String");
Code of the above scenario using selectByVisibleText as given below:
//System property of the Chrome driver
               System.setProperty("webdriver.chrome.driver","C:\Users\XXXX\Desktop\Eclipse_Installer\GeckoDriver\chromedriver.exe");

// Create object of chrome driver
  WebDriver driver =  new ChromeDriver();
  Thread.sleep(3000);
driver.get("https://www.facebook.com/");
driver.manage().window().maximize();
Thread.sleep(3000);

 // Locate the element for first name and enter "Rahul" on text box
           driver.findElement(By.xpath("//input[@name='firstname']")).sendKeys("Rahul");

// Locate the element for email and enter "rahul@gmail.com" on text box
           driver.findElement(By.xpath("//input[@name='reg_email__']")).sendKeys("rahul@gmail.com");

 // Locate the element for password and enter "Rahul123" on text box
           driver.findElement(By.xpath("//input[@name='reg_passwd__']")).sendKeys("Rahul123");

           // Locate the element for day list box
           WebElement  date =driver.findElement(By.xpath("//select[@name='birthday_day']"));

           //Create the object for Select class and pass Webelement as parameter
           Select selectData=new Select(date);

           //Select 5 as Text from the date list box
           selectData.selectByVisibleText("5");

        // Locate the element for month list box
           WebElement  month =driver.findElement(By.xpath("//select[@name='birthday_month']"));

//Create the object for Select class and pass Webelement as parameter
 Select selectMonth =new Select(month);

 //Select May as text from the month list box
  selectMonth.selectByVisibleText("May");

 // Locate the element for year list box
WebElement  Year =driver.findElement(By.xpath("//select[@name='birthday_year']"));
 //Create the object for Select class and pass Webelement as parameter
 Select selectYear =new Select(Year);
 //Select 2015 as text from the month list box
  selectYear.selectByVisibleText("2015");
This is the post for select value from dropdown and multiple value using selenium webdriver. if you have any query , feel free to comment
CheckBox & Radio button
CheckBox and Radio button both are handled in same way, it is generally can be handled by finding the locator and directly clicking on the element on Web Page but most of time it happens that the checkbox is by default checked and we need to verify and uncheck it or may be conditional check box need to be handled same in case of Radio button.
Lets discuss one by one in details.
CheckBox: To handle a check box, first we find its locator using any of the technique as discussed in previous topic (by id, name, xpath , css etc ) and directly click to the that element. But if the checkbox is already checked then in case we need to check by our test case whether it is checked or not.
For this we have a mehod which is isSelcted() , it return a boolean and according to it we can make condition either to check or uncheck. Let go to the coding part to get it more clear.
public Boolean Flag =false; //Define this globally after the class at class level
//Take all the element of checkbox in list
List checkBoxes = driver.findElements(By.xpath("//input[@name='firstname']"));

// This line will check whether the first check box is checked or unchecked and will return boolean
  Boolean  Flag = checkBoxes.get(0).isSelected();

// If the Boolean is true, it will check the second check box and come out of loop
          while(Flag){
            driver.findElements(By.xpath("//input[@name='firstname']")).get(1).click();
     Flag=false;

            }
Above code in eclipse will look like this at below in image

So the similar way we can handle the radio button on the web page.
Commands for WebElements
When we talk about WebElements, we talk about source code or HTML documentation of a Web page. Web Elements in the user interface are the elements that are due to the HTML tag or syntax that are written in Dom structure.These tags have starting and ending tag.
So to interact with these webElements, first we need to take webElements as a return type from any of webdriver method. Take the return type from the findElements method as below:
WebElement driver= driver.findElement(By.name(“Email”));
1) click: This method is used to click to the element in web page and returns void(no return type).Command for click is below:
WebElement driver1= driver.findElement(By.name(“XXXXX”));
driver1.click();
2) clear: This method clears the value from the web element for ex: any text present in the text field gets cleared after evoke clear method. Command for clear is displayed below.
WebElement driver1= driver.findElement(By.name(“Email”));
driver1.clear();
3) getAttribute: This method gives the value of the attribute name passed as a parameter and return a string. Command for clear is displayed below.
WebElement driver1= driver.findElement(By.name(“Email”));
driver1.getAttribute(“name”); //This will return Email as a string
4) getCssValue: This method will return the string and provide the value of the css attribute value.
WebElement driver1= driver.findElement(By.name(“Email”));
driver1.getCssValue(“background-border”);
5) getSize: This method will give you the size of the element and return you the Dimension object.
WebElement driver1= driver.findElement(By.name(“Email”));
driver1.getSize();
6) getLocation: This method do not required any parameter and provided the x and y co-ordinated and return the object of Point.
WebElement driver1= driver.findElement(By.name(“Email”));
Point coOrdinates =driver1.getLocation();
coOrdinates.x;
coOrdinates.y;
7) getText: This method provide the text of the element and return the object as String.
WebElement driver1= driver.findElement(By.name(“Email”));
String coOrdinates =driver1.getText();
8) Submit: This method submits the the web page for its a form type image its works same as click.
WebElement driver1= driver.findElement(By.name(“Email”));
driver1.submit();
9) isDisplayed: This method helps in getting the presence of web element on web page.This method do not accept any parameter and returns a Boolean.
WebElement driver1= driver.findElement(By.name(“Email”));
driver1.isDisplayed();
10) isEnabled: This method helps to know whether the element is Enabled or not and return Boolean as an Object.
WebElement driver1= driver.findElement(By.name(“Email”));
driver1.isEnabled();
11) isSelected: This method helps to know whether the element in web page is selected or not . For example a check box is checked or not and return Boolean as Object.
WebElement driver1= driver.findElement(By.name(“Email”));
driver1.isSelected();
SqlServer Connection through JDBC in Selenium
Previous Topic, In this tutorial we are going to learn SqlServer Connection through JDBC in Selenium but before starting with connecting database we need to understand what is JDBC?
JDBC: JDBC stands for (java database connectivity) is a java API that provides methods which helps in creating the connection with the database. that helps in inserting the query, receiving the result and evaluating the outcome on the basis of actual and expected result.
Use of JDBC connection with database in selenium Script?
Once we are connected with database through jdbc connection, we are able access all the data available in database and perform any action as per requirement.
Suppose we execute any test case through selenium webdriver that created a profile in Web application and stores data is database, so if we are connected with the database we can check whether the saved data is safely stored or created in database or not.
How to perform SqlServer Connection through JDBC in Selenium?
Steps to create connection with Sql server using JDBC connection are below:
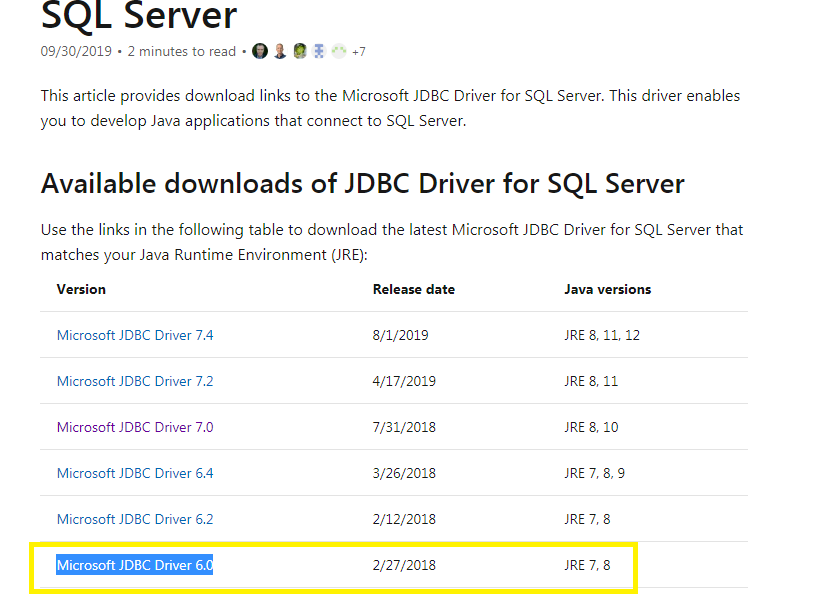
Step1) Download the SqlServer driver from this location location-> https://docs.microsoft.com/en-us/sql/connect/jdbc/download-microsoft-jdbc-driver-for-sql-server?view=sql-server-ver15 and click to any updated version (we are downloading Microsoft JDBC Driver 6.0 version)
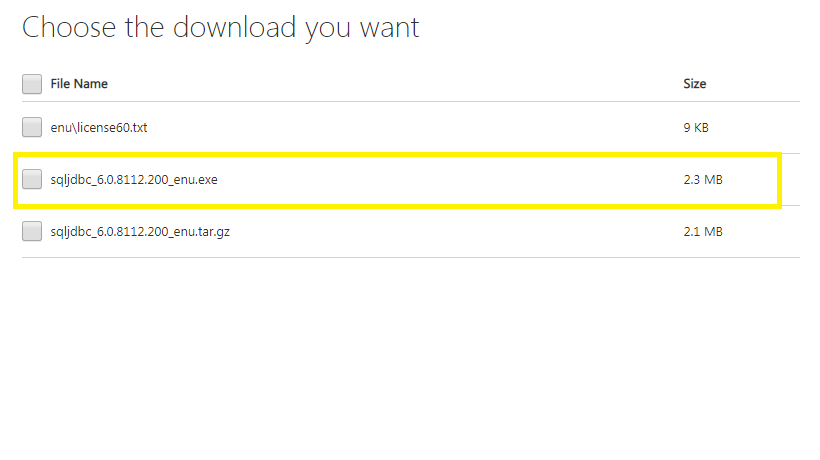
Step 2) Under Download window select sqlJdbc.exe file and click to download.
Step 3) After download the .exe file double click and unzip it as below in screenshot

Step 4) Copy the JDBC driver folder to any of preferred location. Now open the folder and open the x64 in auth folder ex -> C:\Workspace\Microsoft JDBC Driver 6.0 for SQL Server\sqljdbc_6.0\enu\auth\x64 and copy the .dll file

Step 5) Copy the .dll file and paste under bin folder to Jre and jdk folder of you java location , generally its in (Important Step)
for JDK->C:\Program Files\Java\jdk1.8.0_102\bin
for JRE->C:\Program Files\Java\jre1.8.0_102\bin
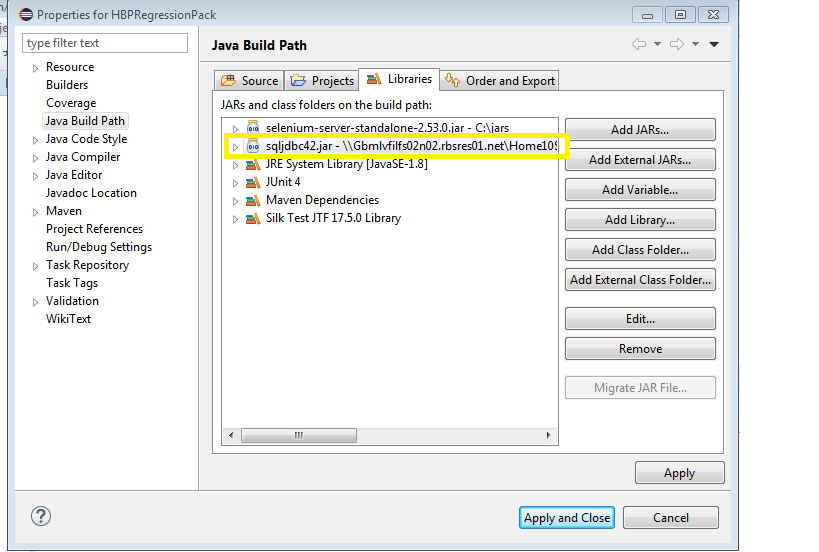
Step 6) Go to eclipse and right click to your project and open configure build path. Under libraries add external jar, which is under the JDBC driver folder . Path for the jar -> Microsoft JDBC Driver 6.0 for SQL Server->sqljdbc_6.0->enu->jre8 and add the jar.(refer screenshot)
Step 7) Now open your SQLServer Database, On login page or connection page always select authentication as ->Window Authentication (on selecting this you don’t have to provide the credentials under your script ) if option not available we will pass the credentials on Test case.
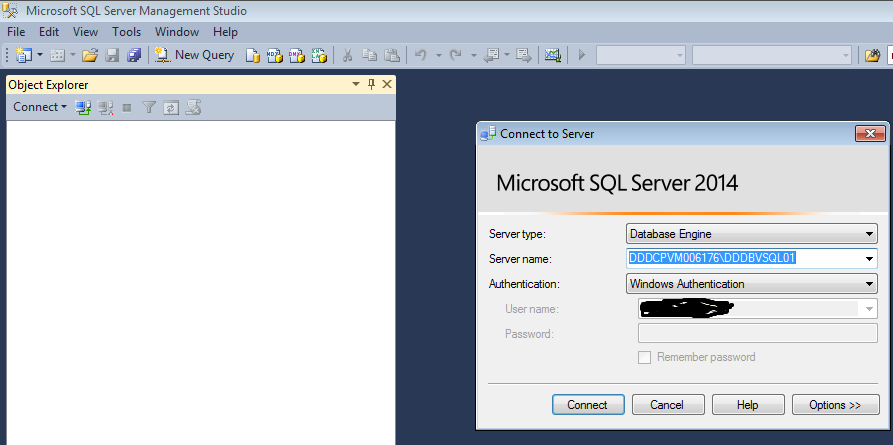
Step 8) We are now done with all the setting stuffs, open the eclipse create a project, Inside the package under class copy the below code.Each Line in code have explanations in comment.
package com.sanity.UserTest;
import java.sql.DriverManager;
 import java.sql.PreparedStatement;
 import java.sql.ResultSet;
public class DatabseConnection {
public ResultSet databaseConnection() {

    java.sql.Connection conn =null;
    ResultSet result = null;
    try {

String url="jdbc:sqlserver://localHost:1433;"+ "databaseName=xxxxxxxxxxx; integratedSecurity=true;";

String username ="xxxxx\\XXXXXXXXXX";
String password="XXXXX";
//Initialize Sqldriver instance
  Class.forName("com.microsoft.sqlserver.jdbc.SQLServerDriver");

 // Creating the connection providing URL and username password
   conn = DriverManager.getConnection(url, username, password);

 //Checking for the connection( returns boolean false if connected)
   System.out.println(conn.isClosed());

 // For Print
    System.out.println("Data values getting displayed below");
 // Sql Query to dispaly all the values under xxxxxxxx table
    String query = "SELECT * from XXXXXXXXX";
 // Providing the query under prepareStatement parameter
    PreparedStatement pst=conn.prepareStatement(query);

 //Command to execute query and capturing all the result under Result set
    result=pst.executeQuery();
     while(result.next()) {

  //Printing the 1 column 2 column and 6 column of the table
     System.out.println(result.getString(1)+ "   "+ result.getString(2) +"   " +result.getString(6));
            }

    return result;

            } catch (Exception e) {
            e.printStackTrace();
            }finally {

            }

    return result;


}}
Step 9) Now provide your server name ,database name, Username, Password after the right click to the .java file and run the program, you will see that all the values of the column are getting displayed under the console. Code in the eclipse displays in the below ways.
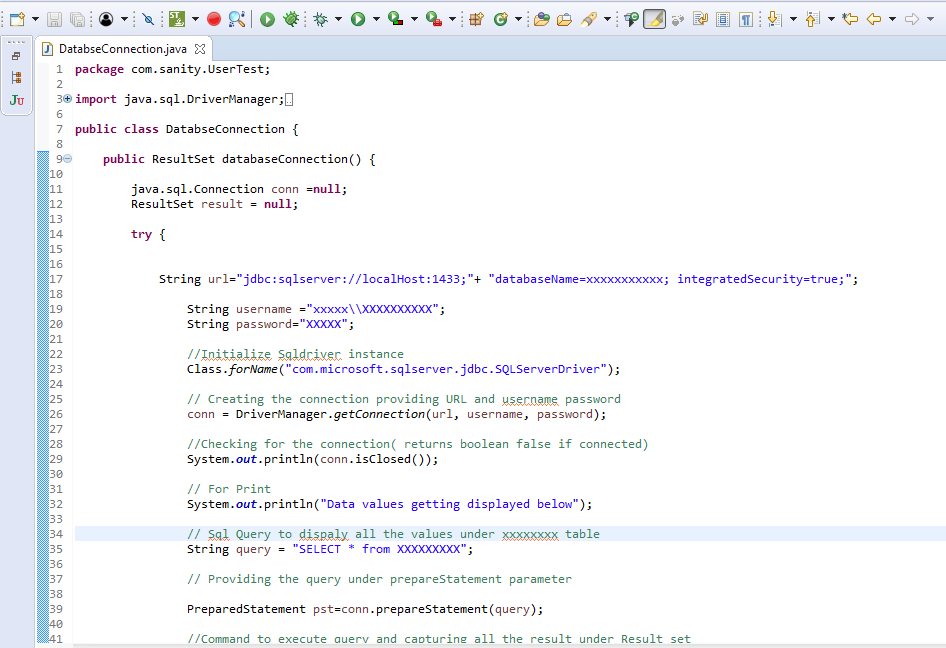
Code Description:
Step 1) Define global variable for the connection and ResultSet
java.sql.Connection conn =null;
ResultSet result = null;
Step 2) Provide the connection strings containing the host name along with database name.
String url=”jdbc:sqlserver://localHost:1433;”+ “databaseName=xxxxxxxxxxx; integratedSecurity=true;”;
Step 3) Provide the database credentials
String username =”xxxxx\XXXXXXXXXX”;
String password=”XXXXX”;
Step 4) This commands is import step, it initializes the driver instance.
Class.forName(“com.microsoft.sqlserver.jdbc.SQLServerDriver”);
Step 5) Creating the connection using credentials and Url instance
conn = DriverManager.getConnection(url, username, password);
Step 6) This step will return boolean and get to know that the connection is up or not. Returns you false if connection is done.
System.out.println(conn.isClosed());
Step 7) General select query
String query = “SELECT * from XXXXXXXXX”;
Step 8) By this command your query if been fetched and executed to database internally and result is captured .
PreparedStatement pst=conn.prepareStatement(query); //Command to execute query and capturing all the result under Result set
result=pst.executeQuery();
Step 9) The statement will move to next every time and with display the data of 1,2 and 6 columns.
while(result.next()) { //Printing the 1 column 2 column and 6 column of the table
System.out.println(result.getString(1)+ ” “+ result.getString(2) +” ” +result.getString(6));
}
Conclusion:
So will above tutorial we can conclude that, we can get the data from the database connection for sqlserver and use the data in a form of String to the selenium automation script, and execute script on different sets of data.