Home » Articles posted by code2test.com (Page 8)
Author Archives: code2test.com
How to select date from DatePicker calender
Previous Topic, In this tutorial we will learn How to select date from DatePicker calender, date from date picker calendar step by step.
How to select date from DatePicker calender using selenium?
Date Picker in just a selection of date from calendar by selecting a number.
On selecting the number (date), the date appears as text field in DD/MM/YYYY format or other format defined in code.
To understand date picker lets consider a scenario and code for date picker.
- Open a web application of Bus Services https://utconline.uk.gov.in/Home.aspx
- Click to Journey date
- select a date from calendar from generic method
Complete Code for the above scenario:
public static void datePicker(String enterDate, WebDriver driver) throws ParseException {

Date current = new Date();
SimpleDateFormat dFormat = new SimpleDateFormat("d/MM/yyyy");
try {
Date dateToSelect = dFormat.parse(enterDate);

String day = new SimpleDateFormat("d").format(dateToSelect);
String month = new SimpleDateFormat("MMMM").format(dateToSelect);
String year = new SimpleDateFormat("yyyy").format(dateToSelect);

System.out.println(day + "     " + month + "     " + year + "      ");

String requiredMonth = month + " " + year;

System.out.println("Required month Year-------------" + requiredMonth);

WebElement clickDateField = driver.findElement(By.xpath("//input[@name='txtDate']"));
clickDateField.click();

Boolean flag = true;

while (flag) {

String monthoncalenderHeader = driver.findElement(By.xpath("//div[@class='ui-datepicker-title']"))
.getText();

if (requiredMonth.equalsIgnoreCase(monthoncalenderHeader)) {
					driver.findElement(By.xpath("//a[text()='" + day + "']")).click();

flag = false;

break;
} else {

if (dateToSelect.compareTo(current) > 0)

driver.findElement(By.xpath("//a[@data-handler='next']")).click();

else if (dateToSelect.compareTo(current) < 0)						driver.findElement(By.xpath("//a[@data-handler='prev']")).click();
				}
}
} catch (Exception e) {
e.printStackTrace();
}

}
To Call the method simply call datePicker(String date, driver); to any of the automation script, just simply pass date(in DD/MM/YYYY) format and driver instance as second parameter.
Explanation of above code line by line:
- Firstly create the object of date class and assign in to DD/MM/YYYY format as below in code
Date current = new Date();
SimpleDateFormat dFormat = new SimpleDateFormat("d/MM/yyyy");- Under try catch block parse the date extract or bifurcate the date, month and year in a String from .format method also take the month and year in a string as the per the calender header in web application
Date dateToSelect = dFormat.parse(enterDate);

String day = new SimpleDateFormat("d").format(dateToSelect);
String month = new SimpleDateFormat("MMMM").format(dateToSelect);
String year = new SimpleDateFormat("yyyy").format(dateToSelect);

System.out.println(day + "          " + month + "     " + year + "         ");

String requiredMonth = month + " " + year;- Now click to the text field of calender, so that the calender get populated
WebElement clickDateField = driver.findElement(By.xpath("//input[@name='txtDate']"));
clickDateField.click();- Now open a while loop and create a condition on if statement that if the required month year is equal to the month year displayed in header of calendar in web application then click to the date on that window if not move to else condition
- Under Else Condition if the required month year is greater that the month year present in the header displayed in the calendar on web application the click to next button, and if its less than click to previous button.
Boolean flag = true;
while (flag) {

String monthoncalenderHeader = driver.findElement(By.xpath("//div[@class='ui-datepicker-title']"))
.getText();

if (requiredMonth.equalsIgnoreCase(monthoncalenderHeader)) {				driver.findElement(By.xpath("//a[text()='" + day + "']")).click();

flag = false;

break;
} else {

if (dateToSelect.compareTo(current) > 0)					driver.findElement(By.xpath("//a[@data-handler='next']")).click();
else if (dateToSelect.compareTo(current) < 0)						driver.findElement(By.xpath("//a[@data-handler='prev']")).click();
}
}
In the above tutorial, we have learned date picker in selenium, next we will learn advance topics in selenium webdriver
Password Encryption and Decryption in selenium
Previous Topic, In this tutorial we will learn password Encryption and Decryption techniques in selenium webdriver, its implementation and advantage in selenium script.
Whats is Password Encryption and Decryption?
Password Encryption and Decryption is selenium web driver is a technique in selenium , of encrypting the password or the user credentials so that it cannot be read by unauthorized individual from directly accessing it or in other words encryption of data is binded in such way that different individual or unauthorized person cannot understand it in simple text .
Similarly Decryption data is the technique to decrypt or converting of data in the text so that the computer can understand the data along with the individual.
How to achieve encryption and decryption in automation script ?
Encryption and Decryption of a String or any other text can be performed in java using Base64 Class, which is part of java.util package and contains method from encryption and decryption of data.
Lets understand encryption more by coding:
package SeleniumArchitecture;

import java.util.Base64;

public class EncrptionAndDecryption {

public static void main(String[] args) {

String encrptData= "Password";

byte[] encodedBytes = Base64.getEncoder().encode(encrptData.getBytes());

System.out.println("encodedBytes --------------->" + new String(encodedBytes));

}
}
Code in Eclipse along with Output:
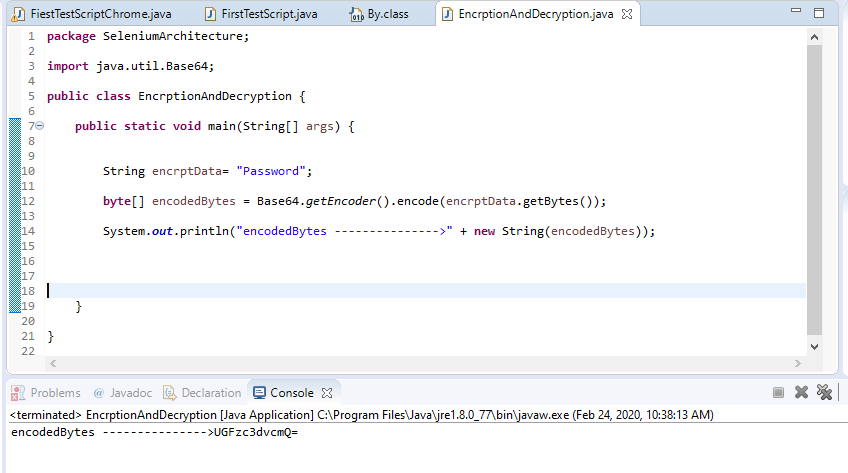
Lets understand Decryption more by coding:
package SeleniumArchitecture;
import java.util.Base64;
public class EncrptionAndDecryption {

public static void main(String[] args) {

//String encrptData= "Password";
String decrptData  ="UGFzc3dvcmQ=";

byte[] decodeBytes = Base64.getDecoder().decode(decrptData.getBytes());

System.out.println("decodedBytes --------------->" + new String(decodeBytes));

	}
}
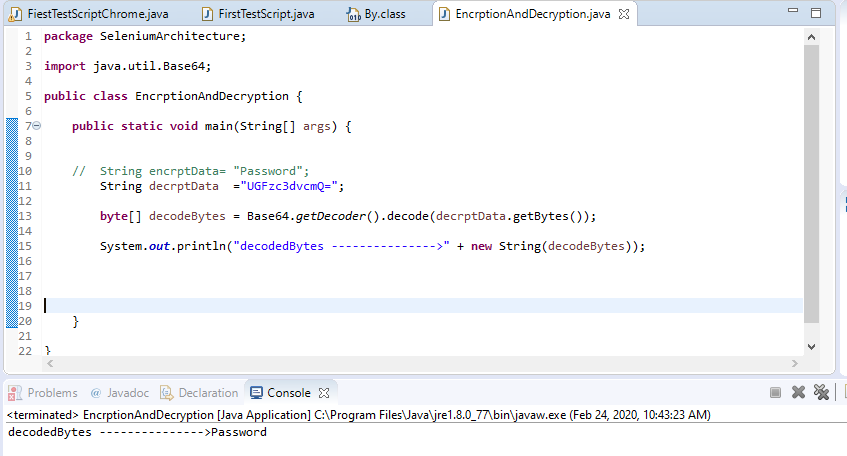
Above tutorials we understand How Encryption and Decryption in selenium works, the encryption and decryption on a string using base64 class.
Facebook-> https://www.facebook.com/code2test/?modal=admin_todo_tour
implicit,explicit And fluent wait in selenium
Wait in selenium Webdriver plays a crucial role in excution of Automation script,So in this tutorial we will discuss all the waits that can be provided by selenium for the smooth script execution.
What is implicit, explicit & Fluent wait in selenium?
As we know that the Web application are been developed by the developers in different technology like javascript etc., so these application takes different time span for the loading of the web page, there may be many other reason for the delay in loading of web page that can be slowness or environmental issue etc.
So to overcome and make our automation script wait for the time required for web page to load and prevends from ‘ ElementNotVisibleException‘ we use wait commands.
There are basically 3 types of wait in selenium webdriver these are:
1) Implicit wait: By implementing the implicit wait in selenium webdriver automation script, the script wait for certain time span for the webpage to load and execution do not gets effected. The syntax for implicit wait is below.
Syntax:
driver.manage().timeouts().implicitlyWait(TimeOut, TimeUnit.SECONDS);
This command accepts the 2 parameters which is Timeout in integer and measurement of time period these are SECONDS, MINUTES, MILISECOND etc.
2) Explicit wait:
Double Click and Right Click using selenium
Previous Topic, In this tutorial we will learn how to Double Click and Right Click in selenium,selenium has its pre-defined classes because of which we perform operation like keyboard operations, mouse movements like drag and drop, mouse hover etc.

How to perform Double click in selenium?
Double click in selenium and Right Click is perforrmed by Action class. In Action class we can perform operation of keyboard and mouse actions. Find below code to double click by action class.
Actions mouseActn=new Actions(driver);
WebElement locator =driver.findElement(By.id("ID"));						 mouseActn.doubleClick(locator).build().perform();
Description on above code:
- Firstly we create the object of Action class and pass the driver as a parameter to it
- Create the locator of the element to perform double click.
- call the doubleClick method from the instance variable of action class the pass the locator as a parameter along with build().perform();
Consider a scenario to under and perform double click to understand more better
- Hit to Url ” http://demo.guru99.com/test/simple_context_menu.html “
- click to “Double-click Me To See Alert”
package SeleniumArchitecture;
import java.util.concurrent.TimeUnit;
import org.openqa.selenium.By;
import org.openqa.selenium.WebDriver;
import org.openqa.selenium.WebElement;
import org.openqa.selenium.chrome.ChromeDriver;
import org.openqa.selenium.interactions.Actions;

public class FiestTestScriptChrome {
public Boolean Flag =false;
public static void main(String[] args) throws InterruptedException  {
//System property of the Chrome driver
			  System.setProperty("webdriver.chrome.driver","C:\\Users\\XXXXXX\\Desktop\\Eclipse_Installer\\GeckoDriver\\chromedriver.exe");
 // Create oject of chrome driver
 WebDriver driver =  new ChromeDriver();
Thread.sleep(3000);			driver.get("http://demo.guru99.com/test/simple_context_menu.html");
driver.manage().window().maximize();
driver.manage().timeouts().implicitlyWait(10000, TimeUnit.MILLISECONDS);
WebElement clickBouble =driver.findElement(By.xpath("//*[@id=\"authentication\"]/button"));
 Actions mouseActn=new Actions(driver);
Thread.sleep(3000);
mouseActn.doubleClick(clickBouble).build().perform();
 Thread.sleep(3000);
driver.quit();
}

}
Right Click in Selenium
Right Click in selenium can be performed by Action Class in selenium.The Right Click in selenium is called as context Click. The syntax for context click in selenium is below:
Actions mouseActn=new Actions(driver);
WebElement clickContext =driver.findElement(By.id("ID"));
 Thread.sleep(3000);						 mouseActn.contextClick(clickContext).build().perform();
Description of above code is below:
- Firstly we create the object of Action class and pass the driver as a parameter to it
- Create the locator for the element to right click .
- call the contextClick method from the instance variable of action class the pass the locator as a parameter along with build().perform();
Consider a scenario to under and perform right click to understand more better :
- Hit to Url ” http://demo.guru99.com/test/simple_context_menu.html ”
package SeleniumArchitecture;
import java.util.concurrent.TimeUnit;
import org.openqa.selenium.By;
import org.openqa.selenium.WebDriver;
import org.openqa.selenium.WebElement;
import org.openqa.selenium.chrome.ChromeDriver;
import org.openqa.selenium.interactions.Actions;

public class FiestTestScriptChrome {

public static void main(String[] args) throws InterruptedException  {
//System property of the Chrome driver			  System.setProperty("webdriver.chrome.driver","C:\\Users\\XXXX\\Desktop\\Eclipse_Installer\\GeckoDriver\\chromedriver.exe");
// Create oject of chrome driver
 WebDriver driver =  new ChromeDriver();
 Thread.sleep(3000);						  driver.get("http://demo.guru99.com/test/simple_context_menu.html");
 driver.manage().window().maximize();
 driver.manage().timeouts().implicitlyWait(10000, TimeUnit.MILLISECONDS);
Actions mouseActn=new Actions(driver);
 WebElement clickContext =driver.findElement(By.xpath("//*[@id=\"authentication\"]/span"));
Thread.sleep(3000);						  mouseActn.contextClick(clickContext).build().perform();
 Thread.sleep(3000);
 driver.quit();
	}
}
So in this Tutorial we have learned how to double Click and right click in selenium webdriver.
If you guys an comment and topics which can be discussed feel free to contact us and write.
How to perform Drag and Drop Action in Selenium
Previous Topic, In the tutorial we will discuss the How to perform Drag and Drop Action in Selenium . The method that are used under Drag and Drop Action Class in Selenium Webdriver.
How to perform Drag and Drop Action in Selenium?
Drag and Drop Action is basically moving any element from one place and another. Or in other words taking the control of an element from one location and dropping it to another location (releasing the control).
Performing Drag and Drop in Selenium
In selenium webdriver using Action Class, we can perform Drag and Drop operation. The method exposed to drag element and drop to any defined location are as below:
- dragAndDrop(source, target)
- dragAndDropBy(source, xOffset, yOffset)
Lets discuss both the methods in Actions class in details
1) dragAndDrop(source, target): This method is called in selenium webdriver once we created the instance variable of Action class, and calling the instance variable followed by (.) . We can call the method. So lets code.
So to under this consider a scenario.
- Launch website https://www.seleniumeasy.com/test/drag-and-drop-demo.html on chrome browser.
- Maximize your browser.
- Take the xpath of source (drag location) and xpath of destination (drop location)
- quit the browser
package SeleniumArchitecture;
import java.util.concurrent.TimeUnit;
import org.openqa.selenium.By;
import org.openqa.selenium.Point;
import org.openqa.selenium.WebDriver;
import org.openqa.selenium.WebElement;
import org.openqa.selenium.chrome.ChromeDriver;
import org.openqa.selenium.interactions.Actions;

public class FiestTestScriptChrome {
public Boolean Flag =false;
public static void main(String[] args) throws InterruptedException  {

//System property of the Chrome driver
			  System.setProperty("webdriver.chrome.driver","C:\\Users\\XXXXX\\Desktop\\Eclipse_Installer\\GeckoDriver\\chromedriver.exe");

 // Create oject of chrome driver
 WebDriver driver =  new ChromeDriver();
 Thread.sleep(3000);
driver.get("https://www.seleniumeasy.com/test/drag-and-drop-demo.html");

 driver.manage().window().maximize();
 driver.manage().timeouts().implicitlyWait(10000, TimeUnit.MILLISECONDS);
  try {
WebElement fromLocation =driver.findElement(By.xpath("//div[@id='todrag']//span[1]"));
WebElement toLocation =driver.findElement(By.id("mydropzone"));

Actions mouseActn=new Actions(driver);
// Thread.sleep(3000);						mouseActn.dragAndDrop(fromLocation, toLocation).build().perform();
Thread.sleep(3000);
} catch (Exception e) {
e.printStackTrace();

}
 driver.quit();
}
}
So lets discuss code in details
In the above code after opening the website and maximize the browser, we have created the xpath for element “Draggable 1” by xpath function as WebElement fromLocation =driver.findElement(By.xpath(“//div[@id=’todrag’]//span[1]”));
we have created the xpath for element “Drop here” by id attribute as WebElement toLocation =driver.findElement(By.id(“mydropzone”));
After that we have instanciated the Actions class and passing the driver as parameter as Actions mouseActn=new Actions(driver);
After creating the object of Actions class, we used the instance variable (mouseActn) and click to (.) and called the method (dragAndDrop) along with build().perform().
The reason for calling the build() method and perform method id as below:
- Build(): This method is called to generate all the actions on a single action.It helps to build the composite method action and perform the action.
- perform(): This method is used to perform all the actions defined but we initially provide build method get in a single action.
Drag and drop in selenium through co-ordinates
2) dragAndDropBy(source, xOffset, yOffset):Till now we have leaned how to drag and drop in selenium using drapAndDrop() method by passing Webelement , but using this method we drag and drop at the mid of the element at a defined position and trigger the event, but in some of the web page we have to drag and drop the mouse action using the x offset and y offset, these x and y offsets are in pixels.
So in that case we have the to provide the location x offset and y offset as a parameter in dragAndDropBy(source, xOffset, yOffset) method. We have to perform the action the same way as we did earlier, just need to pass extra parameters to the method as below:
Consider xoffset is 40 and y offset is 10, so the code will as
Actions mouseActn=new Actions(driver);
mouseActn.dragAndDropBy(source, 40, 10)
So in the Above tutorial we have covered the Drag and Drop action using selenium and Along with Action Class.
Mouse Hover Action in Selenium
Previous Topic, Mouse Hover Action in Selenium: its basically an action which is performed when user takes the mouse cursor at any of the elements like menu, Tab etc,
it automatically triggers an event and displays multiple sets of other options.
How to perform Mouse Hover Action?
Sometimes it happens that few of the element in web application are not visible in web page,so in that case to perform an action on the particular element.
we have to take the mouse to a particular element and after that the required element gets visible.
So in this tutorial we will discuss the features of Mouse Hover Action in Selenium.
Mouse Hover in Selenium
In selenium webdriver Using Action Class we can move to any of the element visible in web page. The method exposed to take control on mouse hover in selenium is below.
- moveToElement(Webdriver)
- moveToElement(target, xOffset, yOffset)
Lets discuss both defined methods in Action class in details.
1) moveToElement(Webdriver): This method can be called in selenium webdriver once we have created the instance variable of Action class, and calling the instance variable followed by (.) ,we can call the method.So lets code.
So to under this consider a scenario.
- Launch website http://www.airindia.in/ on chrome browser.
- Maximise your browser.
- mouse hover to “Manage Your Trip” menu at the top
- quit the browser
import org.openqa.selenium.By;
import org.openqa.selenium.WebDriver;
import org.openqa.selenium.WebElement;
import org.openqa.selenium.chrome.ChromeDriver;
import org.openqa.selenium.interactions.Actions;

public class FiestTestScriptChrome {
public Boolean Flag =false;
public static void main(String[] args) throws InterruptedException  {
//System property of the Chrome driver
			  System.setProperty("webdriver.chrome.driver","C:\\Users\\XXXXXXXXX\\Desktop\\Eclipse_Installer\\GeckoDriver\\chromedriver.exe");

 // Create oject of chrome driver
 WebDriver driver =  new ChromeDriver();
 Thread.sleep(3000);

 driver.get("http://www.airindia.in/");

 driver.manage().window().maximize();
 Thread.sleep(3000);


WebElement manageMyTrip =driver.findElement(By.id("aMnu1"));

Actions mouseActn=new Actions(driver);			 			mouseActn.moveToElement(manageMyTrip).build().perform();

Thread.sleep(3000);

 driver.quit();

	}

}
So let discuss the code in details.
In the above code after opening the website and maximise the browser, we have created the xpath for element “Manage your Trip” by id attribute as WebElement manageMyTrip =driver.findElement(By.id(“aMnu1”));
After that we have instanciated the Actions class and passing the driver as parameter as Actions mouseActn=new Actions(driver);
After creating the object of Actions class, we used the instance variable (mouseActn) and click to (.) and called the method (moveToMethod) along with build().perform().
The reason for calling the build() method and perform method id as below:
- Build(): This method is called to generate all the actions on a single action.It helps to build the composite method action and perform the action.
- perform(): This method is used to perform all the actions defined but we initially provide build method get in a single action.
How to Move To Element in selenium using x,y offset?
2) moveToElement(target, xOffset, yOffset): Till now we have leaned how to mouse hover in selenium using moveToElement() method by passing Webelement , but sometimes using this method we hover mouse at the mid of the element and trigger the event, but in some of the web page we have to hover the mouse action using the x offset and y offset, for ex in Slidder we need to mouse hover till we reach to a defined position.
So in that case we have the to provide the location x offset and y offset as a parameter in oveToElement(target, xOffset, yOffset) method. WE have to perform the action the same way as we did earlier, just need to pass extra parameters to the method as below:
Consider xoffset is 40 and y offset is 10, so the code will as
Actions mouseActn=new Actions(driver); mouseActn.moveToElement(manageMyTrip, 40,10).build().perform()Inheritance in java
Inheritance: It is a feature in Oops concept where a class inherits all the features of another class. When a class inherits the methods and global variable of another class it is not able to perform the action on the defined structure of another class.
The reason for introducing the concept of inheritance in java, is re-usability now the same method and field defined in one class can be used by another class and can also add additional methods,variable etc to it.
Important terminology of inheritance in java:
- Sub Class : The class which inherits the methods, fields and variable of another class is known as sub class. Sub class can also create its own methods,variable and fields.
- Super Class : The class from which the sub class inherits all the features and re-use or access the defined methods, fields and variables is Super Class.
- Re-usability : its a approach to re-use the defined methods, fields etc, which we need on current class gets from another class.
Syntax used for inheritance:
class subClass extends superClass {
//methods
}
Creating Maven Project from Eclipse
The another way of creating the maven project through eclipse is quite simple, in this we do not have to create a folder structure from otherside and import to eclipse ide.
Follow the below steps to create maven project from Eclipse:
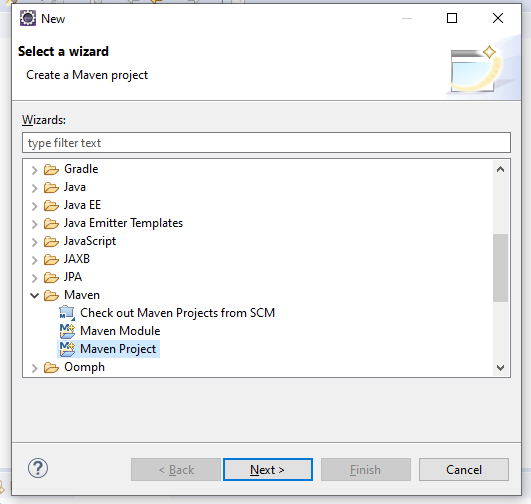
1) Open the eclipse IDE and click to File->New->other , a wizard will open.
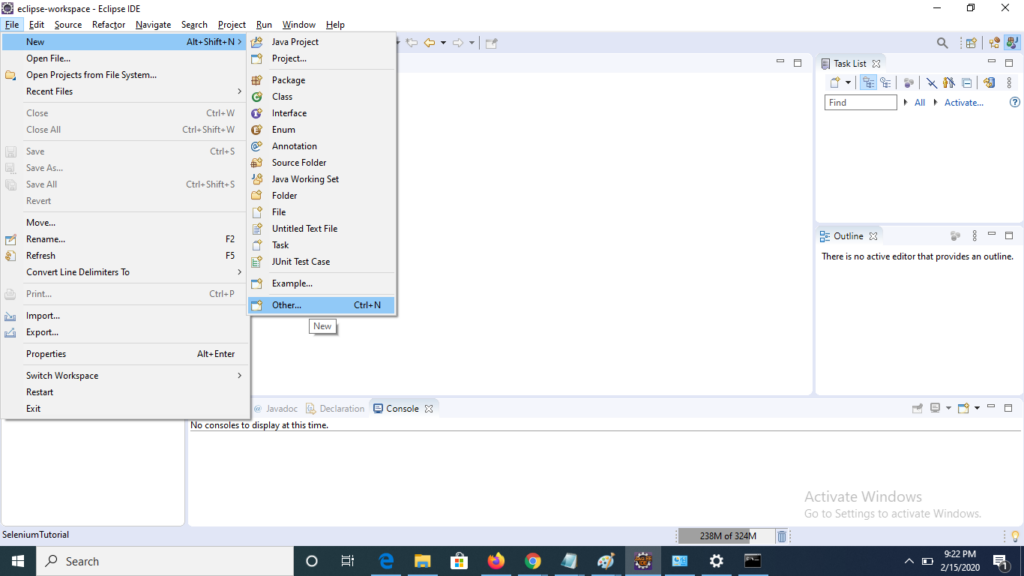
2) Under ‘Select a Wizard’ select Maven->Maven project.
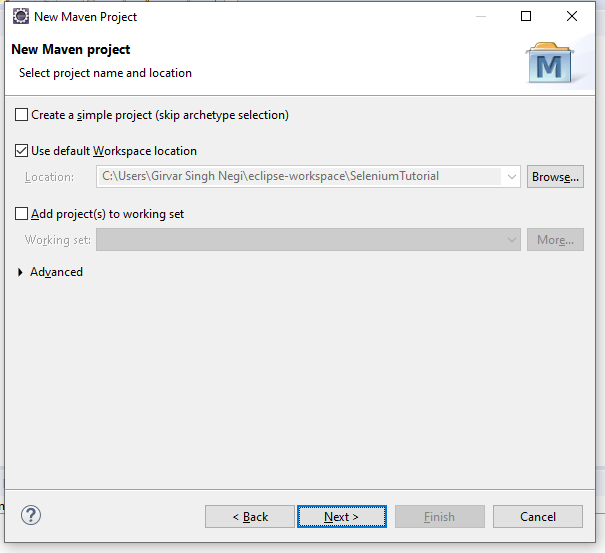
3) Under ‘New maven project’ window uncheck the default folder path and select your preferred location of workspace for maven project, here a choose the default workspace location and click to next.
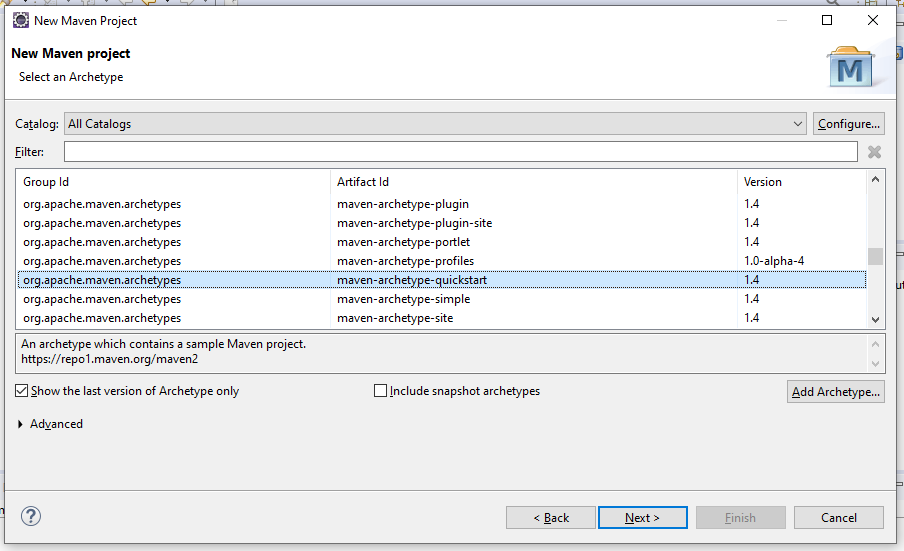
4) Now select the ‘Achetype’ named as ‘maven-archetype-quickstart’ and click to next.
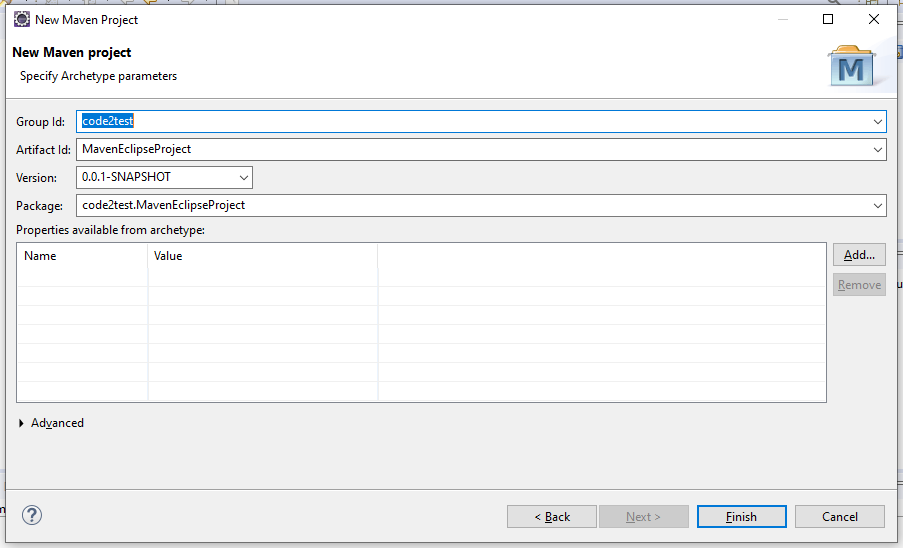
5) Define ‘Group Id:’ and ‘Artifact Id’ and click to Finish button, Package field will be auto create which is combination of (Group Id + Artifact Id).
6) We can see inside the eclipse id that the maven project is been created with defined project name.
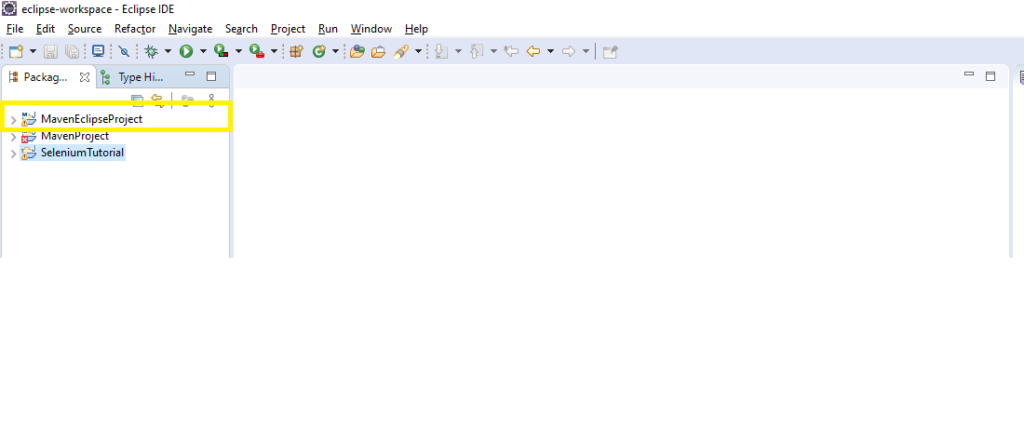
7) Pom.xml and folder structure of maven project for the created maven project will look as below screenshot.
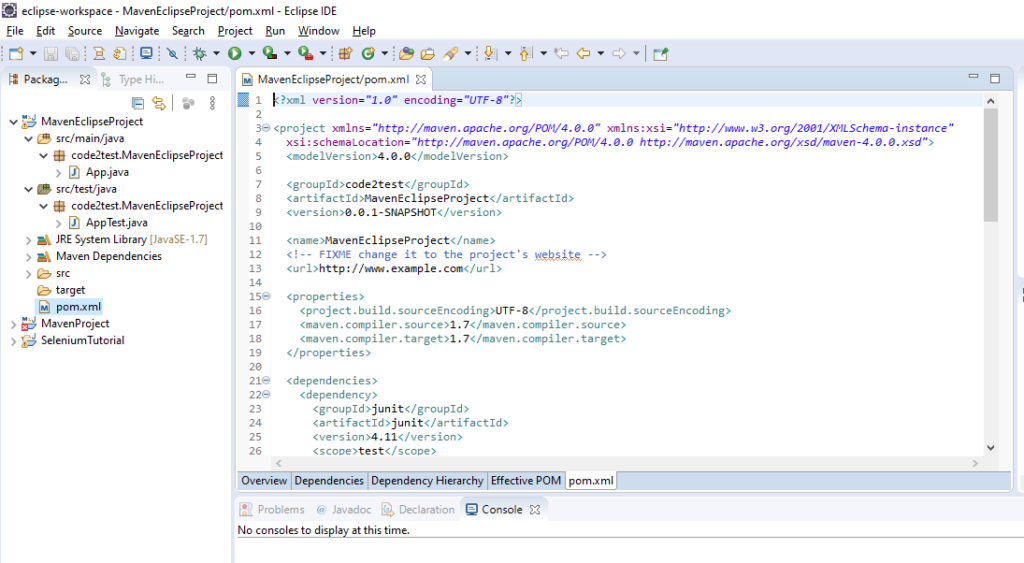
So following the above steps sequentially we can create maven project through eclipse IDE. If you guys have any suggestions or feedback please share with us we love to hear from you and if something need to added as per the suggestion we will add to code2test.com site with you help.
Creating Maven Project from Command Prompt
Previous Topic , In this tutorial we will learn Creating Maven Project from Command Prompt?
Creating Maven Project from Command Prompt
We can create maven project by two ways.One is by command prompt and another is by eclipse ide, let discuss the using command prompt.
Steps to create maven project from command prompt are below:
1) Open the command prompt by opening Run and type cmd and enter.

2) Take your path till the folder structure of your eclipse workspace . Type the command mvn archetype:generate and click enter. This command basically generates the maven project and take few seconds.
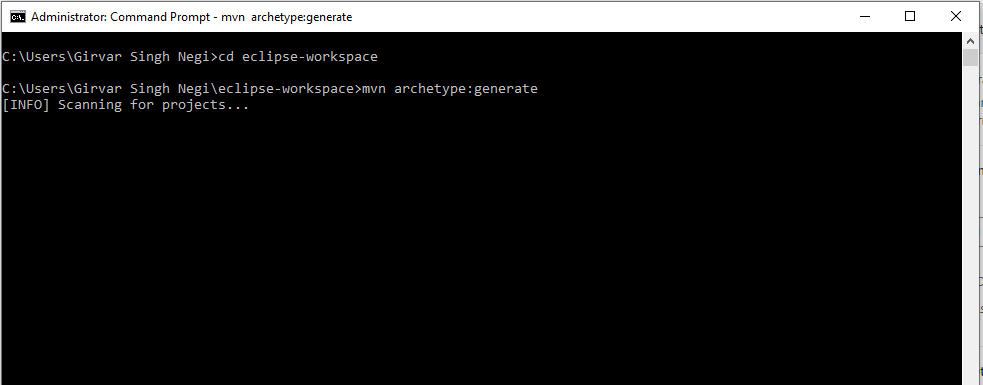
3) Now in cmd during process of generating maven project, it will ask to choose a number, type the number same as mentioned in cmd for me its 1476
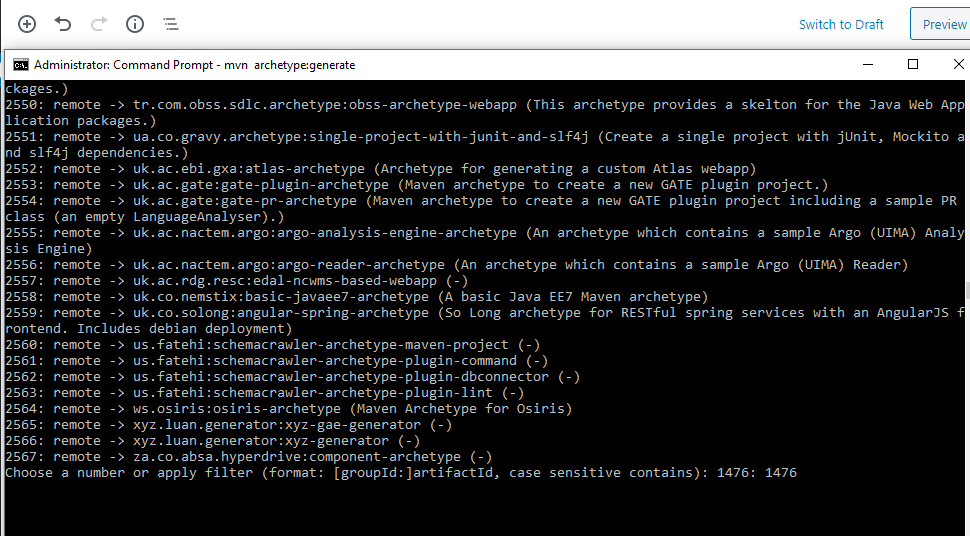
4) Again it will ask to choose a number which is basically the maven archetype version, you can choose the updated version, for me its 8. and click to enter after that it will start downloading the files for updated version to create folder structure of maven project
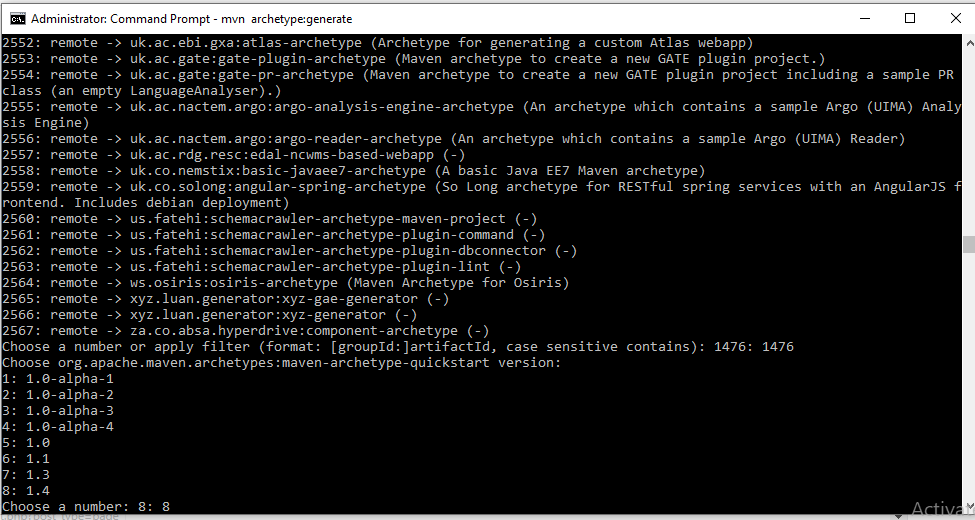
5) Now it will ask for ‘group id’ which means you have to define the package structure to your maven project, I am defining the package as com.code2test
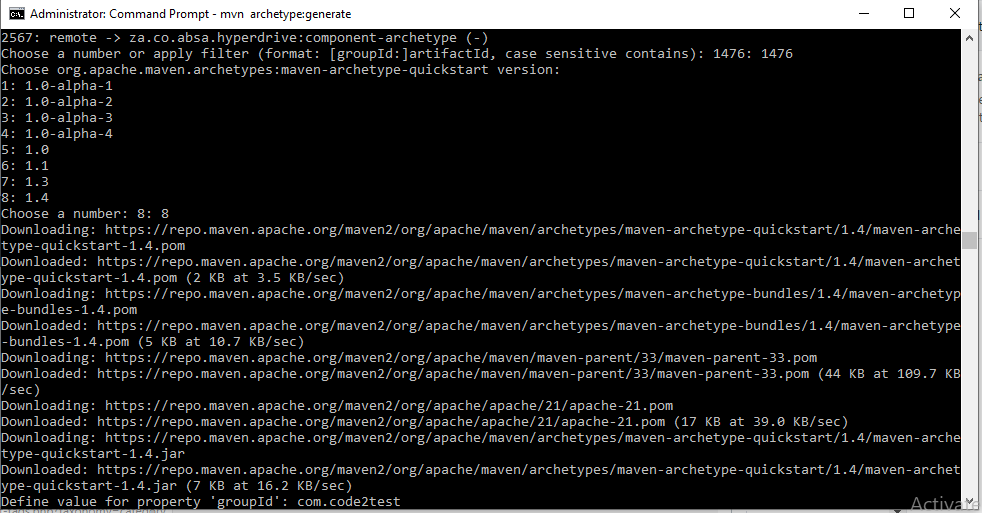
6) Next step is to define the ‘artifact Id ‘, which is basically the project name, i name it as MavenProject
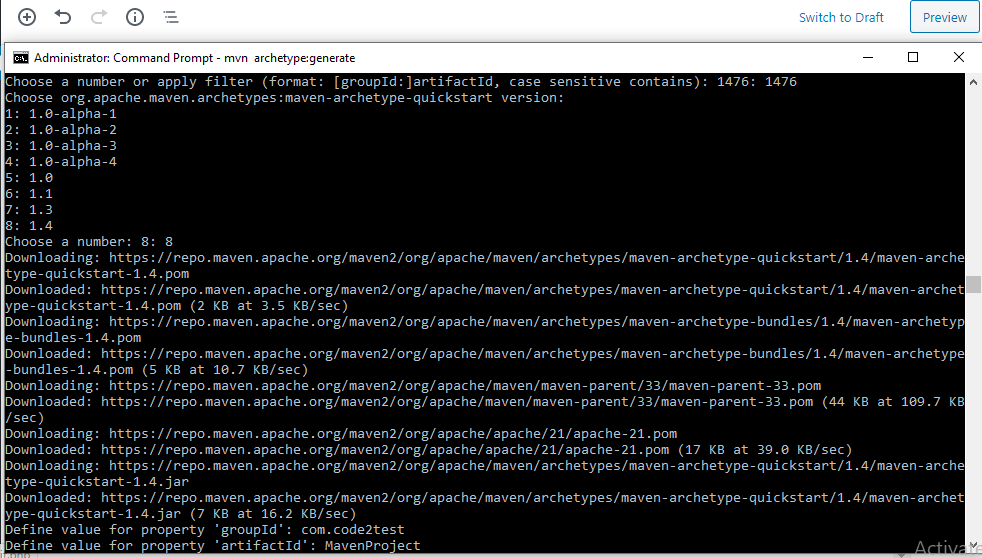
7) Next step is to define the version, for this you have provide any number (you can give you build number of version number of your project code) , I give it 1.0 along with package propery version and hit enter.
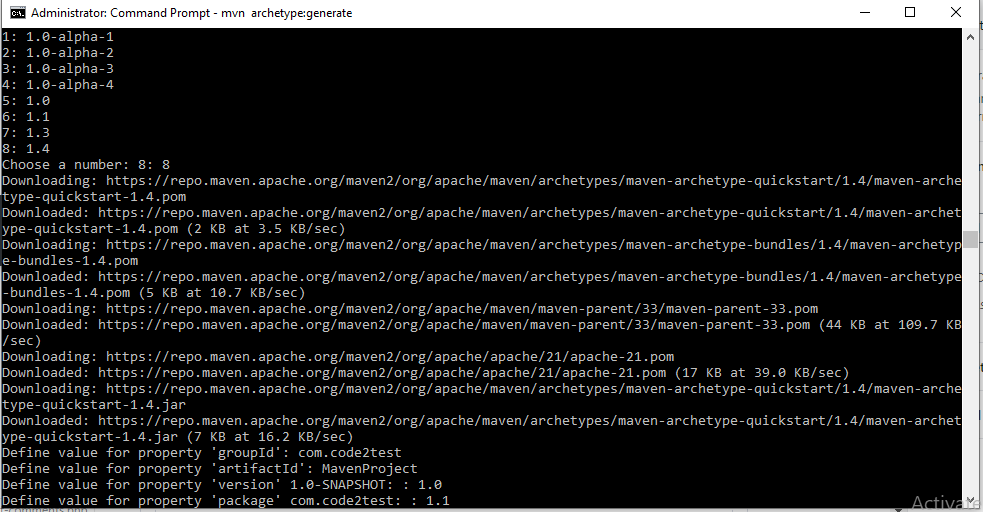
8) Now the step is to provide the confirmation of you maven poject, for this type ‘Y’ and enter.
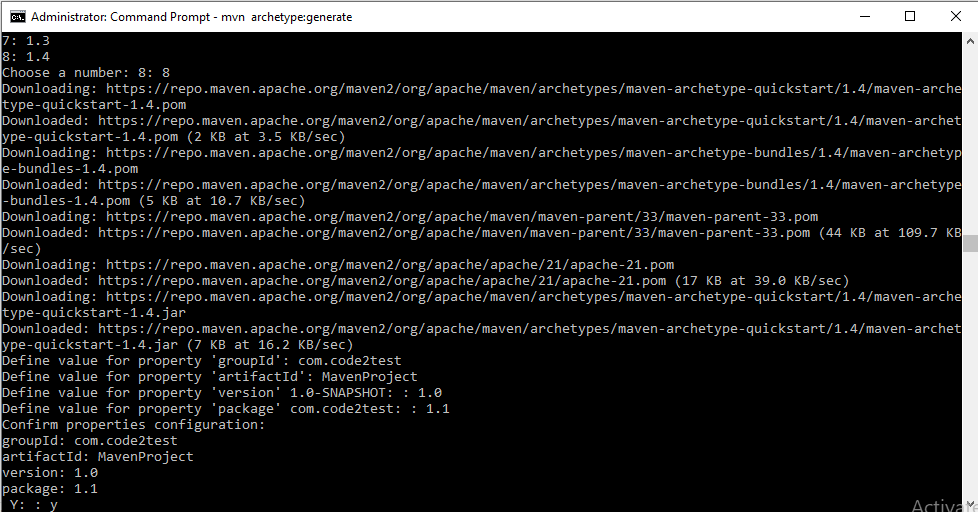
9) Now you will get the message of Build confirmation, go to your project workspace there you will see the maven project is been created on the folder structure.(As in screenshot).

Once your project is created it time to maven your maven project compatible with eclipse ide or in other words can imported to eclipse.
For making maven project compatible with eclipse project, firstly go to the folder structure of the recently created maven project for me its (Maven Project) and type the command mvn eclipse:eclipse and click enter

10) Once the process of making maven project compatible with eclipse project is completed, we will get ‘Build success’ message.
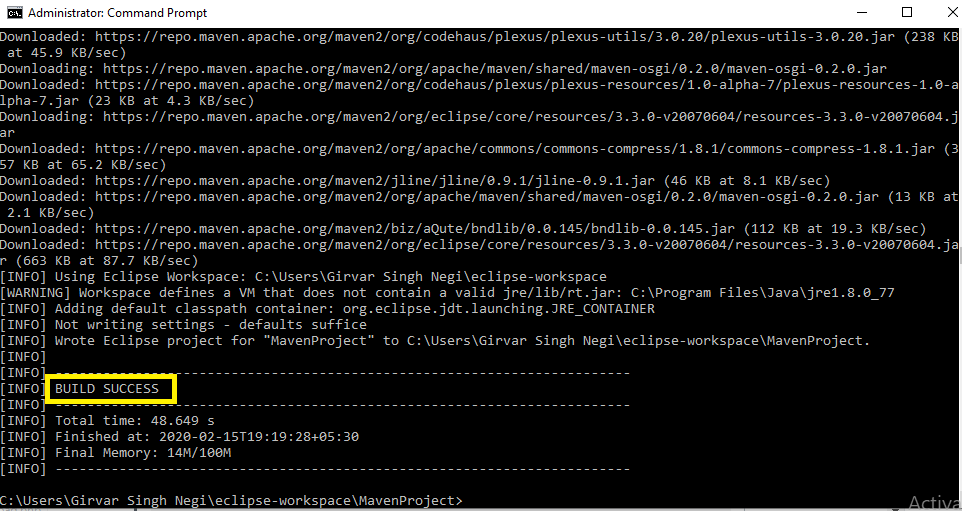
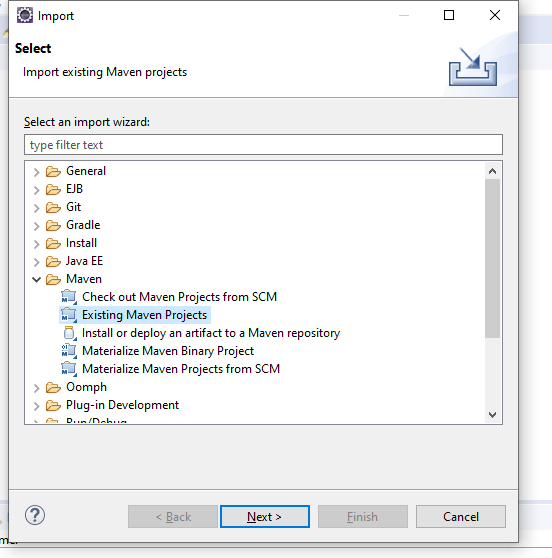
11) Now go to eclipse select-> File->import->Maven->Existing maven project and click next.
12) select newly created maven from workspace on click to ‘Browse’ button under Import Maven Projects window and click to finish.
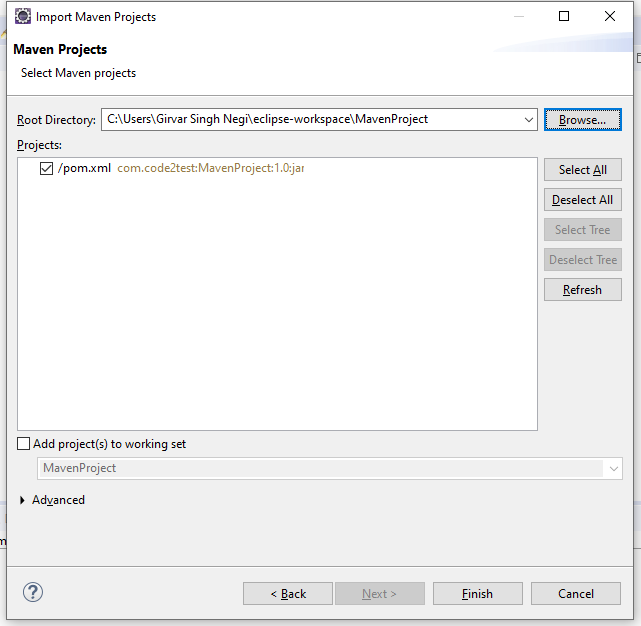
We can see that the maven project gets imported to eclipse ide.

So following the above steps we can create maven project from CMD prompt and perform assigned task. Now in next topic we will discuss how to create maven project through Eclipse.
Maven installation in Window machine
We can easily install maven to our local window machine, for this follow the below steps.
1) There is pre-condition before the installation, we need to install Java and setup the environment variable for the java. In the previous post we have discussed the installation of Java and setup the environment variable. Please click to link for the java setup-> Click for Java Setup
Maven installation and Setup Environmental Variable:
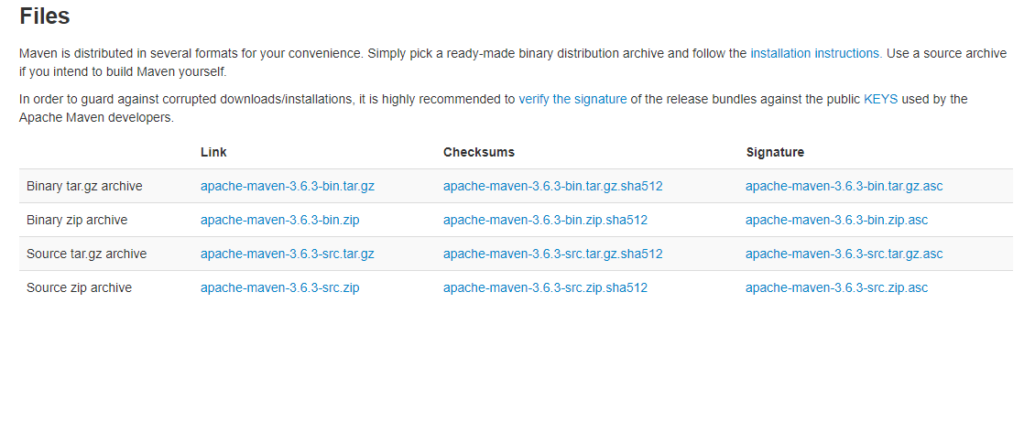
2) Now download Maven from the location : Maven Download
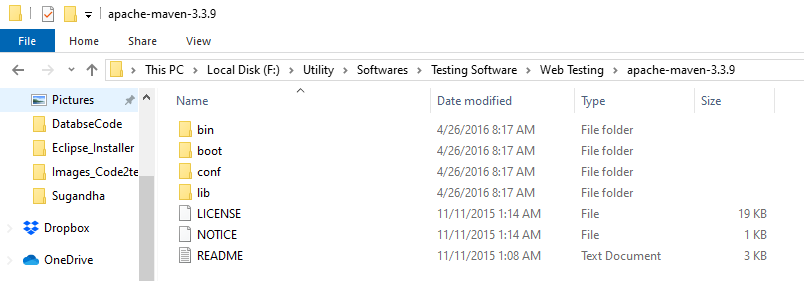
3) Extract the file in any of your preferred folder, I have created a folder and kept the file in this location – “F:\Utility\Softwares\Testing Software\Web Testing\apache-maven-3.3.9”.
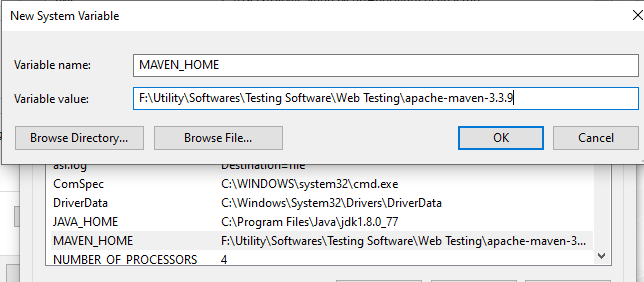
4) Now Setup the Maven Environment variable from system environment variable window.
Under System Variable section, click to New mention variable name as “MAVEN_HOME” and variable value the path of maven folder location, for me its “F:\Utility\Softwares\Testing Software\Web Testing\apache-maven-3.3.9”. and click to OK button
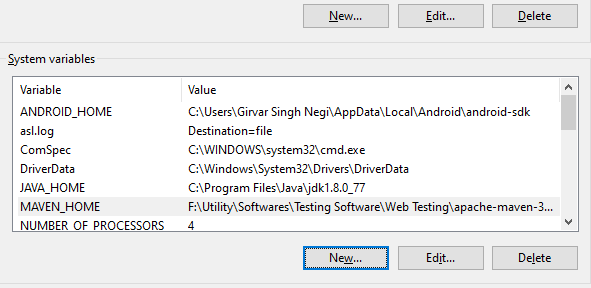
5) The MAVEN_HOME will be displayed under system variable section as below.
6) Now set the Location of MAVEN_HOME to Path location. For this click to Path under system variable and click to edit button.
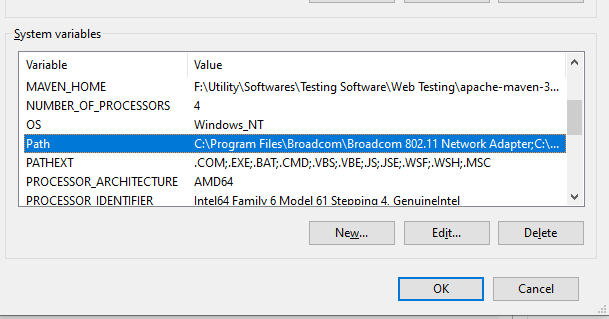
7) Append or add the MAVEN_HOME path till bin folder followed by “;” as this format “%MAVEN_HOME%\bin” and click to OK button , we are using window 10 so it will look like this .
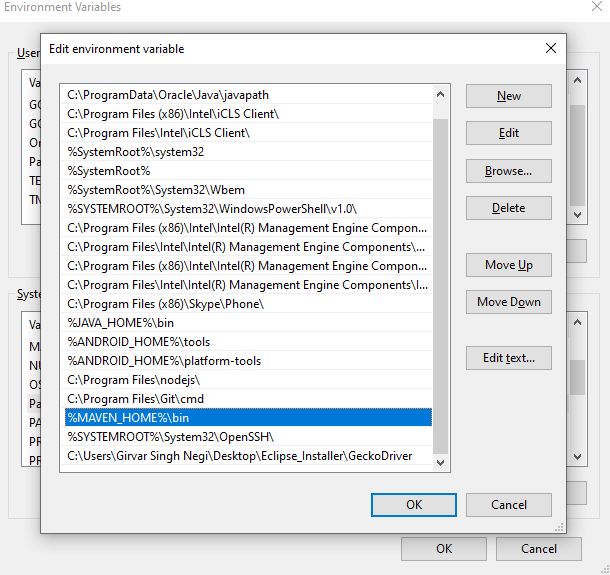
Now its time to check the Maven Installation:
8) To check the maven installation open the command prompt for this, click to Run and type Cmd. Under cmd prompt type command: mvn -version

So, we can see the maven version on CMD after hitting the command with no error message , says that we have successfully installed maven to our local system.