Home » Articles posted by code2test.com (Page 4)
Author Archives: code2test.com
How to Write First Cypress Test Case
Previous Topic , In this tutorial we are going to learn How to Write First Cypress Test Case and execute on different browser.
How to Write First Cypress Test Case?
Whys and how to write test in Cypress? As Cypress build on java script extension. So for working on JavaScript test framework, we have follow the standards of JavaScript framework (like jasmine or mocha). They are famous java script based framework available in market as test framework, we need to follow any one of testing framework standards to write cypress testing.
Cypress has the knowledge of browser to automate. But to make a test case or script runnable we need to inject any of the cypress test framework to any of the provided java script framework, same as TestNG and junit in selenium. Cypress is recommending to use Mocha testing framework because of which Mocha comes within cypress package. So as we download cypress, Cypress automatically bundles Mocha framework.
Understanding MOCHA Structure
Before Writing First Cypress test case, lets first understand MOCHA structure. Below is the MOCHA structure
//Code Structure

describe('My First Test Suite', function(){
    it('My First Test Case', function(){

    })

})
When we say describe block its test suite, it nothing but test suite, there can be multiple test cases in a test suite in Mocha and it block is treated as test case. Here we have one describe block name ‘My First Test Suite’ inside this test suite we have it block which is test case and whatever we define inside the it block it is treated as a test.
In other words all the test is wrapped inside it block and all the it block is wrapped inside describe block . Both the framework MOCHA and Jasmin have same way of writing test cases.
Steps to create first test case in Cypress
Lets consider below scenario for automation.
1) Open the URL -> https://www.demoblaze.com/index.html
2) Click to SignUp on top
3) Type Username
4) Type Password
5) Click to SignUp button
Lets Automate the above scenario:
1) Click to New file button and create a spec file name as FirstTest.js as mention on screenshot below.
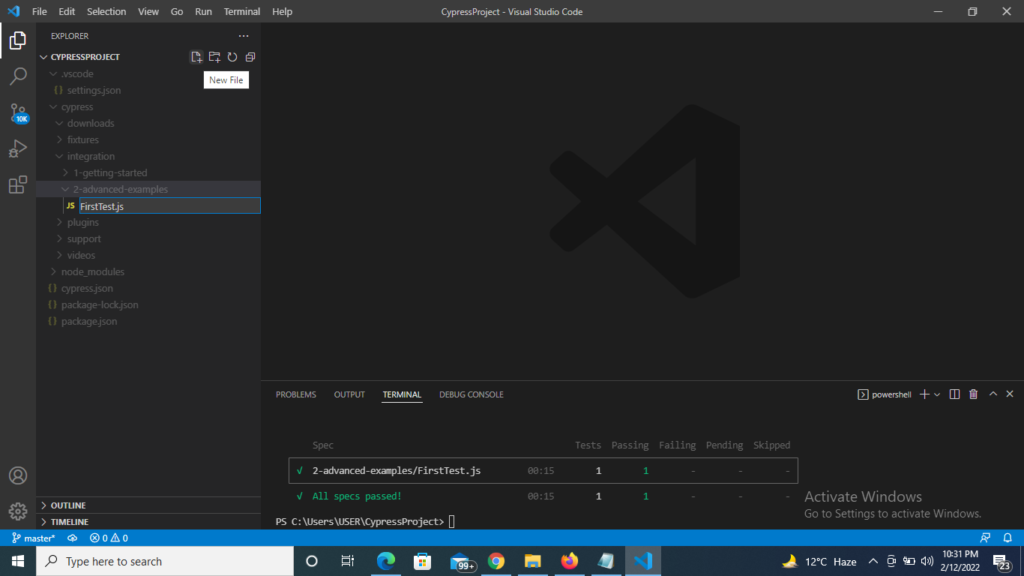
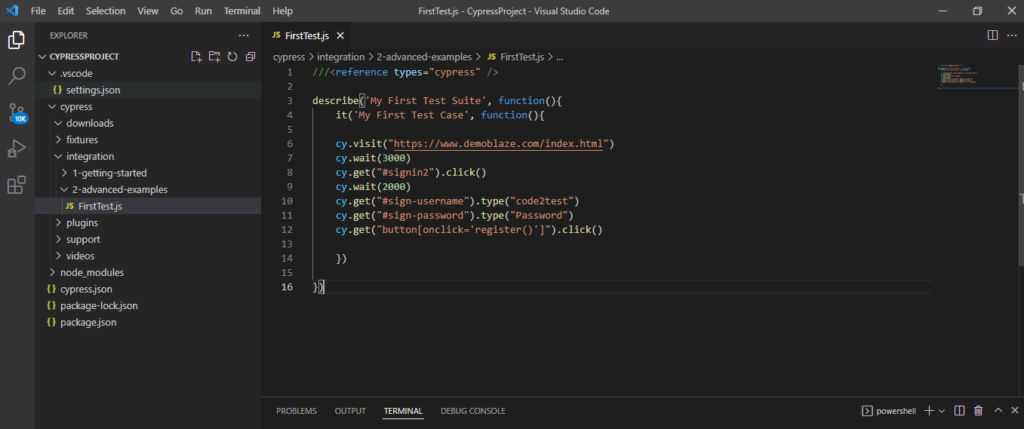
2) Copy and Paste the below code inside this FirstTest.js file.
///<reference types="cypress" />

describe('My First Test Suite', function(){
    it('My First Test Case', function(){

    cy.visit("https://www.demoblaze.com/index.html")
    cy.wait(3000)
    cy.get("#signin2").click()
    cy.wait(2000)
    cy.get("#sign-username").type("code2test")
    cy.get("#sign-password").type("Password")
    cy.get("button[onclick='register()']").click()

    })

})
3) Now click to Terminal on the top and open a new terminal ( Terminal-> New Terminal).
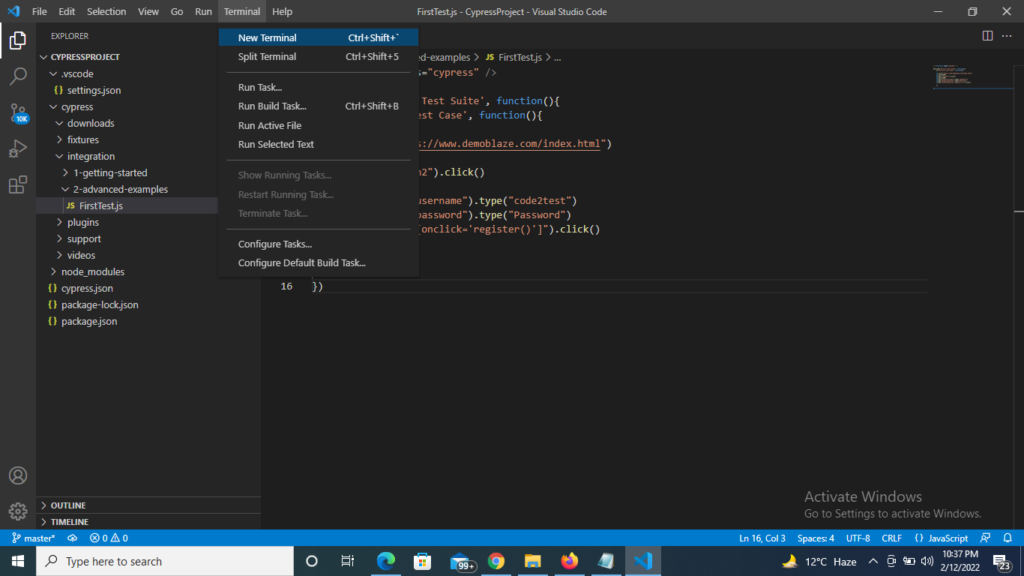
4) You will see a new terminal gets opened on the bottom of your script with different window.
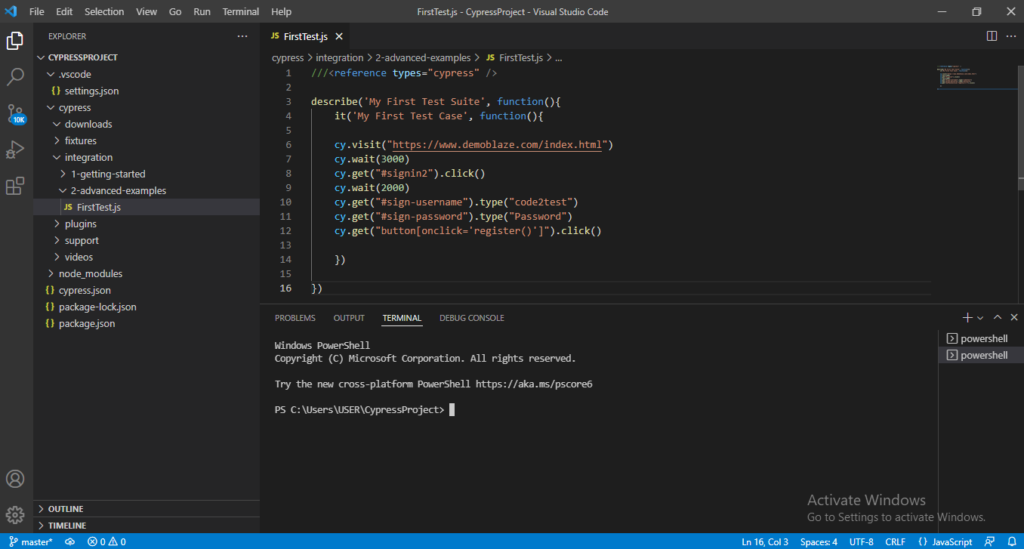
5) Now the next step is to open Cypress Test Runner by hitting below command on terminal. As this command will open the Cypress Test Runner window
node_modules\.bin\cypress open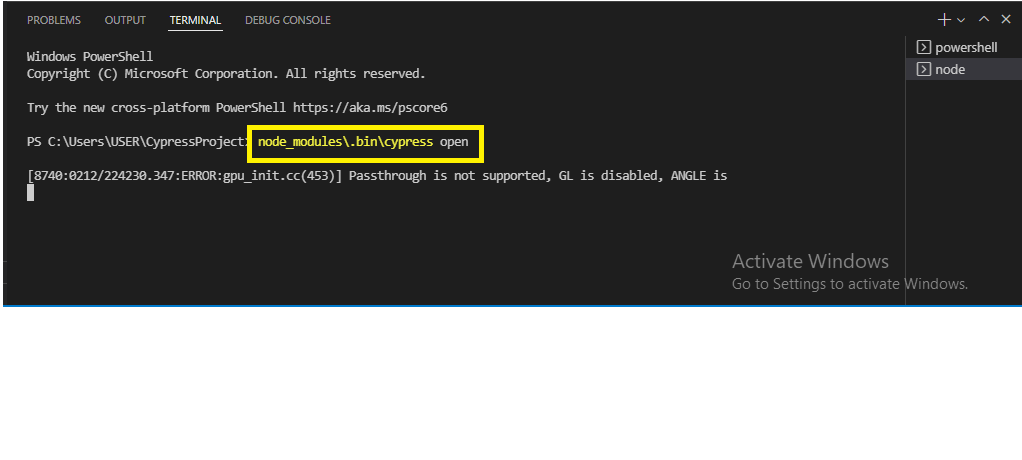
6) We see that our spec file (FirstTest.js) is visible in Cypress Test Runner window.
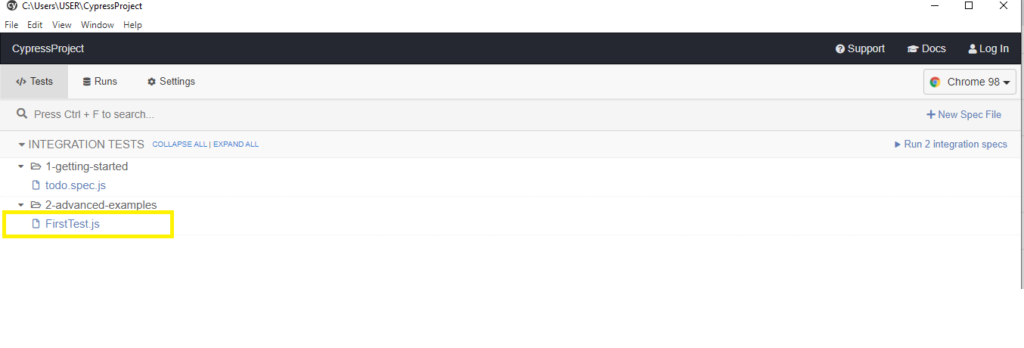
7) Now select the browser from top right list box with 3 options (Chrome, Firefox, Edge, Electron)

8) Suppose we selected Chrome, now double click to FirstTest.js file and execution gets start.
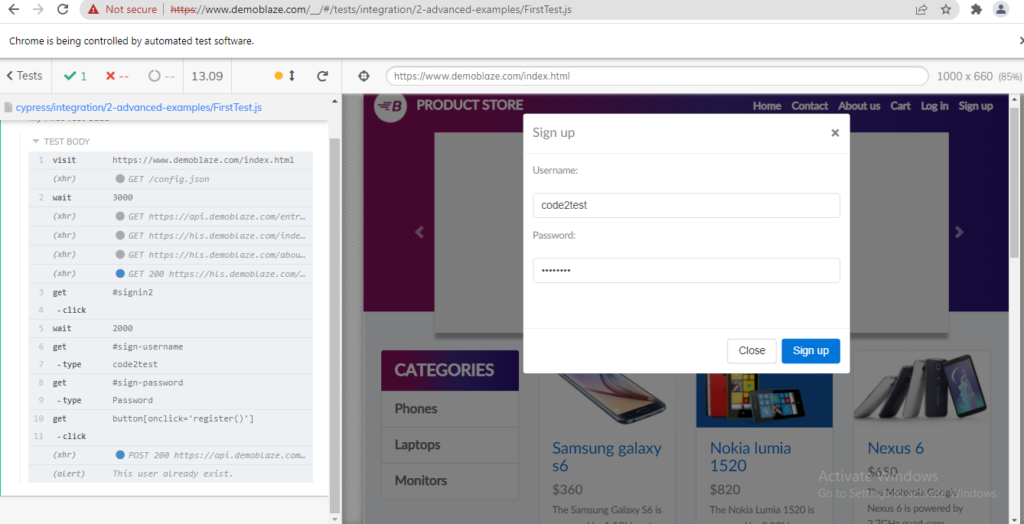
How to Run test execution through Command line or Terminal?
Below are the commands for running execution through terminal or without opening Cypress Test Runner
1) For running specific test file through terminal on default browser (Electron), hit the below command.
node_modules\.bin\cypress run --spec "cypress/integration/2-advanced-examples/FirstTest.js"Note: This command with run the “FirstTest.js” file only and execution will perform in default (Electron) browser in headless mode (means no browser is visible to you).
2) For Running a complete test (all test files available in example folder), hit below command.
node_modules\.bin\cypress run3) For Running specific test on headed Brower (Browser is visible to screen). Hit below command.
node_modules\.bin\cypress run --headed --spec "cypress/integration/2-advanced-examples/FirstTest.js"Note: If we don’t specify browser it will run on default browser Electron.
4) For Running on different browser as per requirement. Hit below command.
node_modules\.bin\cypress run --browser chrome --headed --spec "cypress/integration/2-advanced-examples/FirstTest.js"Note: On hitting above command the execution will perform in chrome browser as mentioned on code. To Run on (edge , firefox) specify or replace the browser name.
For example in firefox we use command -> node_modules.bin\cypress run –browser firefox –headed –spec “cypress/integration/2-advanced-examples/FirstTest.js”
What is Cypress Test Runner ?
Previous Topic , In this tutorial, we are going to learn about Cypress Test Runner in depth.
It is one the important part of Cypress tool which plays a crucial role in Test execution. It helps to provide the initial push to start the execution of test case. During the execution of test cases of test cases in cypress all the commands are being monitored and displayed in Cypress Runner with the provision of running it on different environments.
How to open Cypress Test Runner in Visual Studio Code?
We can open Runner using below steps:
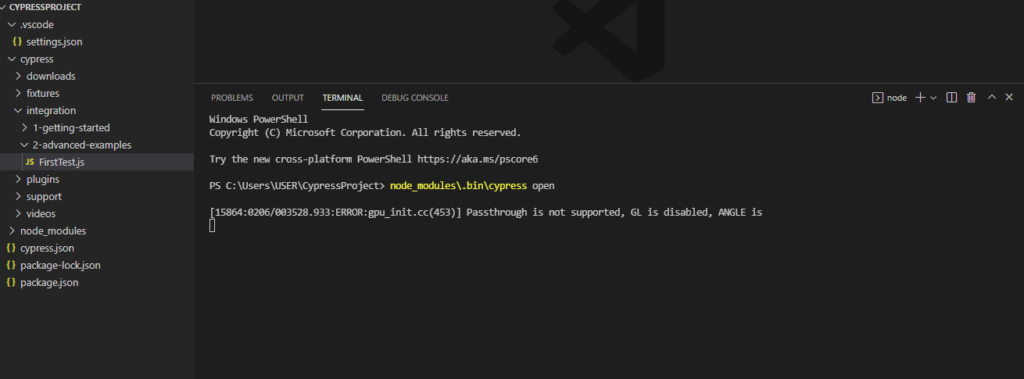
Step 1) Open the Terminal on click to Terminal->New Terminal (refer screenshot)
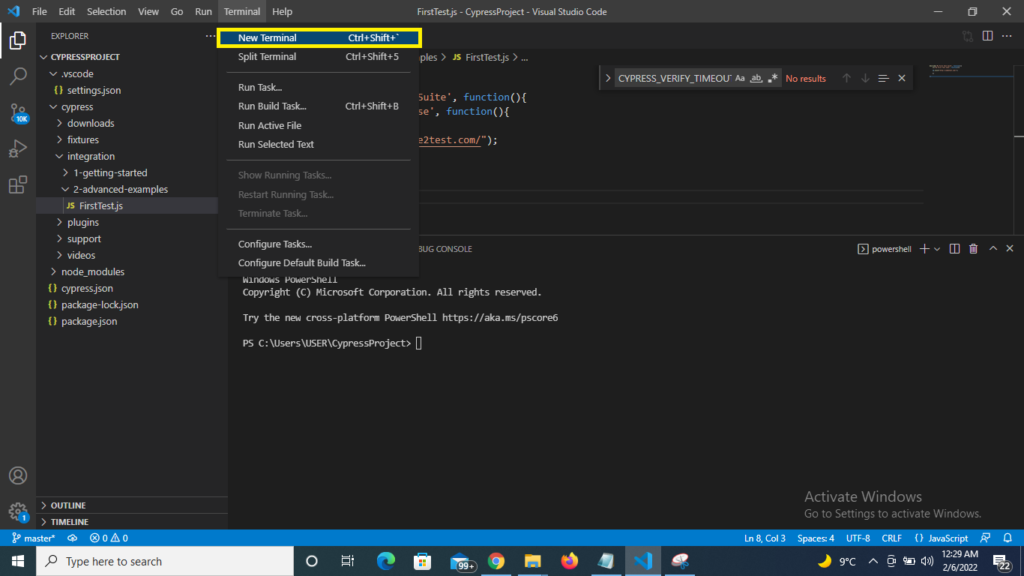
Step 2) Hit the command inside the terminal as below:
//Command to open Cypress Test Runner
node_modules\.bin\cypress open

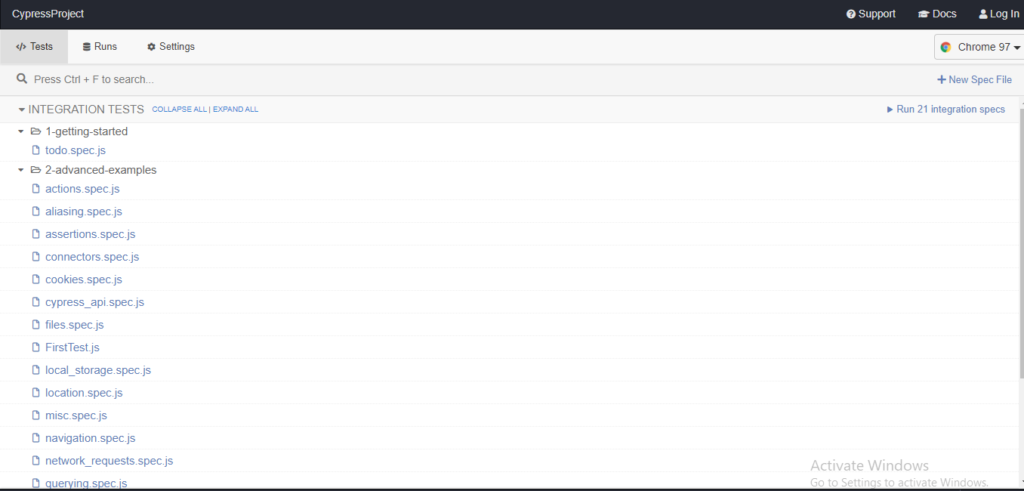
As we hit the command we see that the Cypress is opens the first time on the machine. Once the commands gets fully executed the Test Runner gets executed as it hits the internal API and commands to open Test Runner to different window.
Note: If you get Error as : Cypress verification timed out. The command failed with the following output : c:\User \xxxxxxxxxxx
//Use below command for Set Execution policy (required) refer screenhot below
Set-ExecutionPolicy RemoteSigned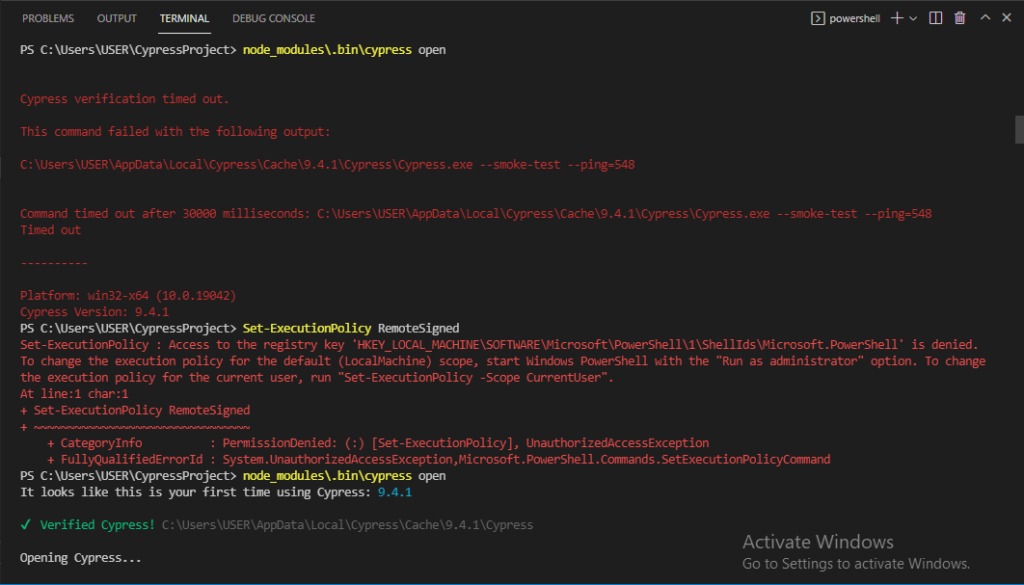
Cypress create a default folder and files inside the Cypress folder. This contains file name like Integration, Plugins, supports, videos’ etc.
The Cypress provides a Framework structure for easy script development. As we open the Test Runner we see that there multiple .js files as default which are sample test cases provided by Cypress developer to understand the the flow (refer screenshot)
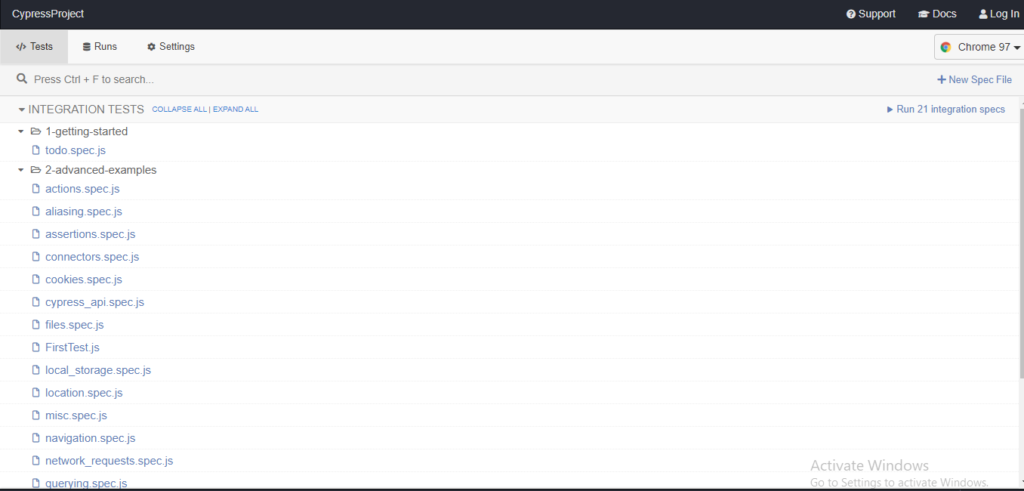
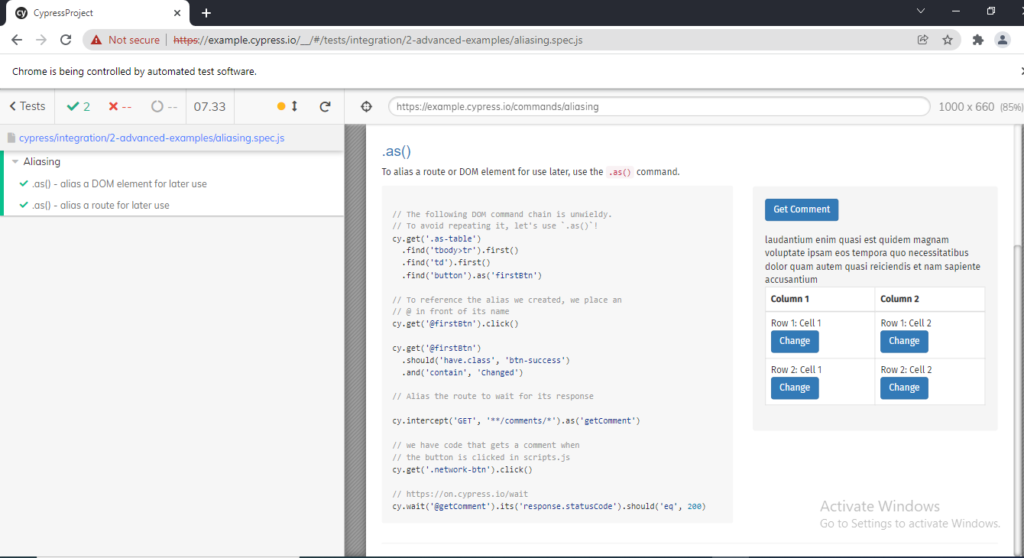
If you wish to run the test case any of the listed (Suppose: aaliasing.spec.js) , you just have to click to that specific test case as a result the browser will open along with logs on left side of browser.
Creating package.json file
Previous Topic , In this tutorial, we are going to learn Creating package.json file inside Visual Studio Code and creating Cypress Project.
What is package.json file? and Whats its use for?
As it name referrers, it a json file which resides in the root of the project and stores metadata
of the current project, its key role is managing all the dependencies and successfully
running the script in our local machine. We will be taking the example for 2 dependencies in our package.json file to understand more in details with the help of NPM commands. But going further we need to understand NPM is depth.
What is NPM? Creating package.json file
NPM refers to Note Package manager, All the developer who develops JavaScript based packages hosts all their package in to this node package manager to its npm Website -> https://www.npmjs.com/.
As we run npm command what it initially does is, it reads all the dependencies from package.json file and after reading json file it directly connects to its repository https://www.npmjs.com/. and search for the dependencies with its version number and pulls it from npm repository to our local project. Similarly it continues this process for all the dependencies defined in project.json file. Due to this reason Package.json is said to be the heart of the node project. So where ever we are working JavaScript or node project , we need to create package.json file.
Steps to Create Package.json file through VC Terminal
1) Go to the terminal create a folder with preferred name ex( CypressProject) and move to the folder. Below are the commands:
//this command will create folder with name CypressProject
mkdir CypressProject

//this command with move to CypressProject Folder
cd CypressProject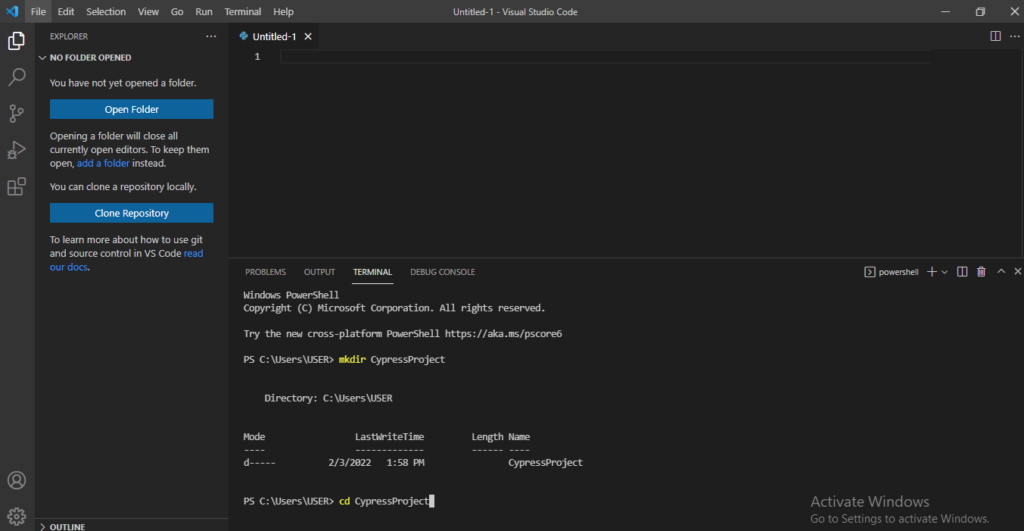
2) Now create npm project with below command
// Command
npm -i init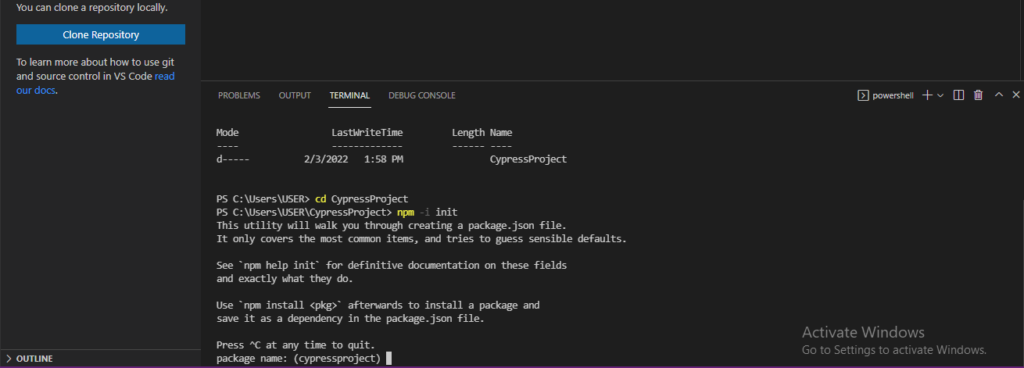
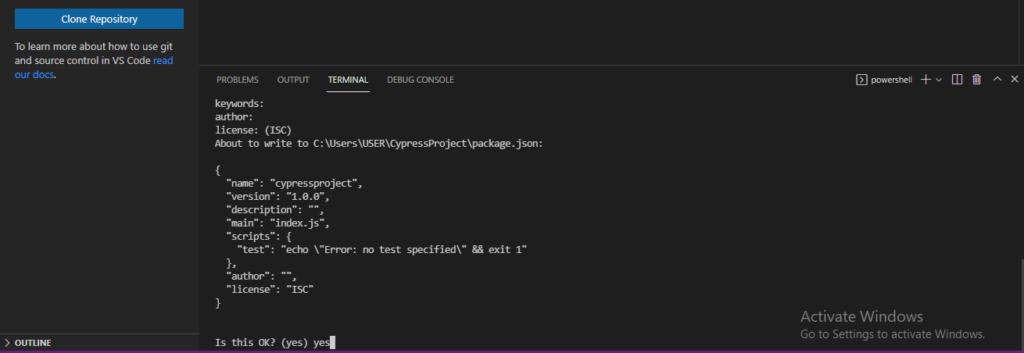
3) Now the terminal would ask you multiple pre-requisite (ex: package name, version etc) . Click to Enter for every pre-requisite or keep it on default data, till the json file gets generate on terminal (refer the screenshot)
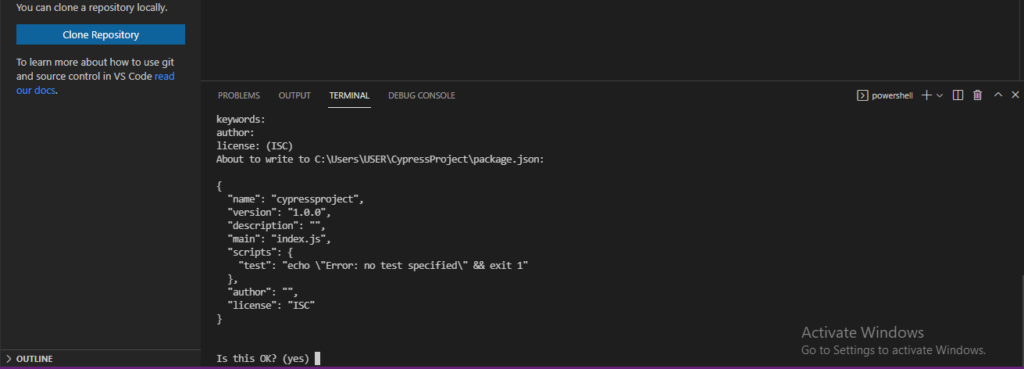
4) At last type “Yes” for question Is this OK?
5) Now setup cypress dependency on using the below npm command and hit enter.
//This command will install cypress dependency
npm install cypress --save-dev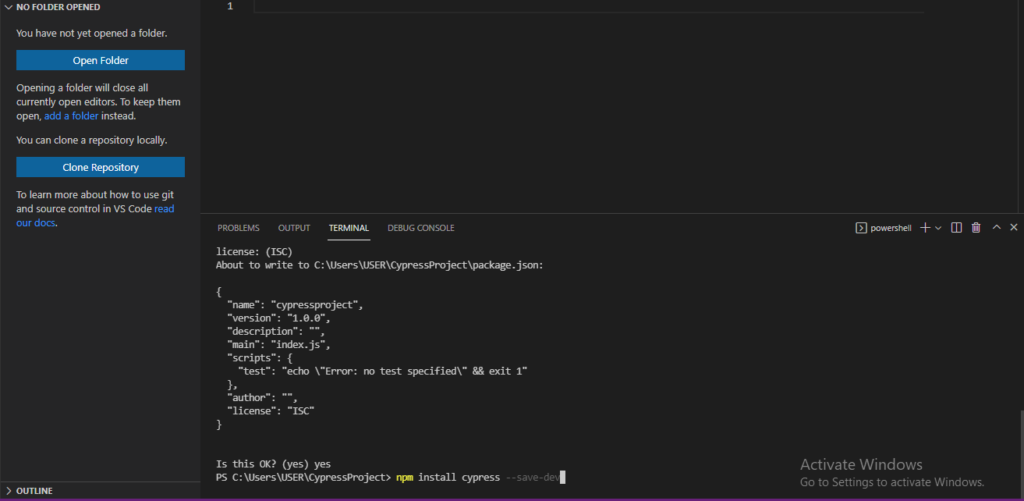
6) As we hit command npm start download , unzip and finish Cypress dependency.

7) Once the Installation is completed click to open folder and select the folder we created above (CypressProject) from directory
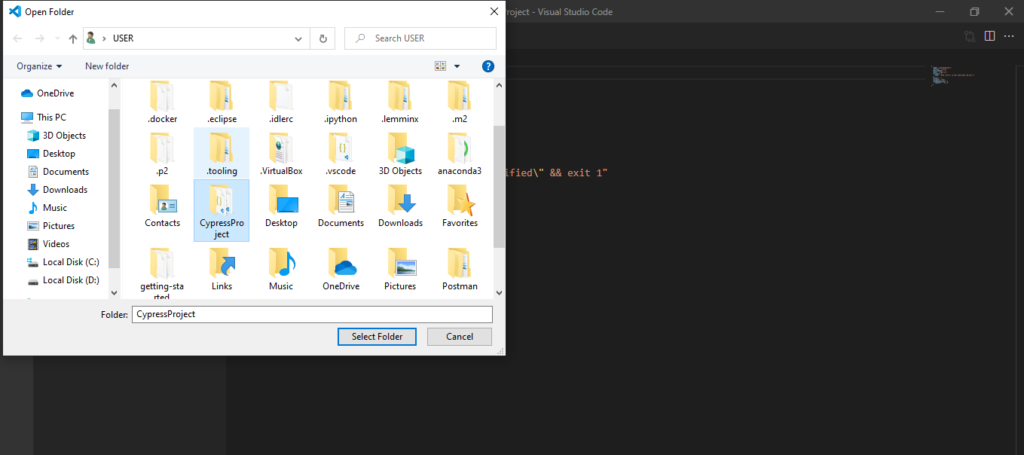
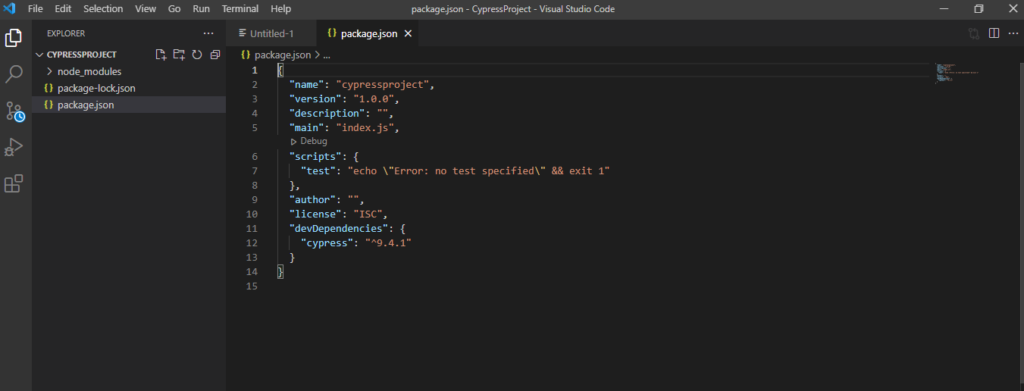
8) Now we are completed with creation of VC project. Click to package.json file where you can see all the dependency mentioned on .json file as per below screenshot
How to Download and Install Visual Studio Code
Previous Topic In this article, we are going to learn how How to Download and Install Visual Studio Code.
For the development we need an IDE for programming in any specific language and Visual Studio is one of them. Why and how to use them? The reason for using this IDE , as this is light weighted and easy to use with strong base of code. This editor is available for Windows, Mac and Linux environment. VS code can support multiple language like C++, C#, Java, Python, PHP etc.
How to Download and Install Visual Studio Code?
Below are the steps to download and setup VC
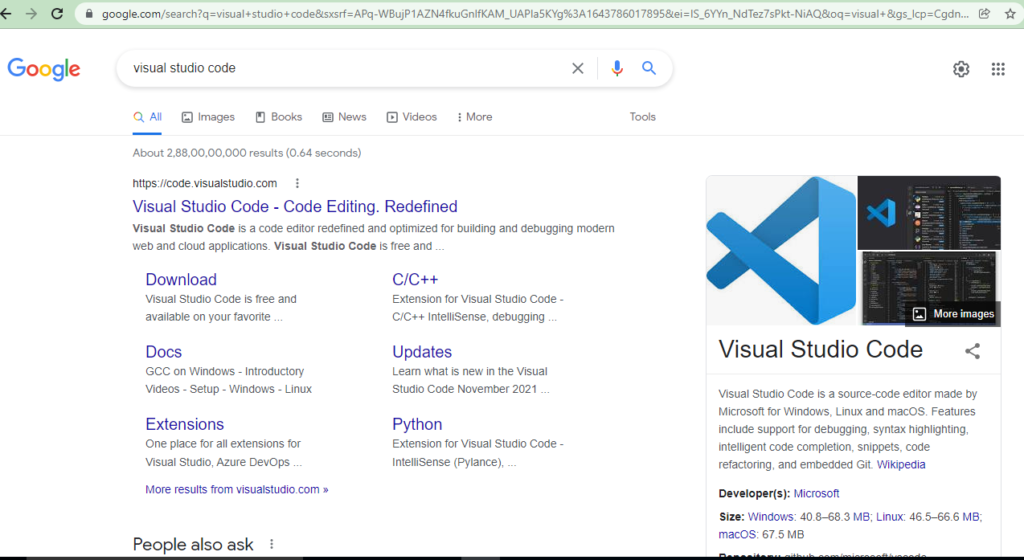
1) Search for “Visual Search Code” on google search as shown in screenshot or click to https://code.visualstudio.com/
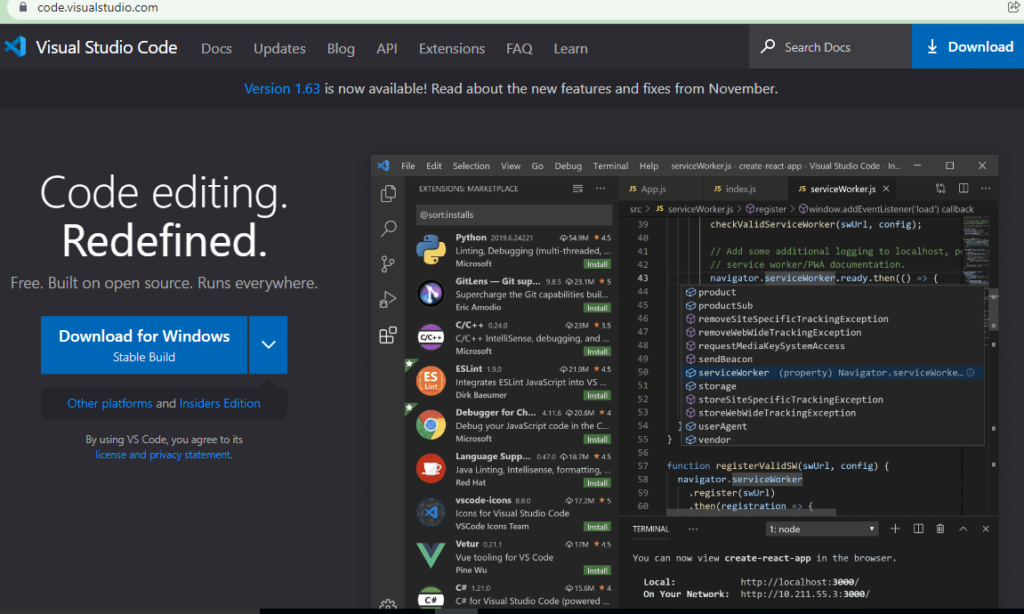
2) Click to Download for Windows button in blue.
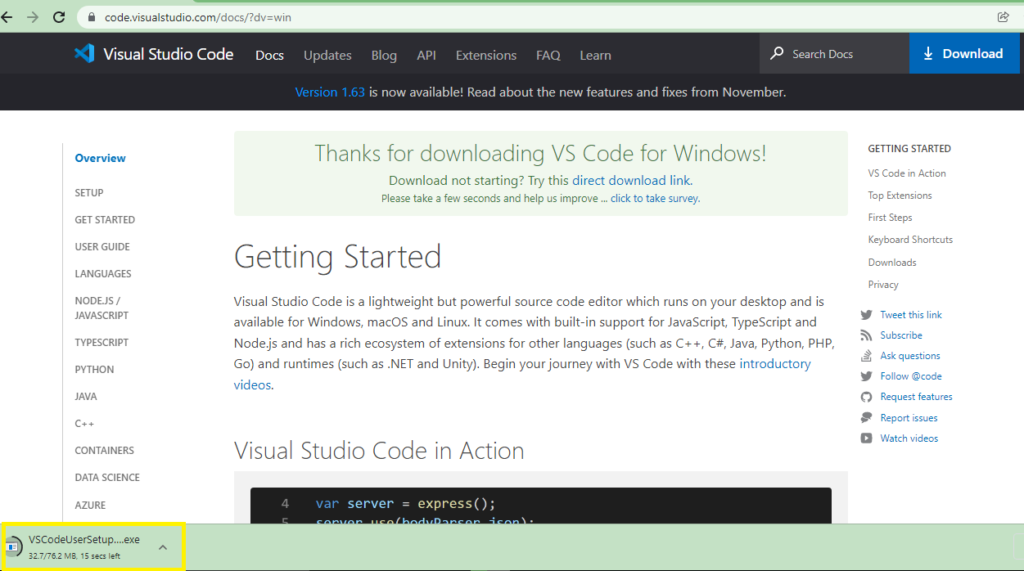
3) After click “Download for Windows” button an .exe file gets downloaded to your system
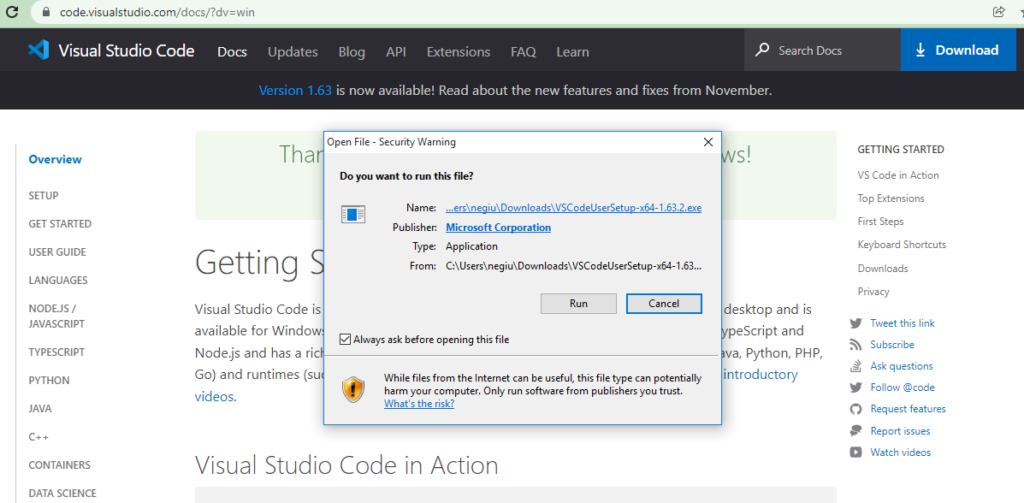
4) Run VSCodeUserSetUP.exe file to your local machine once its downloaded.
5) The Setup window gets appeared after running .exe file. Accept the agreement and click to Next button.
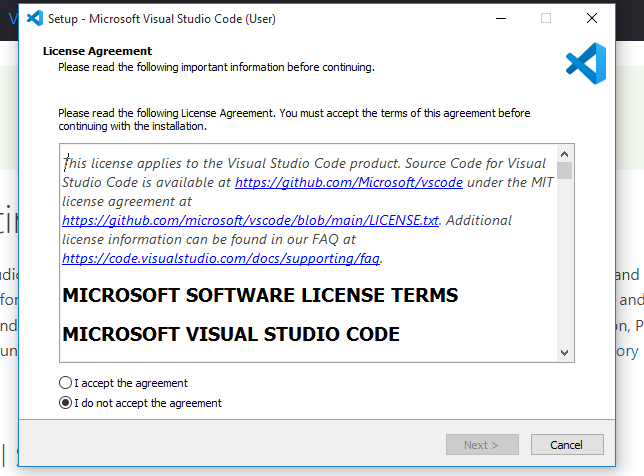
6) Select the default folder and click to next button
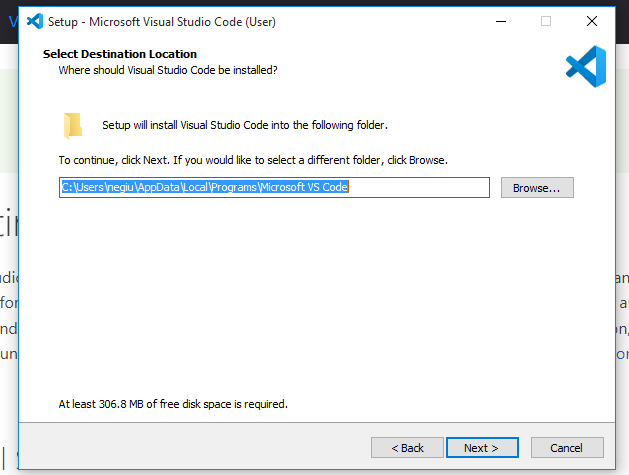
7) Keep default folder name and click to Next button
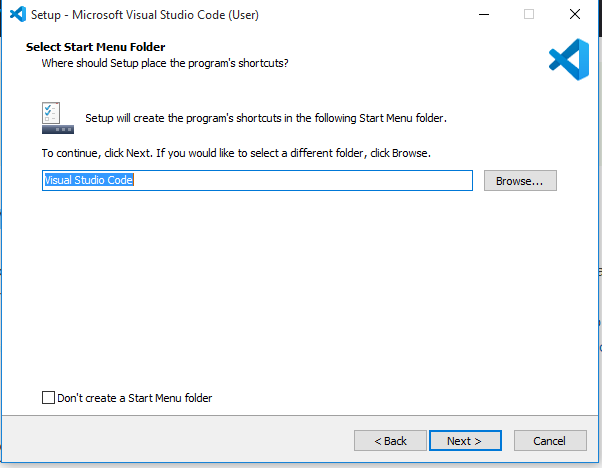
8) Click to Next button under “Select Additional Tasks” window
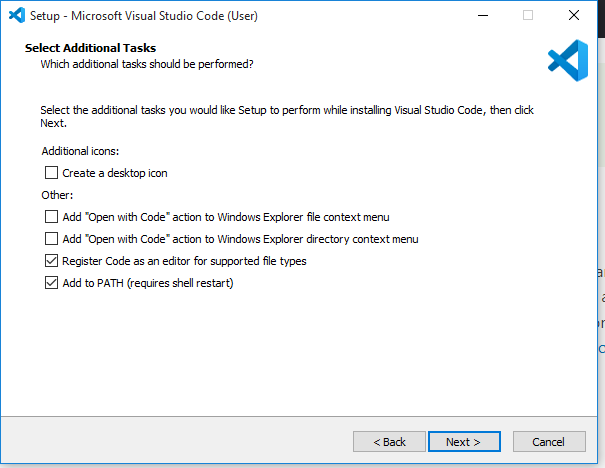
9) Under “Ready to Install” window, click Install button
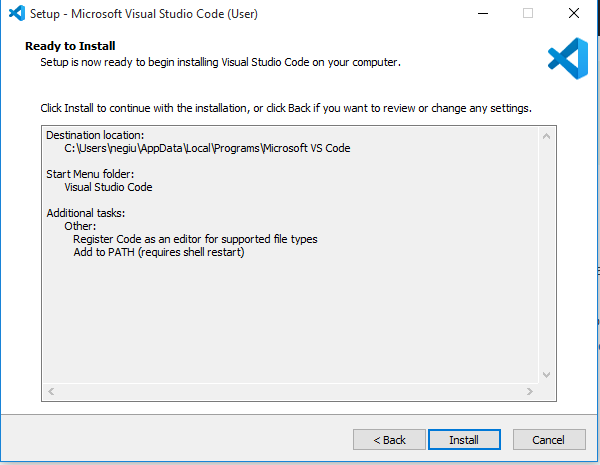
10) On last step just click to Finish.
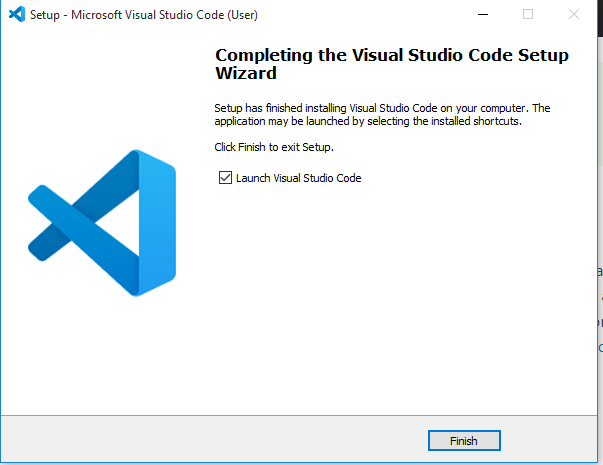
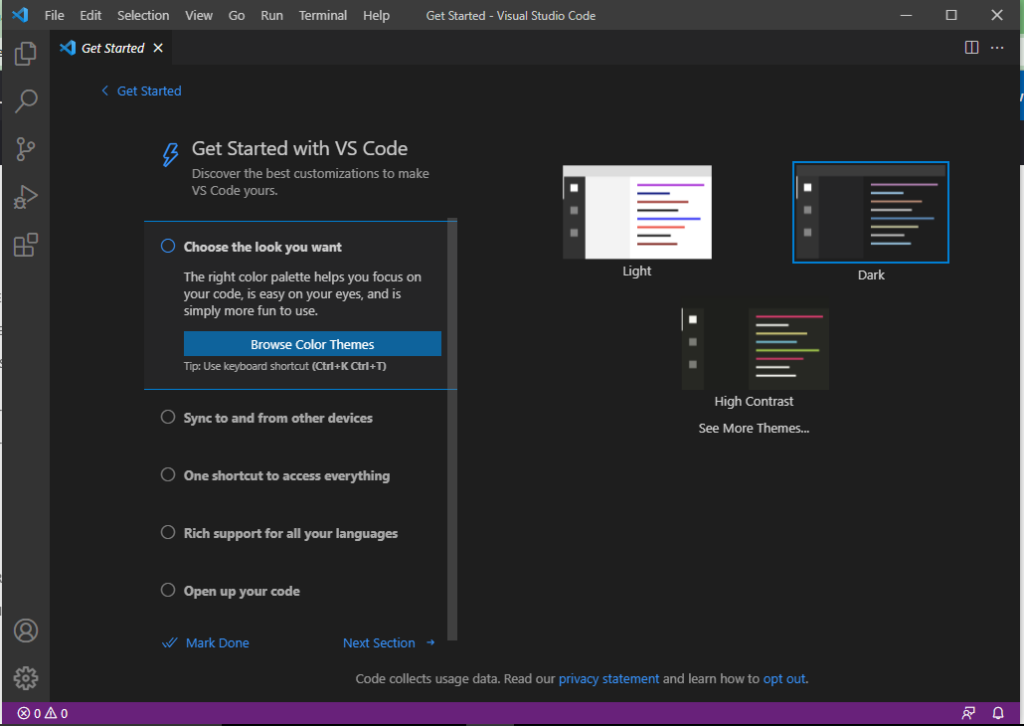
So, Following up the above steps sequentially , We can Download and install Visual Studio Code IDE for windows machine and can perform the coding for the supported languages along with Build-In support JavaScript, Node.js. We will be using the Visual Studio code in our upcoming automation tools like, Protector, Cypress tutorial in our further sessions.
Code2test would love to know your Feedback and suggestions in contents or if our learners need tutorial on some other topics not covered in site feel free to contact and share your suggestions.
How to Download and Installation Apache JMeter
In this tutorial , we will learn How to Download and Installation Apache JMeter, after the installation we will move on the advance topics of Apache Jmeter.
How to Download and Installation Apache JMeter?
Before the start of jmeter installation, we need to fulfill the precondition, which is installation and setup of java. As we are going to install the latest version of jmeter which is 5 and it supports only java 8 and 9, so request all the learners not to install the previous version of java.
Below are the steps to install the Apache Jmeter step by step.
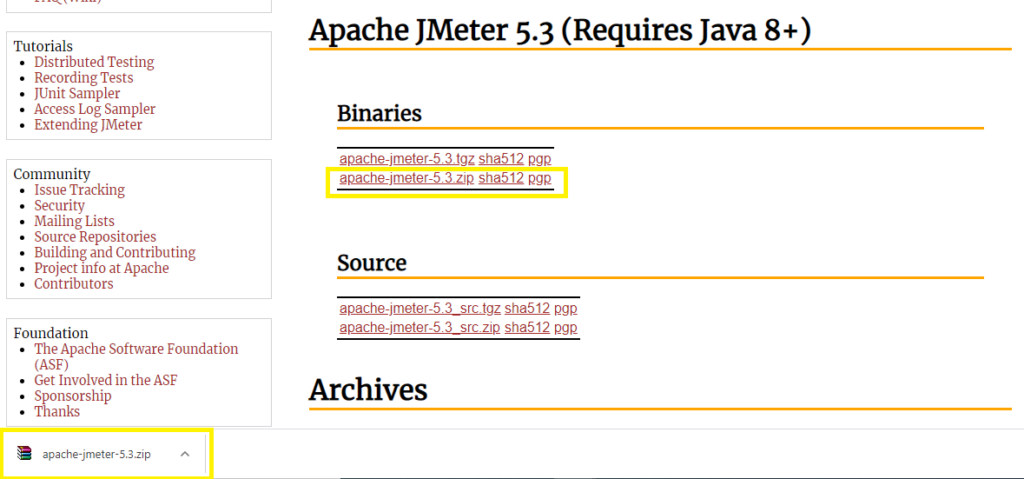
1) Go to the official website Apache Jmeter ,and scroll till binaries section under Apache Jmeter.
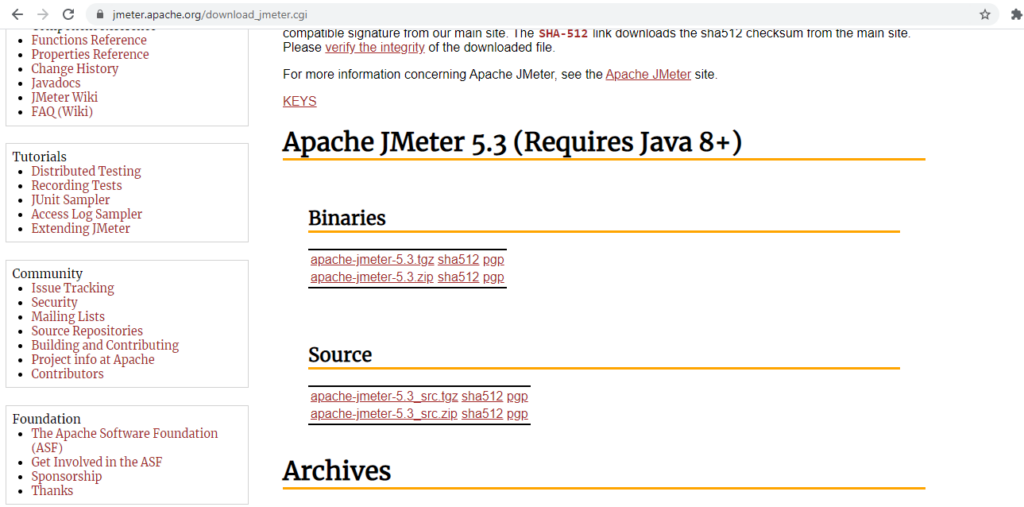
2) Under Binaries section, there are two files with .tgz (for linux machine) and .zip(for window machine). As working in window machine we click to .zip file.
3) Next step is to extract the apache jmeter jar file in to your preferred location, i have save it to c: drive.

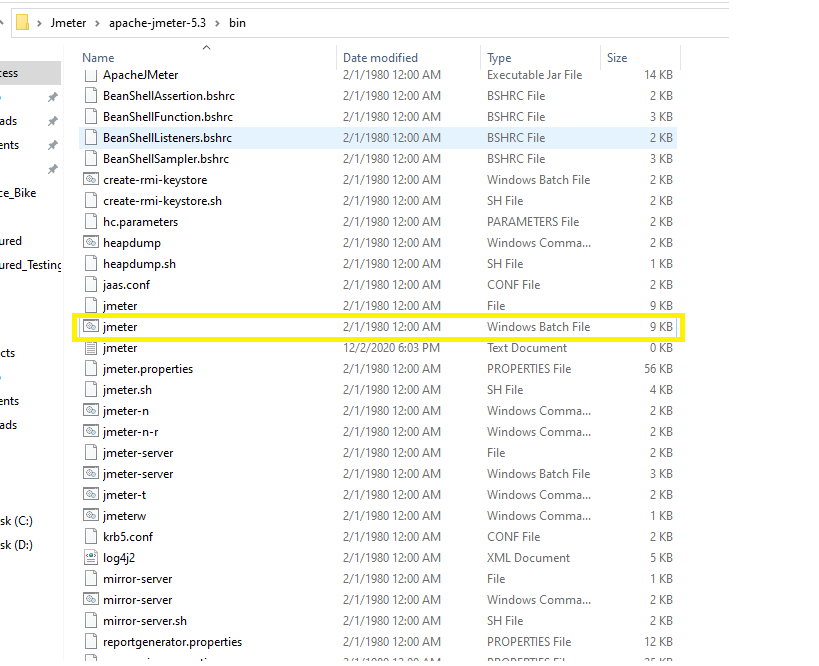
4) Open the bin folder of the extracted zip file and first search and then double click to Batch file with named as jmeter as displyed in below image.
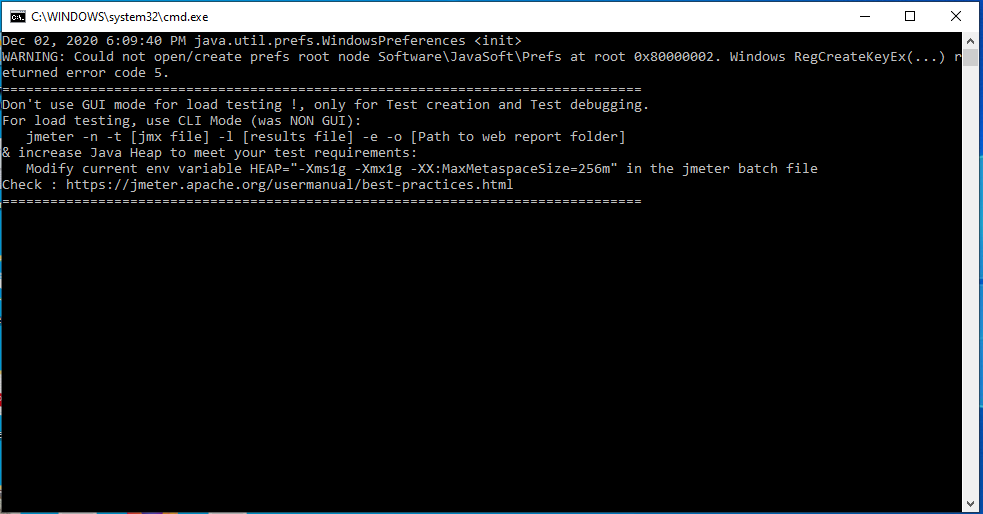
5) As we double click to jmeter batch file, a cmd console will get opened having some log details as below.
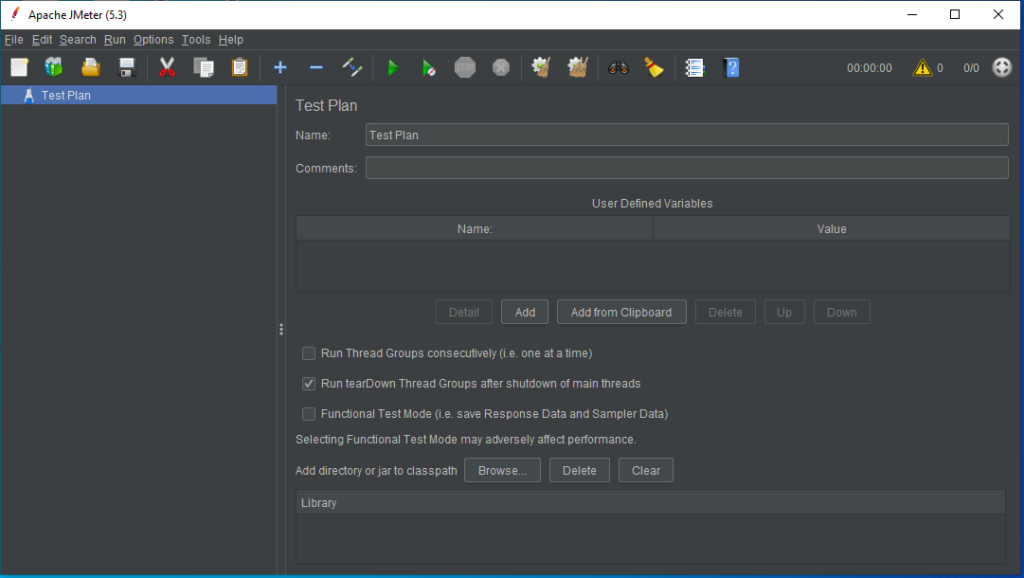
6) Finally after the execution of console logs, jmeter application will get opened, with all the menus and option getting displayed.
Conclusion
So in this tutorial we have learned the sequentially step by step installation of Apache jmeter, in next will learn the advance topics on creating the test plan and the test cases to achieve the performance of any type of application with live application session.
Also we will trying to understand the basic and advance concepts of jmeter step by step from the scratch. So be with us and learn.
How to perform Deserialization with Rest Assured
In previous tutorial, we have learned How to perform Serialization with Rest Assured. In this tutorial we are going to learn Deserialization with Rest Assured, this concept of deserialization is reverse of serialization. Lets focus on the concept of deserialization.
How to perform Deserialization with Rest Assured?
Deserialization is a process or mechanism of transforming bit stream in to object state. In context of Rest assured deserialization is a process of converting response body or payload in to in to object state.
In this tutorial, we will understanding the concept with java language to get things more simpler. To achieve deserialization we create POJO class where all the attribute are defined globally and below the variable the getter and setter methods are created.
Understanding concept of Deserialization with example
As we trigger the request payload using rest assured library, we get response and the value of the response gets initialized to the class attribute or global initialized variable with the help of POJO class object.
Let consider a response payload for which POJO class is to be created.
{"status":"success",
"data":
{"id":1,
"employee_name":"Tiger Nixon",
"employee_salary":320800,
"employee_age":61,
"profile_image":""},
"message":"Successfully! Record has been fetched."}
Let open the payload in jsoneditor.
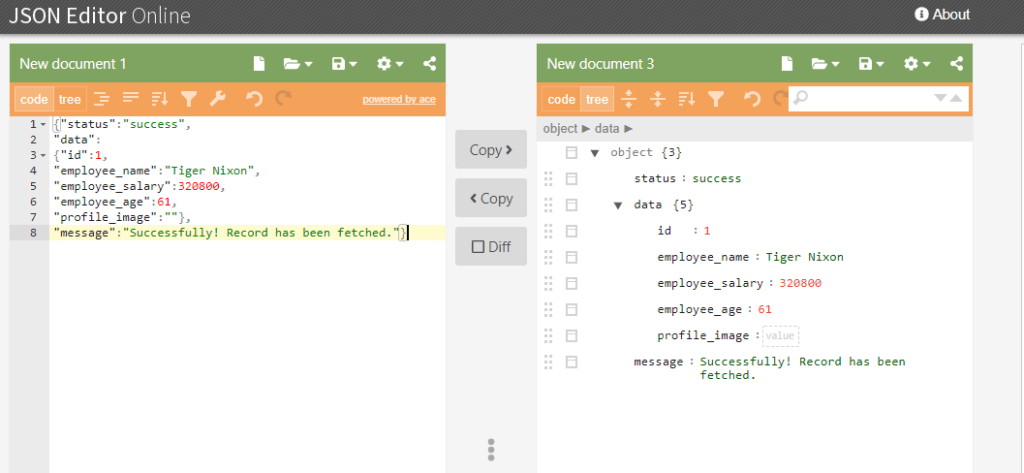
Now create a POJO class(EmployeeDetails.java) and define all the attribute or key of the response json displayed above in a form of global valriable and also create their getter and setter methods as below.
package com.restAssured.employee;

public class EmployeeDetails {

	private String status=null;
	private Data data=null;
	private String message=null;

	public String getMessage() {
		return message;
	}
	public void setMessage(String message) {
		this.message = message;
	}
	public String getStatus() {
		return status;
	}
	public void setStatus(String status) {
		this.status = status;
	}
	public Data getData() {
		return data;
	}
	public void setData(Data data) {
		this.data = data;
	}


}
As we see in response json that their is again a json (nested json) inside Data attribute or key. So in this case create another POJO class(Data.java) as displayed below.
package com.restAssured.employee;

public class Data {

	private int id;
	private String employee_name=null;
	private int employee_salary;
	private int employee_age;
	private String profile_image=null;

	public int getId() {
		return id;
	}
	public void setId(int id) {
		this.id = id;
	}
	public String getEmployee_name() {
		return employee_name;
	}
	public void setEmployee_name(String employee_name) {
		this.employee_name = employee_name;
	}
	public int getEmployee_salary() {
		return employee_salary;
	}
	public void setEmployee_salary(int employee_salary) {
		this.employee_salary = employee_salary;
	}
	public int getEmployee_age() {
		return employee_age;
	}
	public void setEmployee_age(int employee_age) {
		this.employee_age = employee_age;
	}
	public String getProfile_image() {
		return profile_image;
	}
	public void setProfile_image(String profile_image) {
		this.profile_image = profile_image;
	}

}
We are now done with creation of POJO classes. Create a class (RestAssuredRider.java) and run the class where we call the rest assured methods and pass the rest API and get the reponse inside the defined POJO variables.
package com.restAssured.employee;

import static io.restassured.RestAssured.given;

import io.restassured.RestAssured;
import io.restassured.parsing.Parser;

public class RestAssuredRider {

	public static void main(String[] args) {

RestAssured.useRelaxedHTTPSValidation();


EmployeeDetails empDetail =given().expect().defaultParser(Parser.JSON)
.when()
		.get("http://dummy.restapiexample.com/api/v1/employee/1").as(EmployeeDetails.class);

System.out.println("Status value is---->"+empDetail.getStatus());
System.out.println("Message is---->"+empDetail.getMessage());

	}

}
Code in eclipse with be displayed as below.
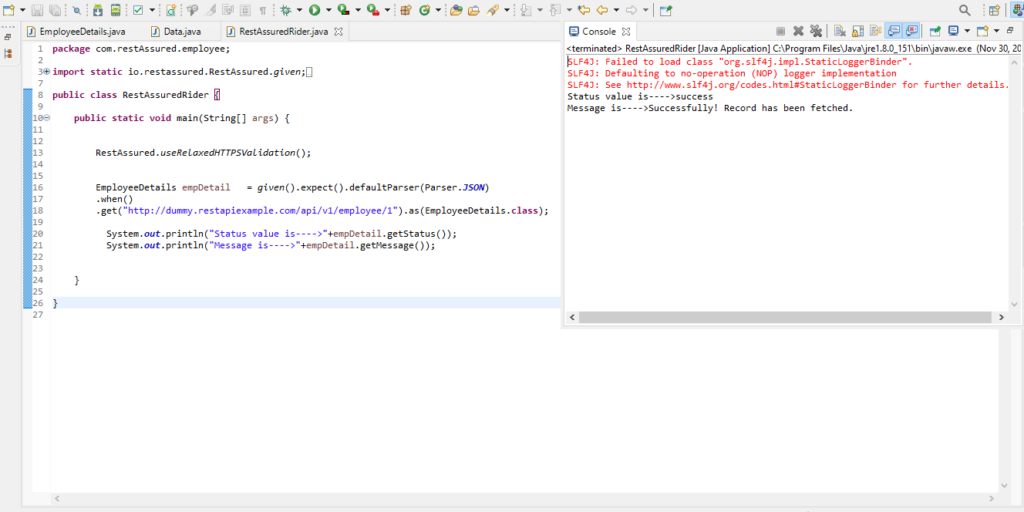
Conclusion
So in the above eclipse console, we see that we have received the response that is printed by calling the object of POJO class, and we the help of reference variable we call all the attribute key along with its value and work with it as per requirement.
How to perform Serialization with Rest Assured
In previous tutorial, we have learned how to parse Json Response body . In this tutorial we will discuss the concept of Serialization with Rest Assured using POJO classes
How to perform Serialization with Rest Assured?
Serialization is a process or mechanism of transforming the object state in the bit stream. In context of rest assured serialization is a process of converting the object state in the request body or payload.
As in this tutorial we are using java language to make things more simpler, In serialization we create java object from the POJO (plain old java object) class where all the attributes of the request is been defined with in a class as per the required payload structure and passed this object as a request with in the body keyword as a parameter in rest assured.
Let consider a payload as an example for which POJO class is to be created.
{
“location”: {
“lat”: -50.383494,
“lng”: 44.427362
},
“accuracy”: 70,
“name”: “Saket Terminal”,
“phone_number”: “(+91) 854 908 5667”,
“address”: “new collectorate office”,
“types”: [
“Belt teminal”,
“Commercial shop”
],
“website”: “https://code2test.com”,
“language”: “French-IN”
}
Let open this payload inside the jsoneditor, it will display as below.
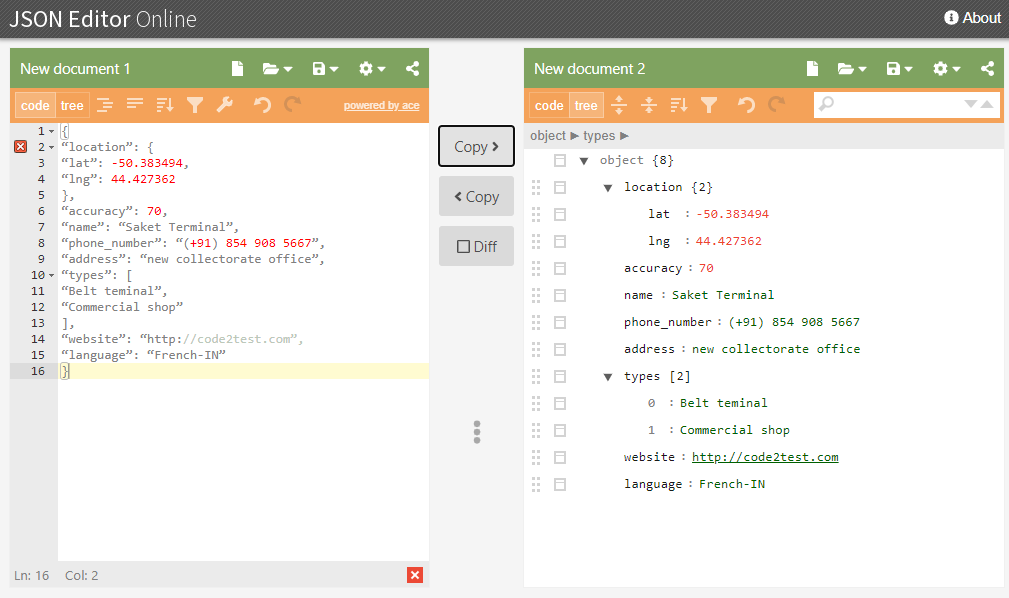
Creating POJO class (AddPlace.java) with getter and setter objects for the all the attributes present on the above JSon.
package com.restAssured;
import java.util.List;
public class AddPlace {

	private int accuracy=0;
	private String name=null;
	private String phone_number=null;
	private String address=null;
	private String website=null;
	private String language=null;
	private Location location=null;
	private List<String> types=null;

	public Location getLocation() {
		return location;
	}
	public void setLocation(Location location) {
		this.location = location;
	}
	public int getAccuracy() {
		return accuracy;
	}
	public void setAccuracy(int accuracy) {
		this.accuracy = accuracy;
	}
	public String getName() {
		return name;
	}
	public void setName(String name) {
		this.name = name;
	}
	public String getPhone_number() {
		return phone_number;
	}
	public void setPhone_number(String phone_number) {
		this.phone_number = phone_number;
	}
	public String getAddress() {
		return address;
	}
	public void setAddress(String address) {
		this.address = address;
	}
	public List<String> getTypes() {
		return types;
	}
	public void setTypes(List<String> types) {
		this.types = types;
	}
	public String getWebsite() {
		return website;
	}
	public void setWebsite(String website) {
		this.website = website;
	}
	public String getLanguage() {
		return language;
	}
	public void setLanguage(String language) {
		this.language = language;
	}

}
As we need to create other POJO class (Location.java) for location attribute, as its again a json (nested JSon).
package com.restAssured;
public class Location {
	public double lat;
	public double lng;


	public double getLat() {
		return lat;
	}
	public void setLat(double lat) {
		this.lat = lat;
	}
	public double getLng() {
		return lng;
	}
	public void setLng(double lng) {
		this.lng = lng;
	}

}
Now create a final POJO class (RestServiceDemo.java) which provides all the values to the setter methods and finally call rest assured keywords along with methods and pass the object inside body keyword and run the script.
package com.restAssured;
import io.restassured.RestAssured;
import io.restassured.path.json.JsonPath;
import io.restassured.response.Response;
import static io.restassured.RestAssured.*;
import static org.hamcrest.Matchers.*;
import java.util.ArrayList;

public class RestServiceDemo {
public static void main(String[] args) {

	RestAssured.baseURI ="https://rahulshettyacademy.com";
	RestAssured.useRelaxedHTTPSValidation();

	AddPlace  pojo= new AddPlace();
	pojo.setAccuracy(70);
	pojo.setAddress("Saket Terminal");
	pojo.setLanguage("UnitedKingdon-IN");
	pojo.setPhone_number("(+91) 8567523457");
	pojo.setWebsite("https://code2test.com");
	pojo.setName("new collectorate office");

	ArrayList<String> list=new ArrayList<String>();
	list.add("Belt Number");
	list.add("Local Number");

	pojo.setTypes(list);

	Location loc=new Location();
	loc.setLat(-34.4567);
	loc.setLng(56.2453);

	pojo.setLocation(loc);

 Response response=given().queryParam("key","qaclick123")
.body(pojo)
.when().post("maps/api/place/add/json")
.then().log().all().assertThat().assertThat().statusCode(200).extract().response();
System.out.println("Get the response"+response.toString());

	}
}
After Running the code in eclipse, the output in console display as below.
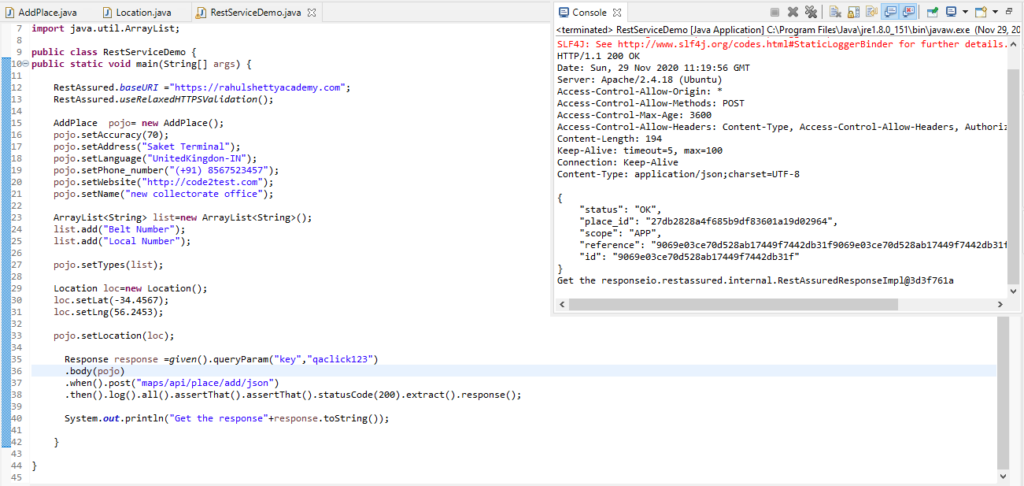
Conclusion
So in above image we see that, we received the status “OK” response or in other words successful response.
We have not passed any Json request or payload on the body keyword as parameter but the object of the POJO class. So now we are clear with the concept of serialization in our next tutorial we will understand the concept of de-serialization with rest assured.
Parse JSON Response Body with Rest Assured
In Previous tutorial, we have learned how to Test Rest Api using Rest Assured so in current tutorial we will move to more advance topic and understand Parse JSON Response Body with Rest Assured.
How to Parse JSON Response Body with Rest Assured?
To under in depth, we will parse Json mock response body with two differnet type of json body, firstly we will consider a simple json response after that we will take nested json response body and try to parse with different sets of scenarios.
1) Simple Json : To parse json body ,we will be using JsonPath class and be using its methods to get the value of a particular attribute.
Below is the mock json response
{
"status": "OK",
"place_id": "9172e95034d47483d8e0775710eb6a54",
"scope": "APP",
"reference": "de2fad9729217c7b69d9a0bb4906e742de2fad9729217c7b69d9a0bb4906e742",
"id": "de2fad9729217c7b69d9a0bb4906e742"
}
Suppose we required to retrieve the value of place_id from the above mock json response, so to get the vlaue of “place_id ” below is the code for the same.
JsonPath jpath=new JsonPath(response);
String placeId=jpath.getString("place_id");
Complete code in eclipse with be look like this:
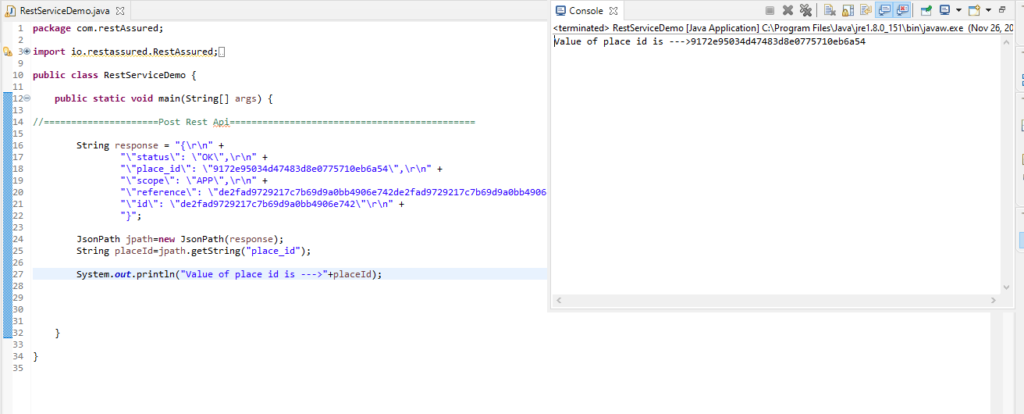
2) Nested Json: Json can contain nested objects in Json format and these object may contains Array with value assigned to it key in key value form this type of json structure is known as nested Json.
Below is the mock json response example:
{
"dashboard": {
"purchaseAmount": 1060,
"website": "code2test.com"
},
"courses": [
{
"title": "Selenium",
"price": 50,
"copies": 6
},
{
"title": "Appium",
"price": 40,
"copies": 4
},
{
"title": "Rest Assured",
"price": 45,
"copies": 10
},
{
"title": "SoapUI",
"price": 30,
"copies": 5
}
]
}
To view or under json in better way, you can can open https://jsoneditoronline.org/ website and paste above json file it will give a tree structre as shown below.
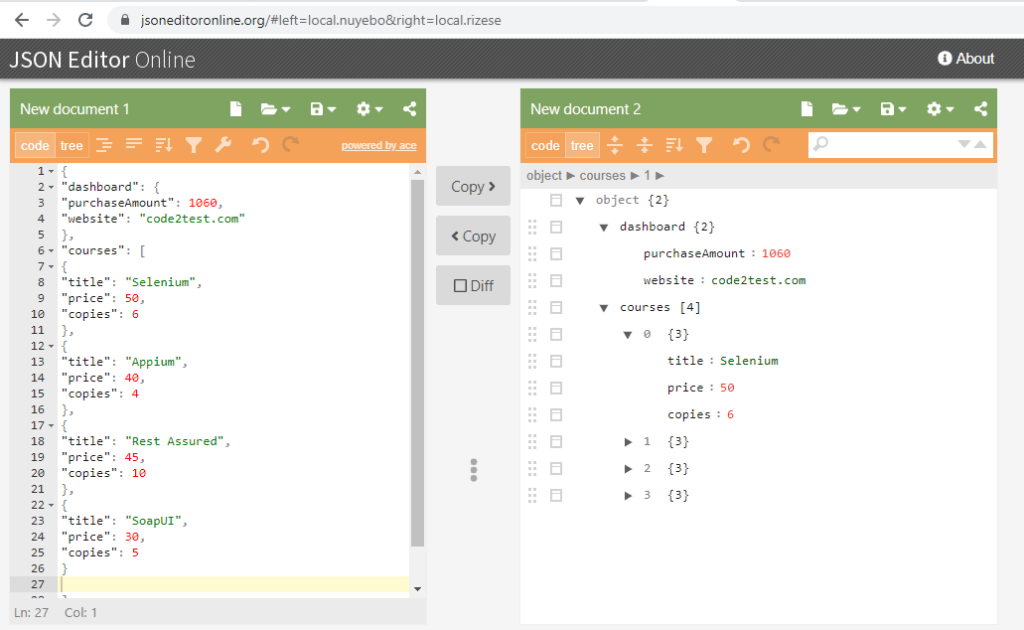
Lets parse the above json with all possible ways by considering the below scenarios.
a) Get the purchase amount of the course?
b) Title of first course (which is selenium) ?
c) Total copies sold by SoapUI?
d) Total number of courses?
e) Print all the title of the courses
Lets start above sechanario sequesncially.
a) Get the purchase amount of the course
JsonPath jpath=new JsonPath(response);
int puchaseAmt=jpath.getInt("dashboard.purchaseAmount");
b) Title of first course (which is selenium)
JsonPath jpath=new JsonPath(response);
String firstCourseTitle=jpath.getString("courses[0].title");
c) Total copies sold by SoapUI
JsonPath jpath=new JsonPath(response);
String totalCopiesSoapUi=jpath.getString("courses[3].copies");
d) Total number of courses?
JsonPath jpath=new JsonPath(response);
int sizeofCourse=jpath.getInt("courses.size()");
e) Print all the title of the courses
JsonPath jpath=new JsonPath(response);
int sizeofCourse=jpath.getInt("courses.size()");
for(int i=0;i<sizeofCourse;i++)
{
String alltitle=jpath.getString("courses["+i+"].title");
System.out.print(alltitle+", ");

}
Complete code in eclipse will look in below
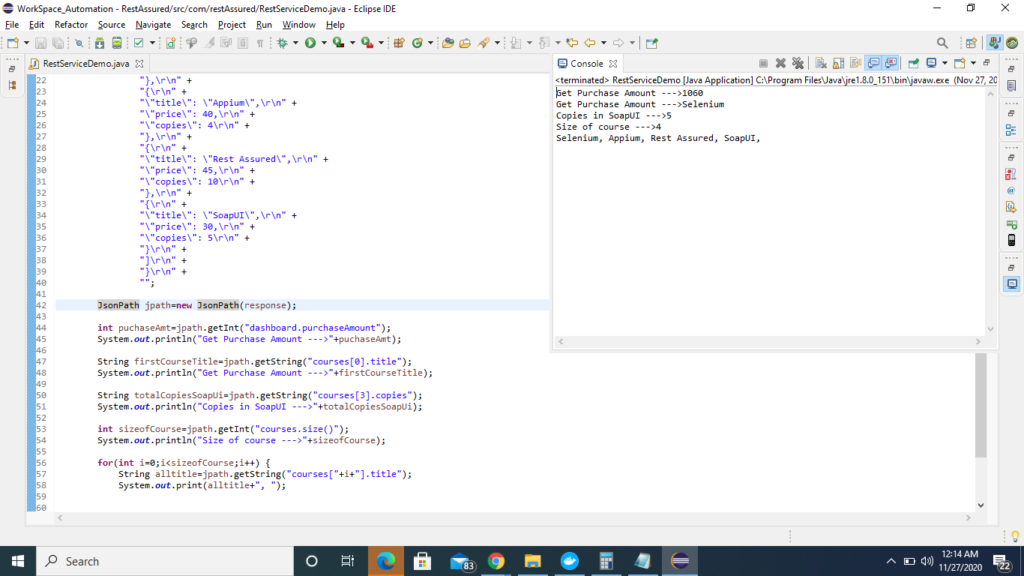
Conclusion
So in the above tutorial we have learned to parse a simple and complex json or nested json , this parsing of json is very helpful when we hit any rest api and get the json response, in that case we need to retrieve the value from json in key value pair.
Test Rest Api using Rest Assured
In previous tutorial we have how to Configure Eclipse with Rest-Assured API, In this tutorial we will be learning how to write and Test Rest Api using Rest Assured.
Test Rest Api using Rest Assured
To understand in depth, we will are taking a simple Rest Api and the details of this Api is provided below.
End Point->https://rahulshettyacademy.com
Resource->/maps/api/place/add/json
Query Parameter -> key =qaclick123
Http method-> POST
Sample Request Json->
{
“location”: {
“lat”: -38.383494,
“lng”: 33.427362
},
“accuracy”: 50,
“name”: “Frontline house”,
“phone_number”: “(+91) 983 893 3937”,
“address”: “29, side layout, cohen 09”,
“types”: [
“shoe park”,
“shop”
],
“website”: “http://google.com”,
“language”: “French-IN”
}
Sample Response Json->
{
“status”: “OK”,
“place_id”: “928b51f64aed18713b0d164d9be8d67f”,
“scope”: “APP”,
“reference”: “736f3c9bec384af62a184a1936d42bb0736f3c9bec384af62a184a1936d42bb0”,
“id”: “736f3c9bec384af62a184a1936d42bb0”
}
In order to get the above response, we will follow the below steps through java code using rest assured api
1) We will use Rest assured class to create a request body and provide the required parameters to the request body
2) Will define the https type
3) Sending request to the server
4) Getting back the response from the server
5) Display the response in console of eclipse
How to Write and Test Rest Api using Rest Assured
Find Below code to hit the request from Rest Assured Api and getting back the response from the server.
package com.restAssured;

import io.restassured.RestAssured;
import static io.restassured.RestAssured.*;

public class RestServiceDemo {

public static void main(String[] args) {

//=====================Post Rest Api======================
RestAssured.baseURI="https://rahulshettyacademy.com";
RestAssured.useRelaxedHTTPSValidation();

given().queryParam("key", "qaclick123").header("Content-Type", "application/json")
.body("{\r\n" +
"  \"location\": {\r\n" +
"    \"lat\": -38.383494,\r\n" +
"    \"lng\": 33.427362\r\n" +
"  },\r\n" +
"  \"accuracy\": 50,\r\n" +
"  \"name\": \"Noida Residence\",\r\n" +
"  \"phone_number\": \"(+91) 8587657896 \",\r\n" +
"  \"address\": \"29, Supertech, cohen 09\",\r\n" +
"  \"types\": [\r\n" +
"    \"shoe park\",\r\n" +
"    \"shop\"\r\n" +
"  ],\r\n" +
"  \"website\": \"http://google.com\",\r\n" +
"  \"language\": \"French-IN\"\r\n" +
"}\r\n" +
"")
.when().post("/maps/api/place/add/json")
.then().log().all().assertThat().statusCode(200);

	}

}
Code in Eclipse:
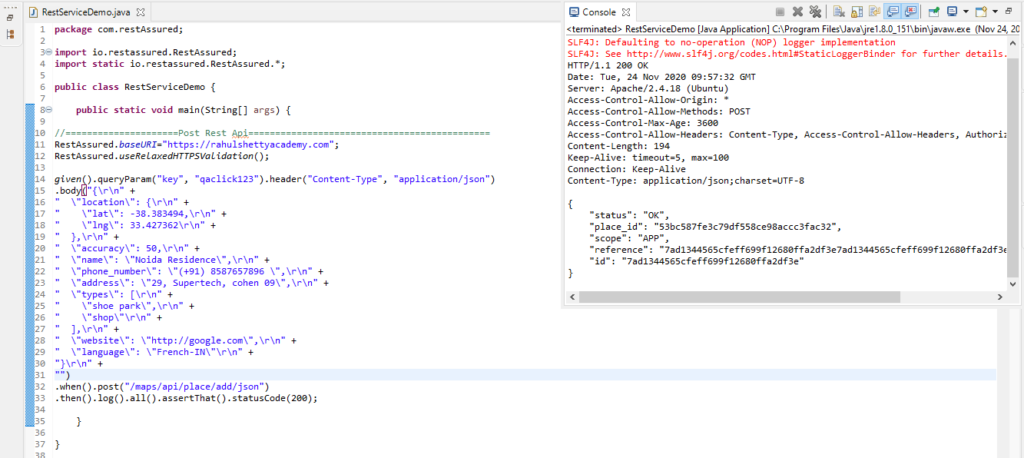
Code Explanation:
1) This line of code uses Rest Assured Class followed by baseURI method to capture the baseURL
RestAssured.baseURI="https://rahulshettyacademy.com";2) It means you are trusting all hosts even regardless the SSL certificate is invalid
RestAssured.useRelaxedHTTPSValidation();3) In this line of code we are providing the credentials, as query parameters header type and request json under body keyword.
given().queryParam("key", "qaclick123").header("Content-Type", "application/json")
.body("{\r\n" +
"  \"location\": {\r\n" +
"    \"lat\": -38.383494,\r\n" +
"    \"lng\": 33.427362\r\n" +
"  },\r\n" +
"  \"accuracy\": 50,\r\n" +
"  \"name\": \"Noida Residence\",\r\n" +
"  \"phone_number\": \"(+91) 8587657896 \",\r\n" +
"  \"address\": \"29, Supertech, cohen 09\",\r\n" +
"  \"types\": [\r\n" +
"    \"shoe park\",\r\n" +
"    \"shop\"\r\n" +
"  ],\r\n" +
"  \"website\": \"http://google.com\",\r\n" +
"  \"language\": \"French-IN\"\r\n" +
"}\r\n" +
"")
4) under When keyword we are providing the resource or in other words the extended URL after base url. for ex: https://rahulshettyacademy.com//maps/api/place/add/json
.when().post("/maps/api/place/add/json")
5) Under then keyword, we provide validation code here we provided 200 which means successfull
.then().log().all().assertThat().statusCode(200);So in above tutorial we have learned the test rest assured api using rest assured, in further tutorial we will learn more features with in Rest API
Configure Eclipse with Rest-Assured API
In Previous Tutorial we have learned Introduction of Rest Assured, so in current tutorial we will understand how to Configure Eclipse with Rest-Assured API.
How to Configure Eclipse with Rest-Assured API
To configure and setup eclipse with Rest Assured API, we need to follow the below steps step by step:
3) Download the Rest Assured Jars
4) Setup rest assured jars in eclipse
Above steps will help in configuration of Rest assured, Step 1 & 2 are already discussed in previous tutorials (click and walkthrough the tutorial sequentially), we will proceed with 3 & 4 steps to get more in depth.
Download the Rest Assured Jars
1) Click to url Rest assured website for jar download.
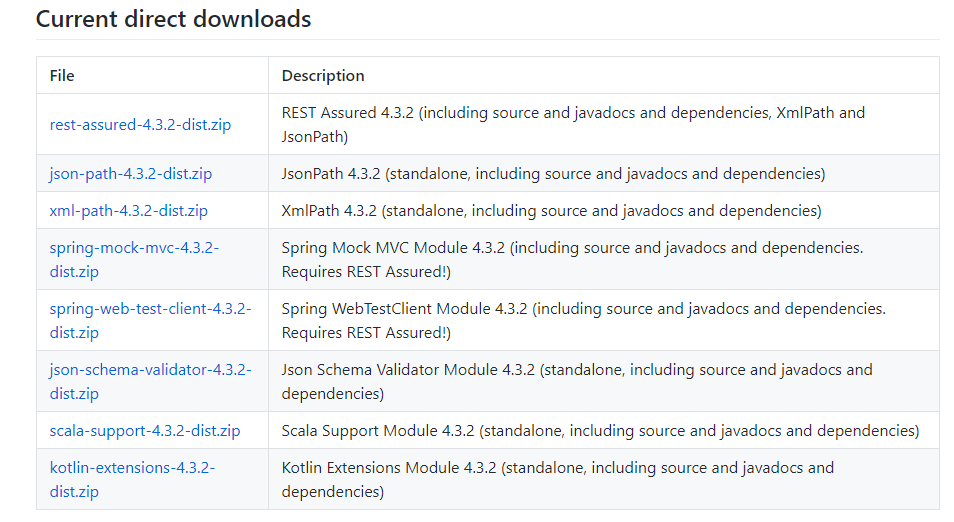
2) Download all the jars below the Files columns.
3) Unzip all the jars and save to your preferred folder, now next step is to setup rest assured jars in eclipse Ide.
Setup Rest assured jars in eclipse
1) Create java project in eclipse by click to File->New-> Java Project , mention the project name and click to Finish button
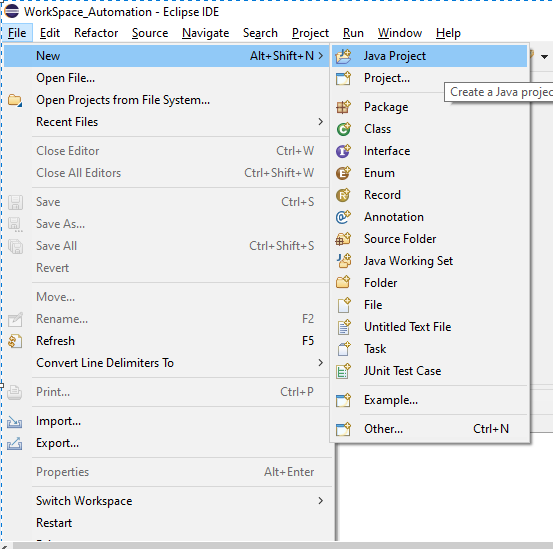
2) Now create a class inside default package
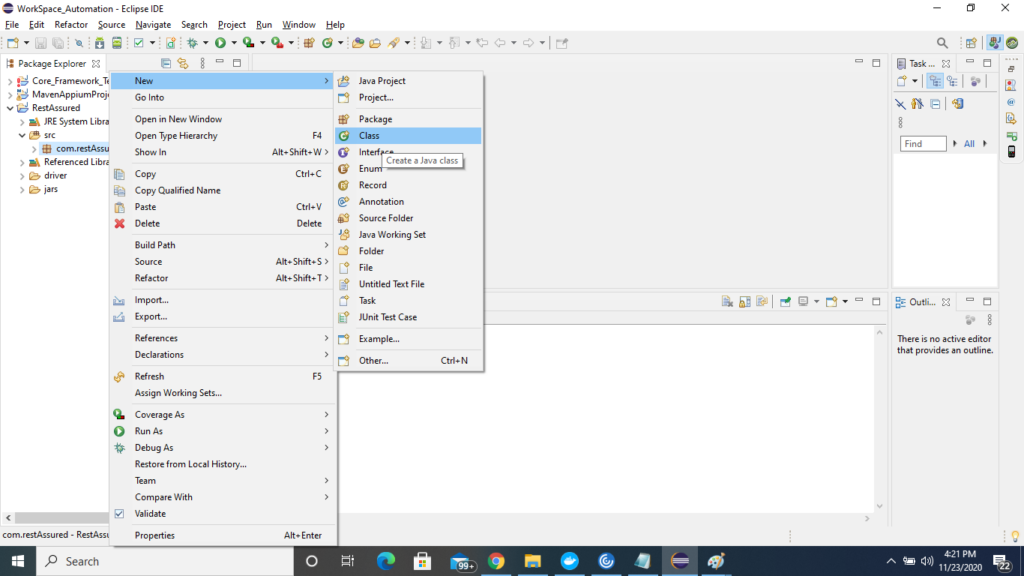
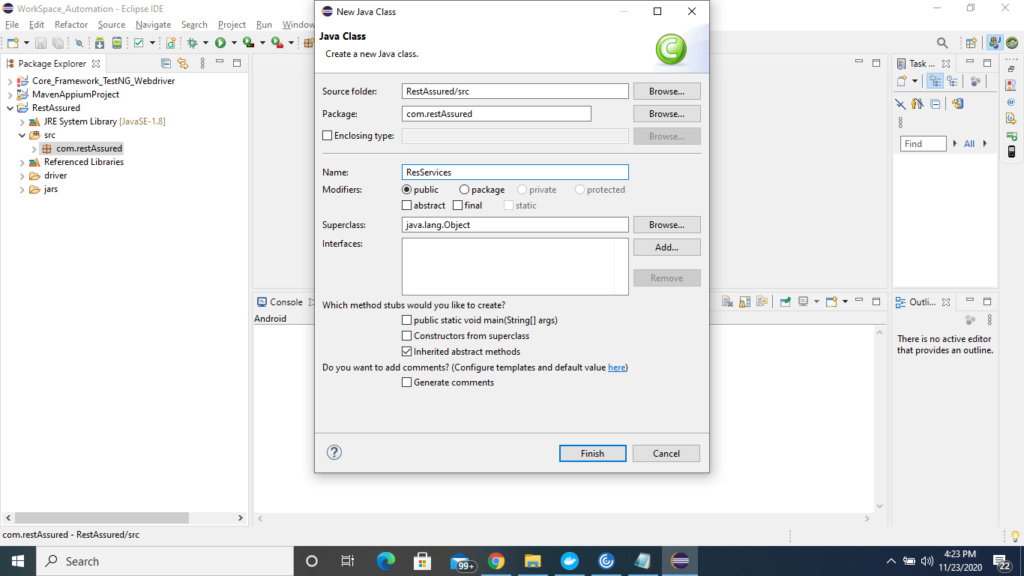
3) Now we need to provide the rest assured jars to the project for this follow the below steps.
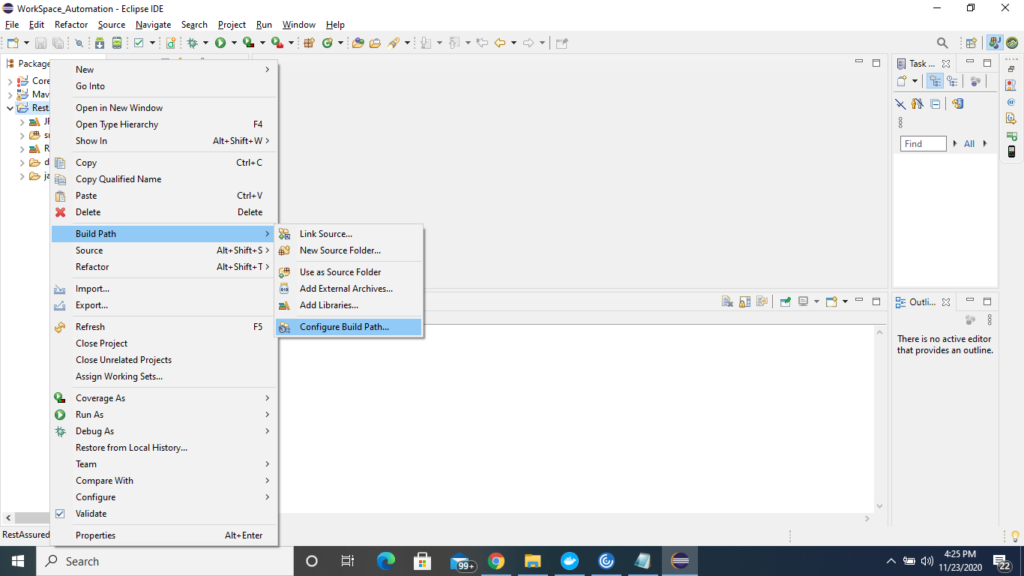
Right click to Project -> Select->Build path->Select Build path
4) Under Java Build Path window-> Click to Libraries->click to Add External jars and now select all the unzip external jars of rest assured and click t apply and close.
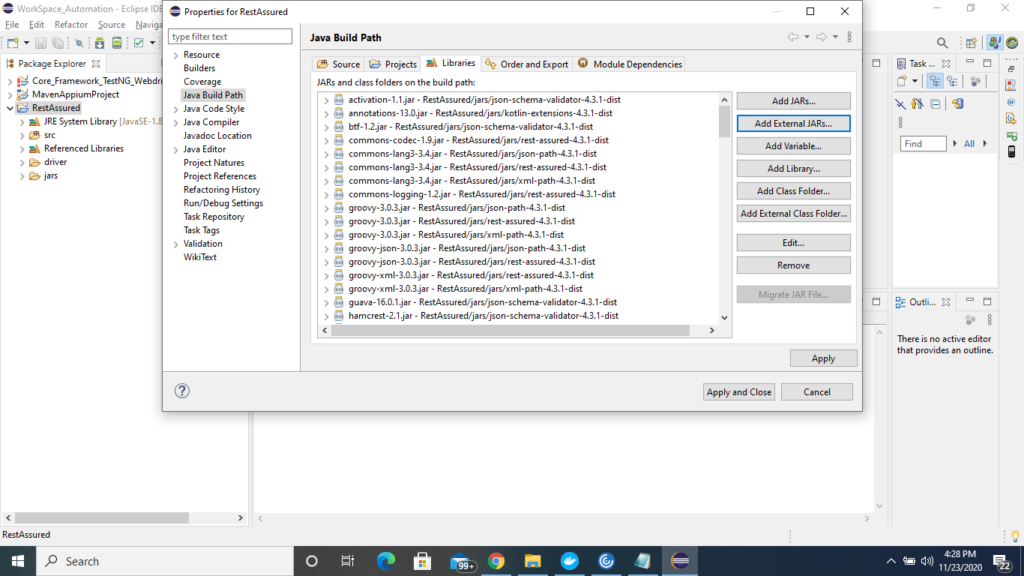
So by following above steps we will successfully install and setup rest assured on eclipse, in further tutorial , we will learn working on rest api and will try to hit rest services using rest assured and validate the output or expected output.
Comment for any feedback regarding the tutorial or any query on tutorial part