Home » Articles posted by code2test.com (Page 10)
Author Archives: code2test.com
Object identification through xpath
Xpath: is basically extended as XML path, its basically a syntax or command by which we can allocate or find the elements of Web page in Html Dom Structure. The basic syntax for Xpath is: //Tag[@attribute=”Value”]
There are basically two types of Xpath.
1) Absolute Xpath
2) Relative Xpath
Lets discuss the above type of Xpath in depth:
1) Absolute Xpath: In Absolute Xpath, the position of the element in HTML Dom structure is created in linear approach. The element is location from top of /HTML and followed the path till the required element followed by “/” sign.
/html/body/div[1]/div[2]/div/div/div/div/div[2]/form/table/tbody/tr[2]/td[1]/input
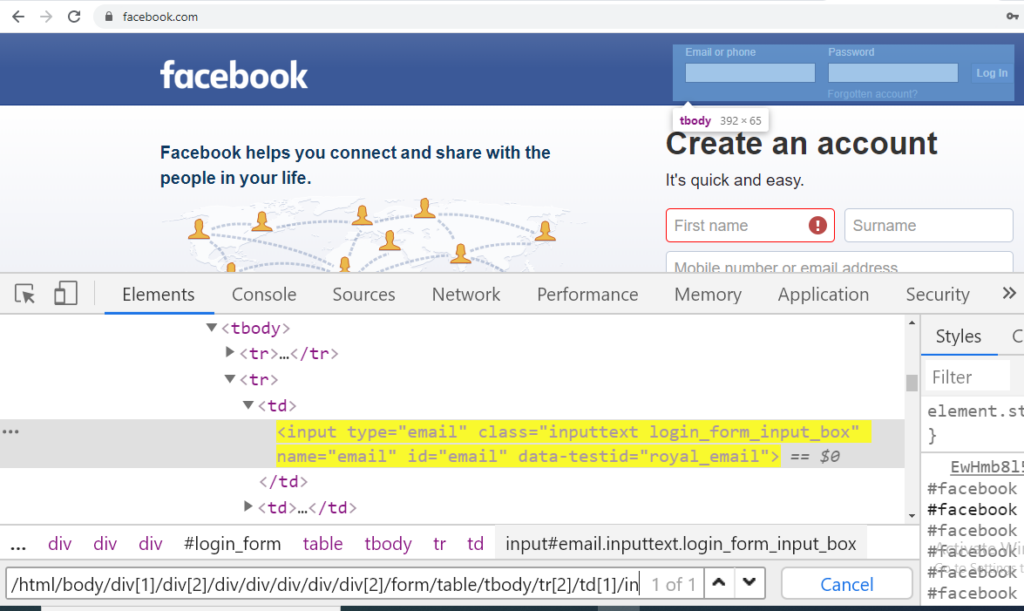
2) Relative Xpath: In Relative Xpath, there is no need to write the xpath from the start of HTML tag or writing the long xpath from Parent to child sequentially.The xpath can be created from the middle of the HTML body using “//” and use the tag name followed by attribute name and value.
//TagName[@Attributename=”Value”]
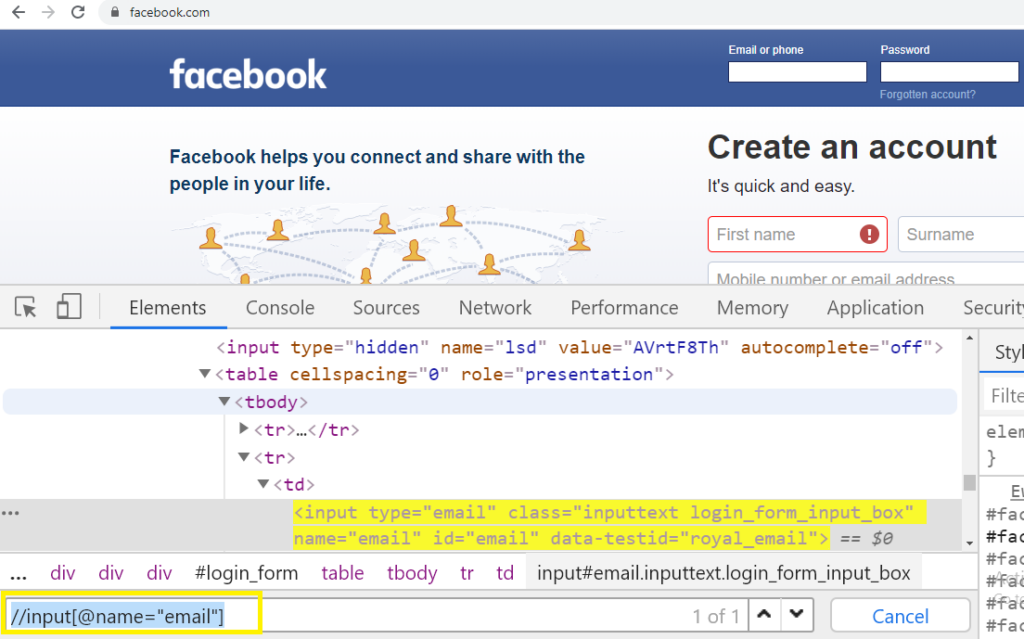
Methods can be used in Xpath Expression:
There are few methods or functions that can be used in the Xpath to create a unique Xpath elements and so that if there any change in the HTML or DOM structure this will not effect in the identification of Xpath and also helps on reducing the efforts of creating long xpath, searching the uniqness of web element and consumes time.
Below are the few mostly used method for Xpath creation as below:
1) Contains(): This method is helpful for the Web page where the HTML dom structure changes frequently, so with the help of partial text in the value of the attribute name we can locate the element on the Web page.Below is the syntax for Contains() method.
//*[contains(@attributeName,’partialValue’)
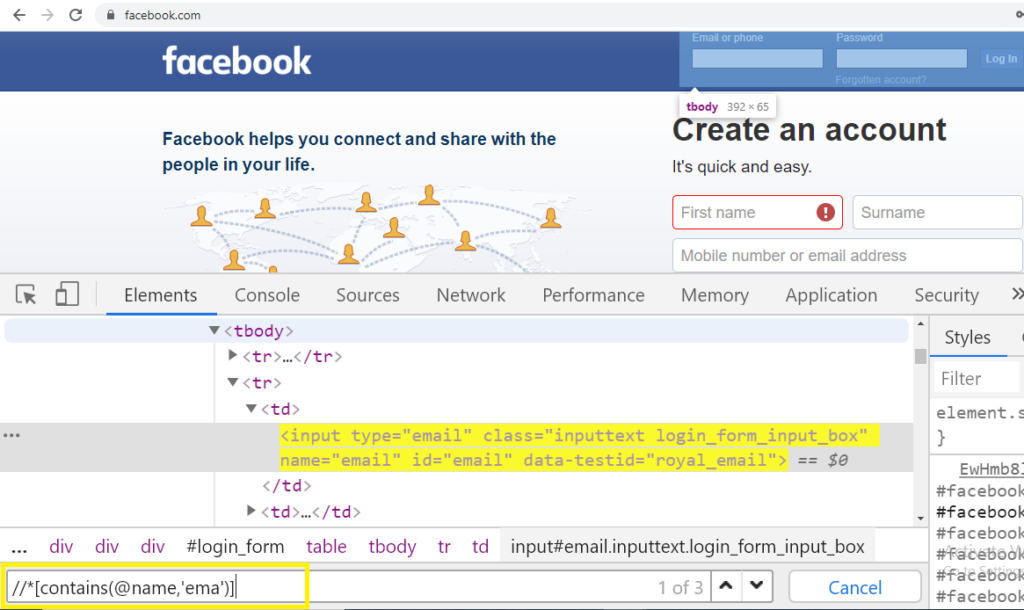
In the above screenshot example we can see that using partial text value of attribute the xpath is created.The attribute (name) with partial value (ema) is provided under the contains method and the element is highlighted in yellow in HTML Dom structure
2) Starts-with(): Using this function we need to provide the starting name of the value of the attribute of dynamic element and non dynamic web element. For example: We have a text in the web page which changes its value from (email) to (email123), (email1234),(email12345).
In this case we can provide the value as “email ” under the starts-with function. Below is the syntax:
//*[starts-with(@attributeName,’value”)]
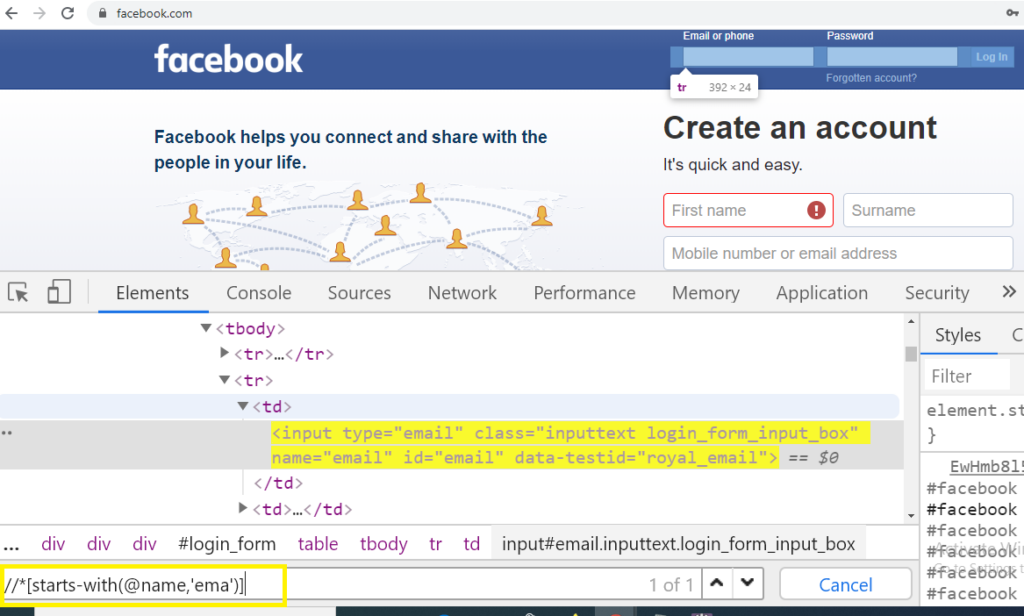
Note: There is difference in contains() and start-with() function is that in contains() function we can provide the value of attribute name from start, mid or from last string but in case of start-with() function we need to provide the value of attribute from the start of string till any length.
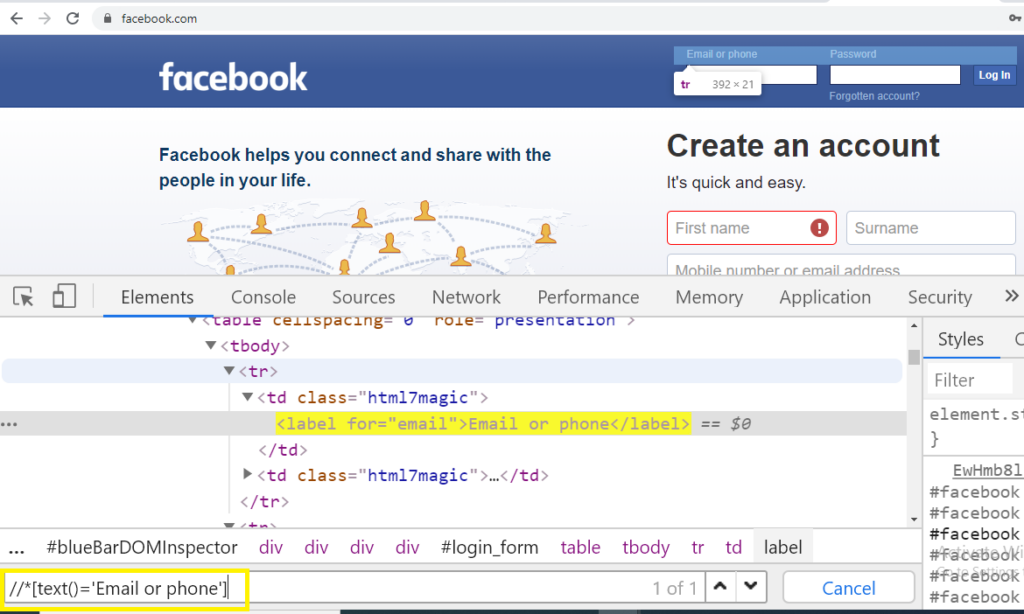
3) Text(): The function is used to locate the element using the exact text in the web page. We provide the text present in Web page as a value for the attribute name text and the element in the web page is uniquely identified.Below is the syntax for the text() method.
//*[text()=’Value’]
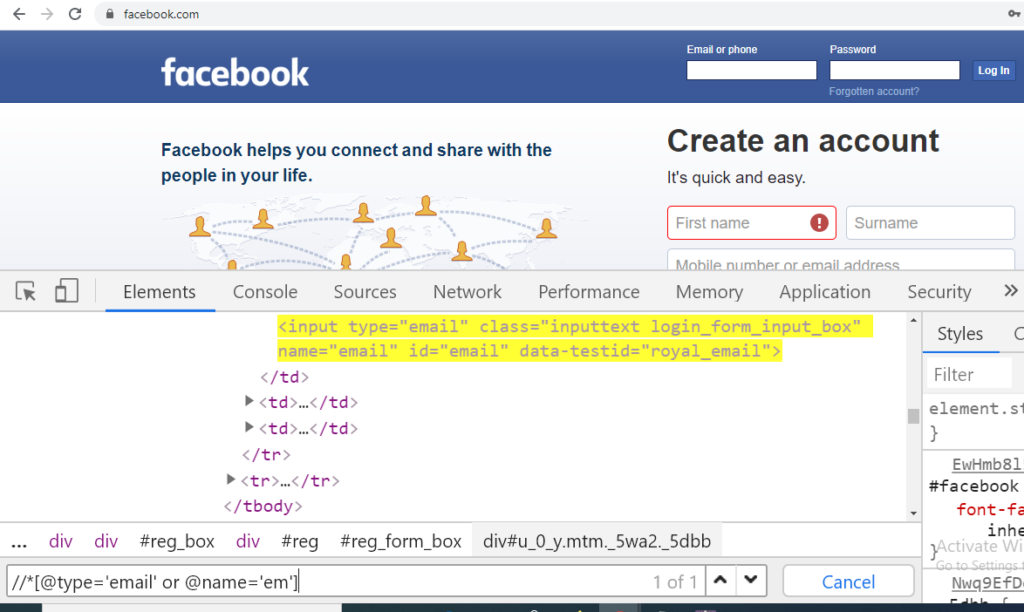
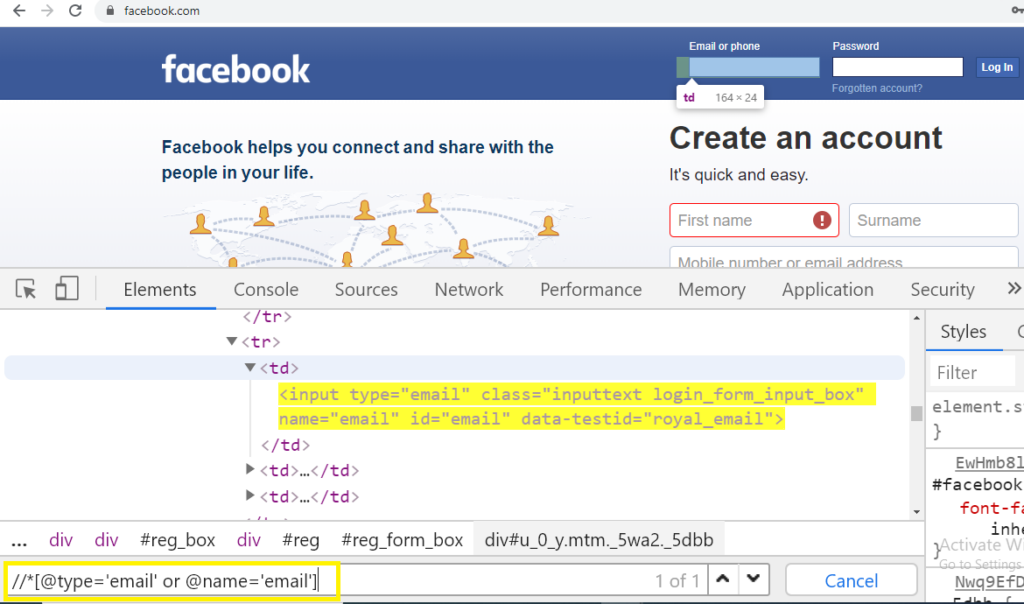
4) Or & AND: OR expression is used to provide the conditions to the attributes and its value to agree on certain set of condition. Its means there should be atleast one condition true, so that the element be located in web page.Below is the syntax for the OR expression:
//*[@attributeName=’value1′ or @attribute=’value2′]
AND function is used to provide the condition to which both the condition should be true to locate the element on Web page.Below is the syntax for AND function.
//*[@attributeName=’value1′ and @attribute=’value2′]
Object identification on webdriver defined methods
Selenium Webdriver interacts with webpage through object identification. Identification of any web element is performed by reading its source code and finding the unique value of the defined webelement.
Identification of object in selenium performed using findElement() and findElements().
There are few object identification techniques in webdriver .
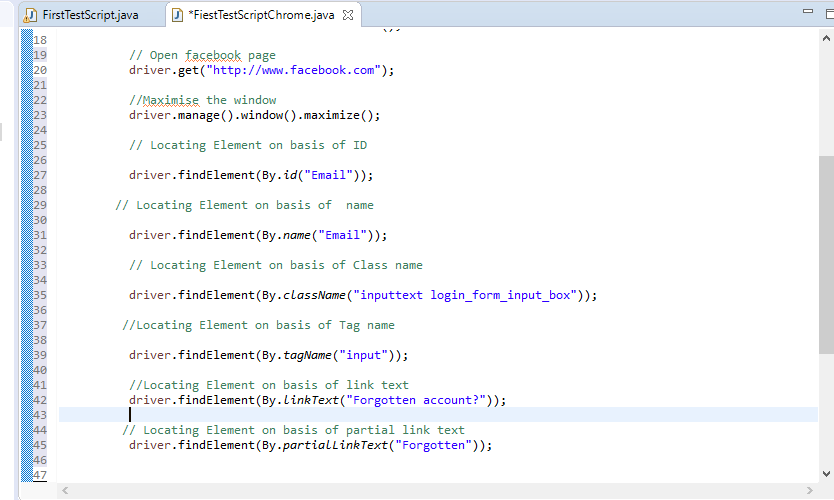
- ) Locating Element By Id-> To locate element on the basis of id, perform below scenarion.
- Firstly open an application (for ex: www.facebook.com)
- Move to login page and click to F12 button on you keyboard . The source code will open
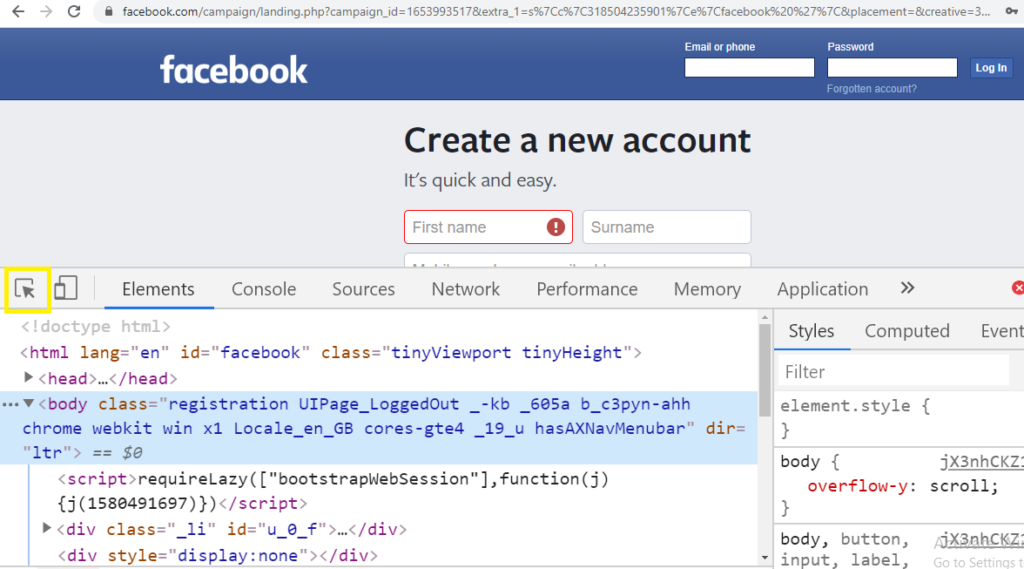
- Now click to arrow on the source code window on top (highlighted in yellow).
- Now after click take the mouse cursor to the text box on “Email or phone” and click the source code for the text box will be displayed down. Now view the tag for id and copy its value “Email”.
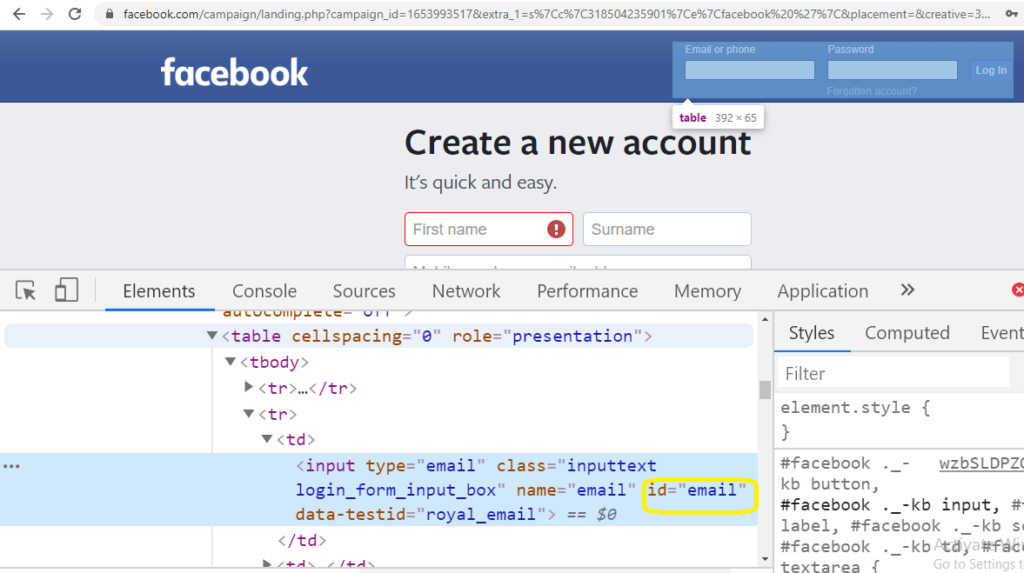
- In the automation test case write below code to locate element on basis of id:
driver.findElement(By.id(“Email”));

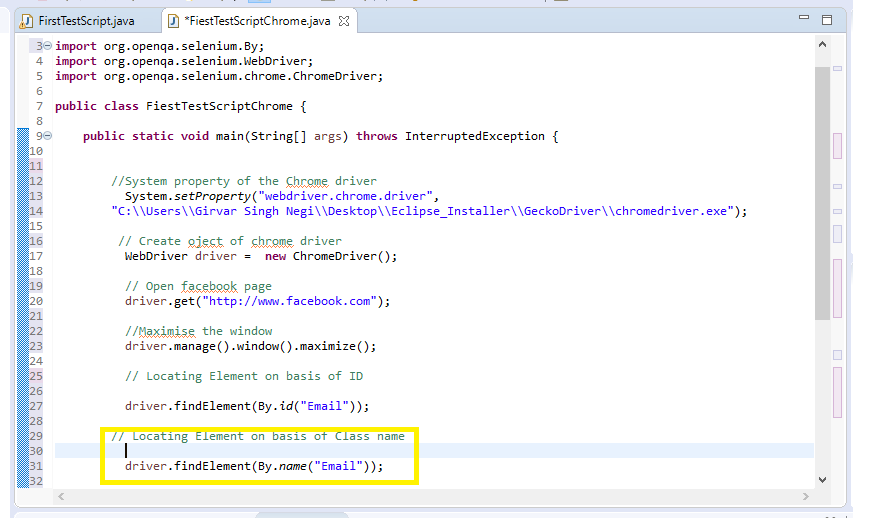
2) Locating Element By Name: Similar way as we identified or located the element by id, we perform the same steps an able to locate the element on basis of Name for the unique identification.
In the automation test case object location by name is performed using below code:
driver.findElement(By.name(“Email”));
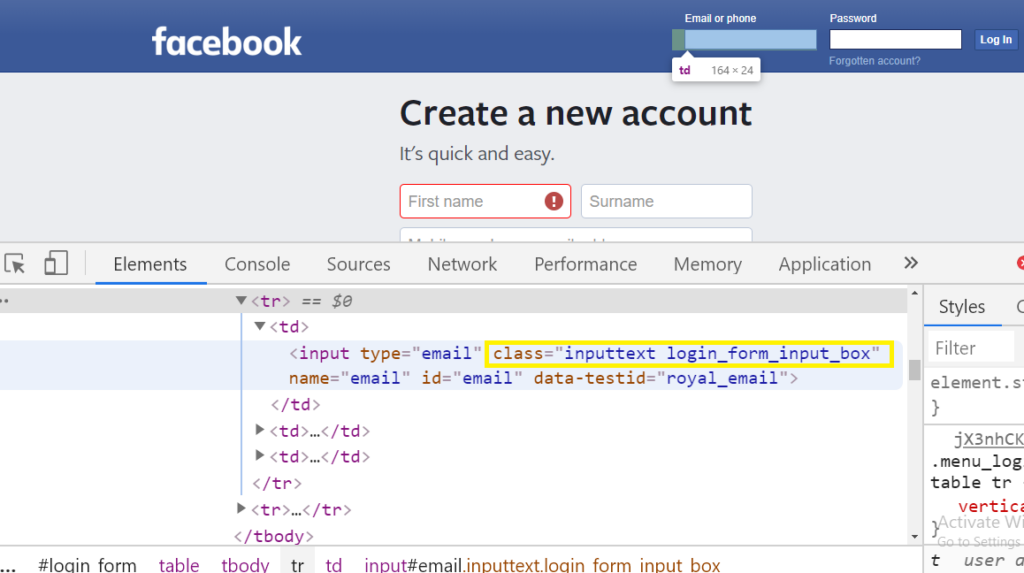
3) Locating Element By Class Name: Object identification using Class Name is performed by using blow line of code and using the same technique as above.
In the automation test case object location by Class Name is performed using below code:
driver.findElement(By.className(“inputtext login_form_input_box”));
4) Locating Element By Tag Name: Object identification using Tag Name is performed by using blow line of code and using the same technique as displayed in case of ID.
In the automation test case object location by Tag Name is performed using below code:
driver.findElement(By.tagName(“input”));
5) Locating Element By Link Text: Object identification for the link text is identified for the link visible in Web page generally it is present in <a href tag and ends with </a>.
In the automation test case object location by Link Text is performed using below code as per the below example :
driver.findElement(By.linkText(“Forgotten account?”));
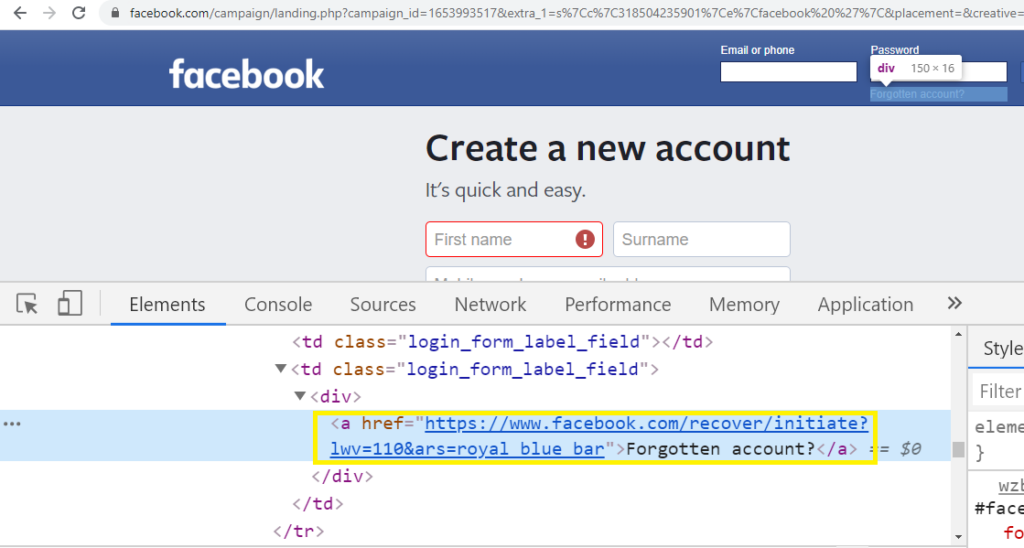
5) Locating Element by Partial Link Text: If we want of locate any element in a web page by providing the partial link value. So this can be done by Partial Link Text command as below.
// Locating Element on basis of partial link text
driver.findElement(By.partialLinkText(“Forgotten”));
Running Test Case in Chrome Browser
Previous Topic,Running Test Case in Chrome Browser is simple as running in the other browser, difference is we need to provide the chrome driver on the path.
Running Test Case in Chrome Browser?
To Run the Test on chrome Browser follow the below steps one by one.
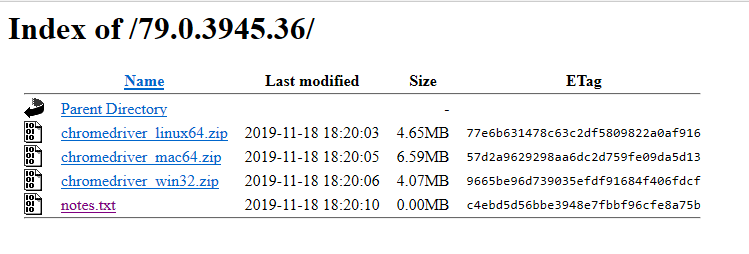
Step 1) Click to Click Here link to open the latest chrome driver installation version and click on chrome driver as per the chrome version on your system

Step 2) Click on the chrome driver link as per configuration of OS on you system. Lets say i have window OS so in that click click to chromedriver_win32.zip.
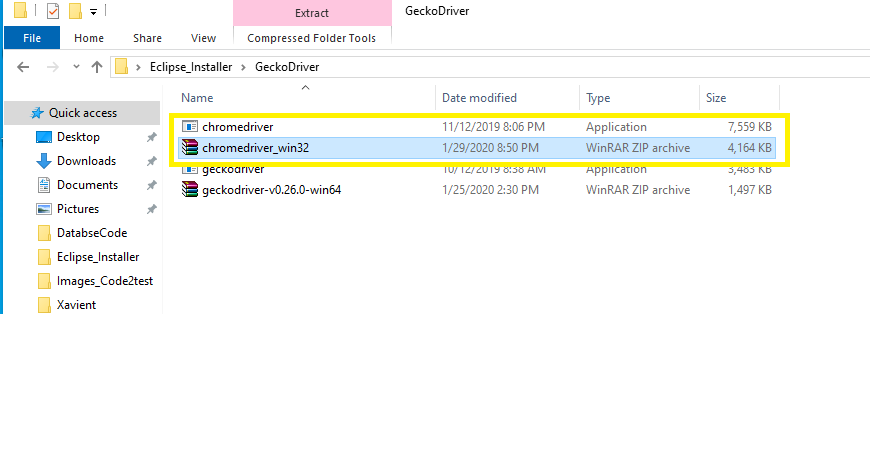
Step3) Now download the Zip to any of you preferred location and unzip it.
Step 4) Open the eclipse and create a class and copy the below code.
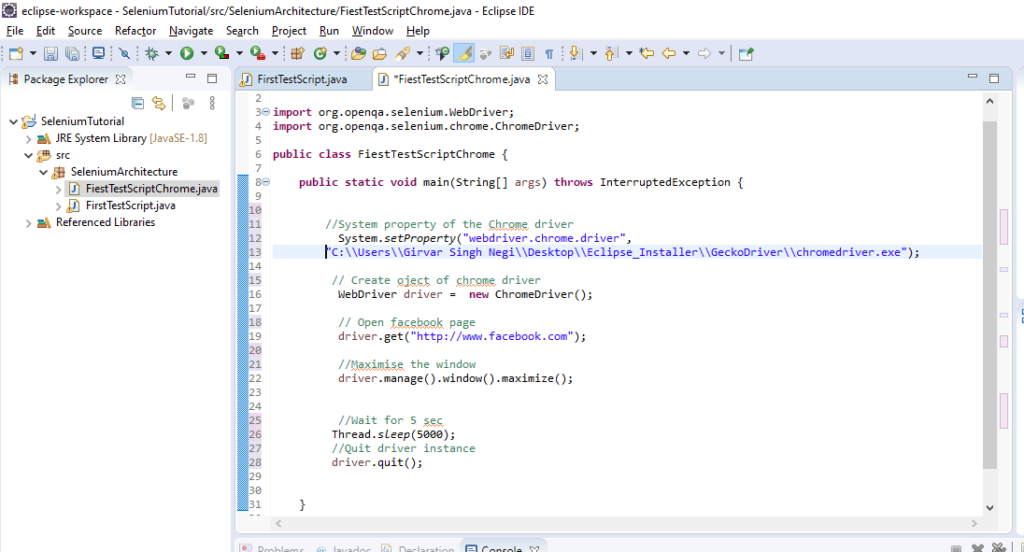
Cope the below code:
package SeleniumArchitecture;
import org.openqa.selenium.WebDriver;
import org.openqa.selenium.chrome.ChromeDriver;
public class FiestTestScriptChrome {
public static void main(String[] args) throws InterruptedException {


    //System property of the Chrome driver( provide the local path of chrome driver here)
      System.setProperty("webdriver.chrome.driver",
    "C:\\Users\\xxxx\\Desktop\\Eclipse_Installer\\GeckoDriver\\chromedriver.exe");

     // Create oject of chrome driver
      WebDriver driver =  new ChromeDriver();

      // Open facebook page
      driver.get("http://www.facebook.com");

      //Maximise the window
      driver.manage().window().maximize();


      //Wait for 5 sec
     Thread.sleep(5000);
     //Quit driver instance
     driver.quit();


}}
Step5) Now Run the below code, Right click to java file ->Run as->Java application
Database Testing
package SeleniumArchitecture;
import java.sql.DriverManager;
import java.sql.ResultSet;
import org.openqa.selenium.WebDriver;
import org.openqa.selenium.firefox.FirefoxDriver;
import com.mysql.jdbc.Connection;
import com.mysql.jdbc.PreparedStatement;
import com.mysql.jdbc.Statement;
public class FirstTestScript {
public static void main(String[] args) throws InterruptedException, InstantiationException, IllegalAccessException, ClassNotFoundException {
/*
* System.setProperty(“webdriver.gecko.driver”,
* “C:\\Users\\Girvar Singh Negi\\Desktop\\Eclipse_Installer\\GeckoDriver\\geckodriver.exe”
* ); WebDriver driver = new FirefoxDriver();
* driver.get(“http://www.facebook.com”);
*
* Thread.sleep(5000); driver.quit();
*/
java.sql.Connection conn =null;
try {
String url=”jdbc:mysql://localhost:3306/”;
String driver=”com.mysql.jdbc.Driver”;
String dbName=”Girvar”;
String username =”root”;
String password=””;
Class.forName(driver).newInstance();
conn = DriverManager.getConnection(url+dbName, username, password);
System.out.println(conn.isClosed());
java.sql.Statement st=conn.createStatement();
ResultSet rs= st.executeQuery(“select * from EMPLOYEE”);
/////////////////////////////////prepare statement interface /////////////////////////////
PreparedStatement pst= (PreparedStatement) conn.prepareStatement(“select * from employee where name=? and age=?”);
/*
* pst.setString(arg0, arg1); pst.setInt(parameterIndex, x);
*/
while(rs.next()) {
System.out.println(rs.getString(1)+rs.getString(2));
}
} catch (Exception e) {
e.printStackTrace();
}finally {
}
}
}
How To Download and Install selenium webdriver
Previous Topic, In this tutorial we will learn How To Download and Install selenium webdriver in java.
How To Download and Install selenium webdriver?
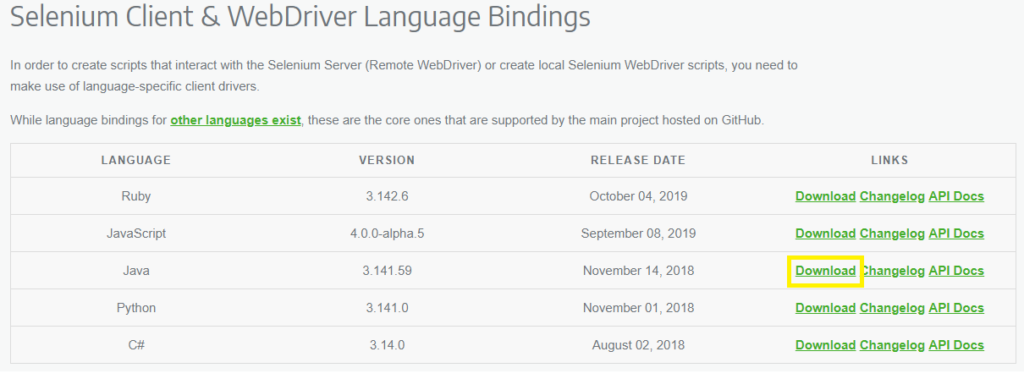
- Now after the setup of eclipse and workspace in local system, we will now download the selenium webdriver java click from the link Click Here
- Save the zip to any preferred location
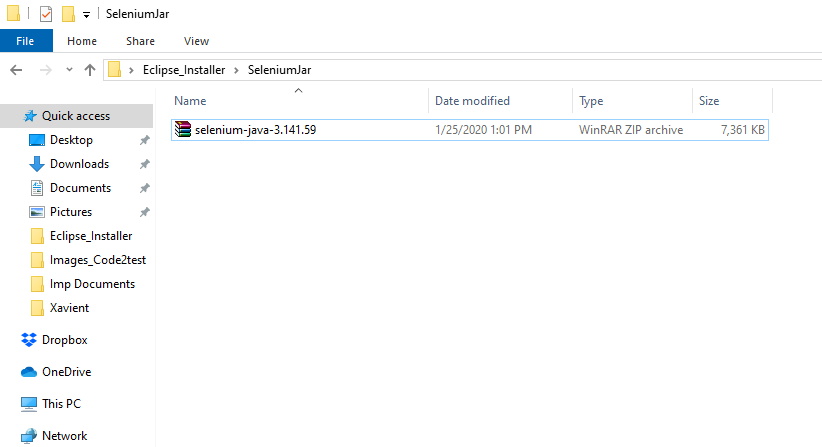
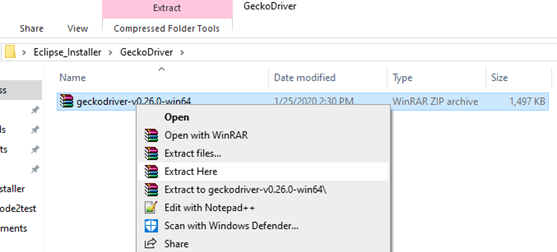
- Once the download of Zip file is completed , Now extract the downloaded zip file to the same location.
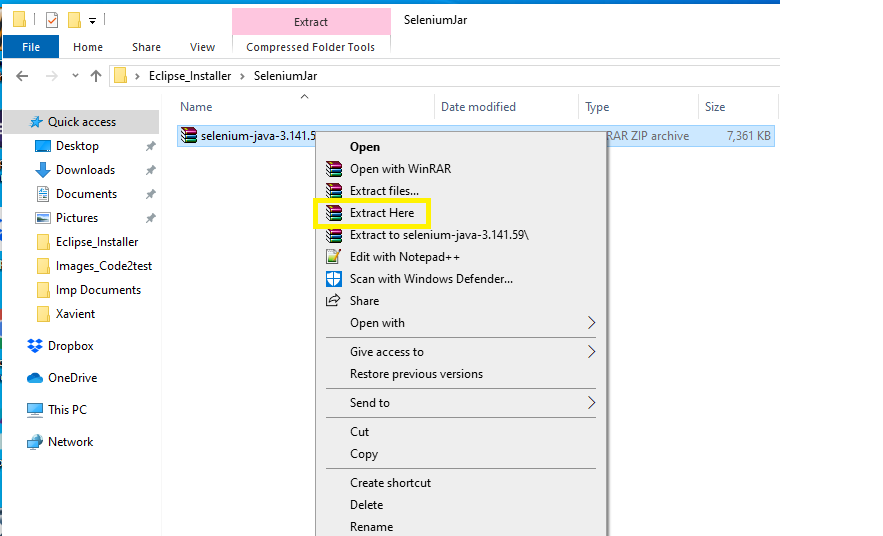
- After click to Extract Here, there will be few files will appear and these configuration files with be needed for the selenium setup

First Test case Firefox (GeckoDriver with selenium)
How to write First Test case Firefox (GeckoDriver with selenium)?
After completing the installation process in previous topic, its time to execute First Test case Firefox (GeckoDriver with selenium) script to understand how GeckoDriver with Selenium works.
Whats is Gecko Driver?
Gecko Driver:When we talk about Gecko it is coined to Gecko web browser which is developed by Mozilla foundation. Gecko driver provides a bridge between selenium and Firefox browser.Gecko acts as proxy between W3C webdriver compatible client and Gecko based web browser.
Mechanism if GeckoDriver with browser
Higher version of Selenium ex (selenium3) uses Marionette for launch Firefox instead of default(Where .exe is not been provided).
Marionette works as default for selenium 3. Selenium uses W3C protocol for send request to gecko driver.
Download Gecko Driver with below steps:
- To download Gecko driver click to Click Here , Click to the gecko driver link for the release compatible to you system config for ex(window, linux, IOS).
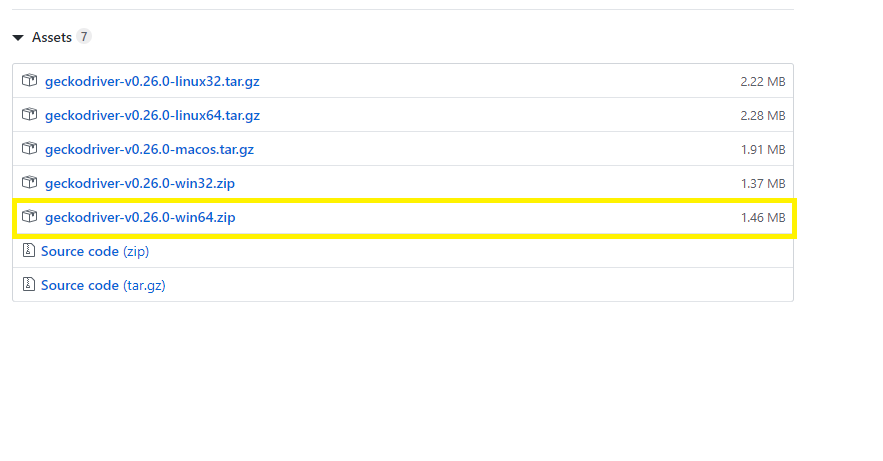
- Once the geckodriver zip file is downloaded, unzip the file on you specific folder

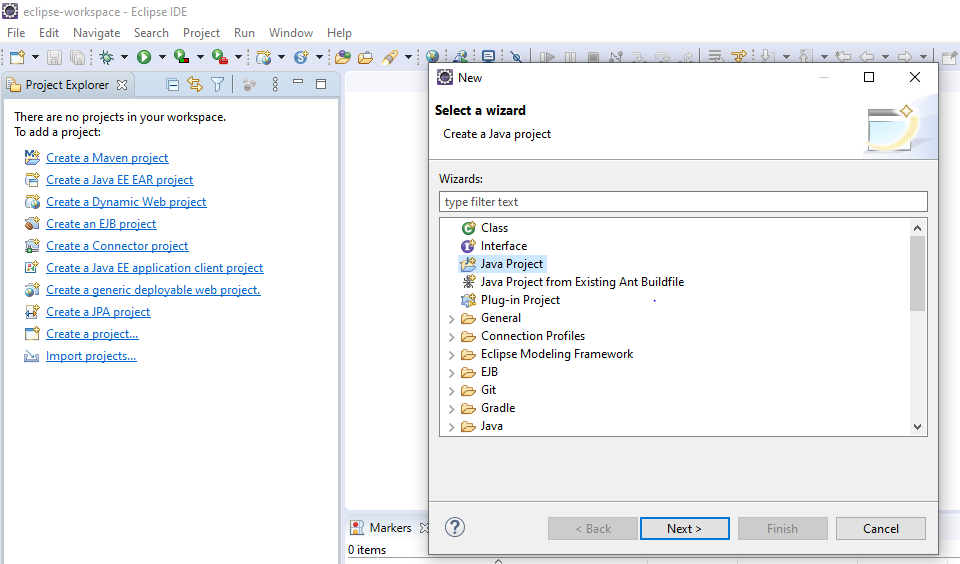
Now Create a New Java Project with below steps:
- Open the Eclipse and select File->New->Project->Java Project
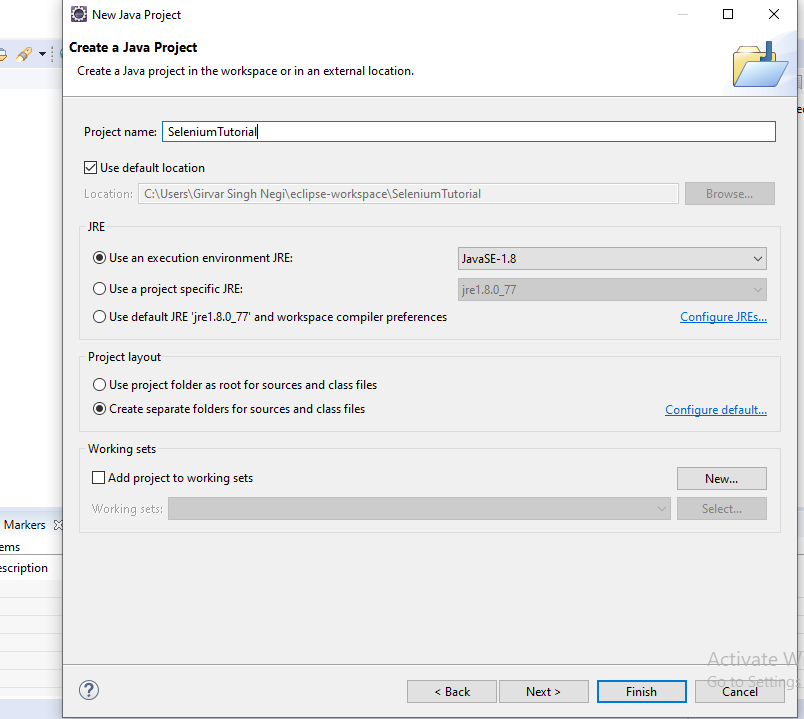
- Enter your project name SeleniumTutorial(mention any name) and then click to finish button at the bottom
- Now create a new package Step->File->New->Package, A window will open enter package name (Selenium Architecture)(you can mention any name) and click to finish button.
- After creating package eclipse project will be displayed on left pane.
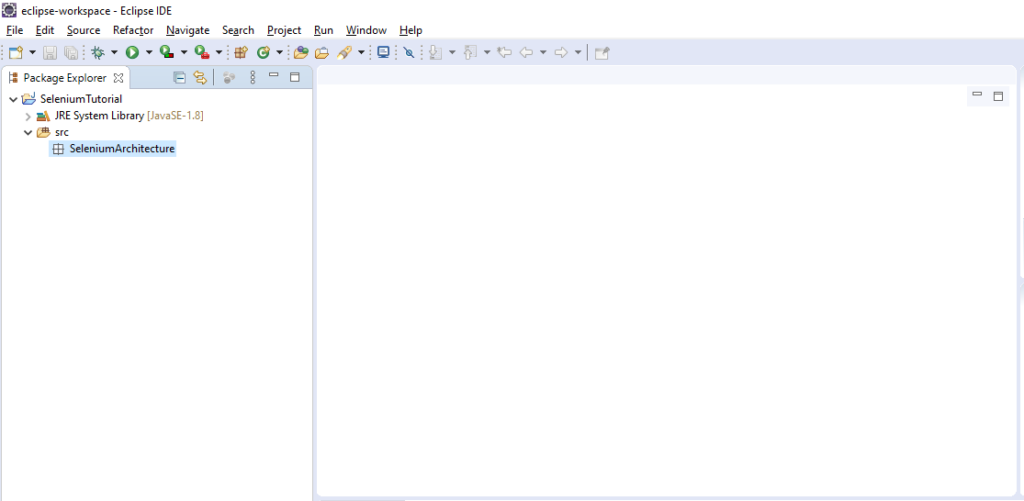
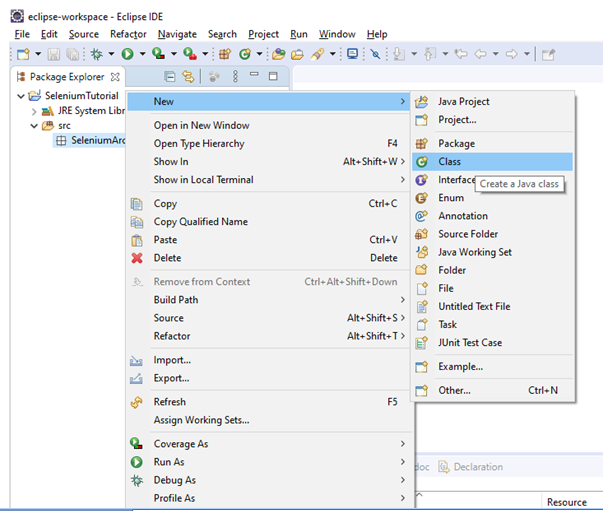
Create a Class in package for this Right Click to you package(SeleniumArchitecture) ->New->Class button.
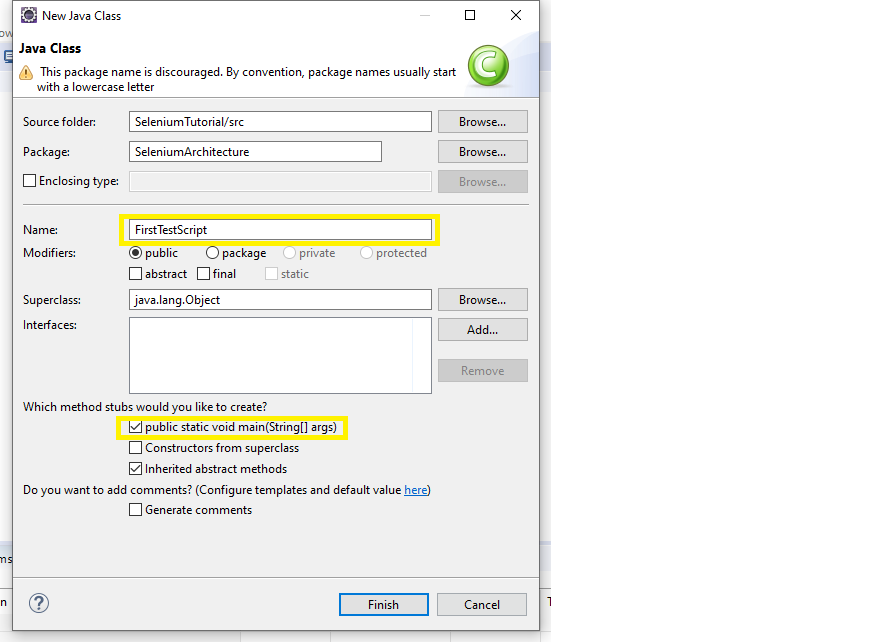
- Once you click to class , Class window will appear enter any name for class as(FirstTestScript) and check the check box for public static void main (as shown in picture).
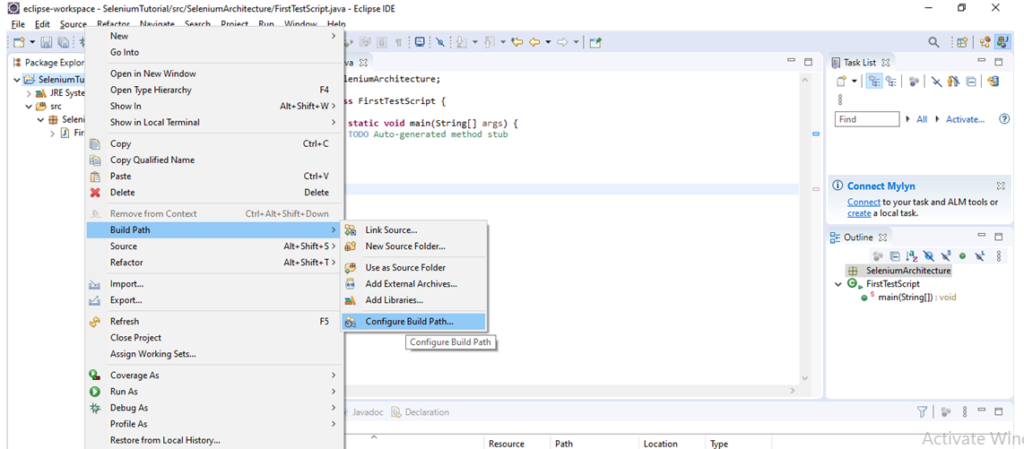
Add Selenium Webdriver Jar (follow below steps)
- Right click on the project Selenium Tutorial ->Build path->Configure build path.
- Under Java Build path window->Click on libraries(Menu on top)->click on Add external jars (on right side) a window will open , go to the folder where selenium jar is kept and all the files from lib and outside the lib folder. Now click to apply and close
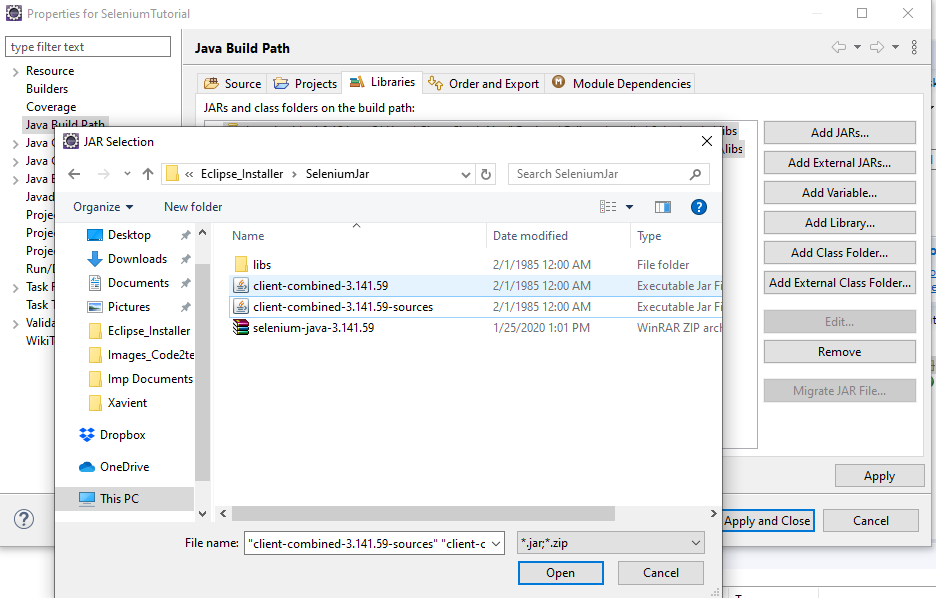
- Jars will be saved on your project.
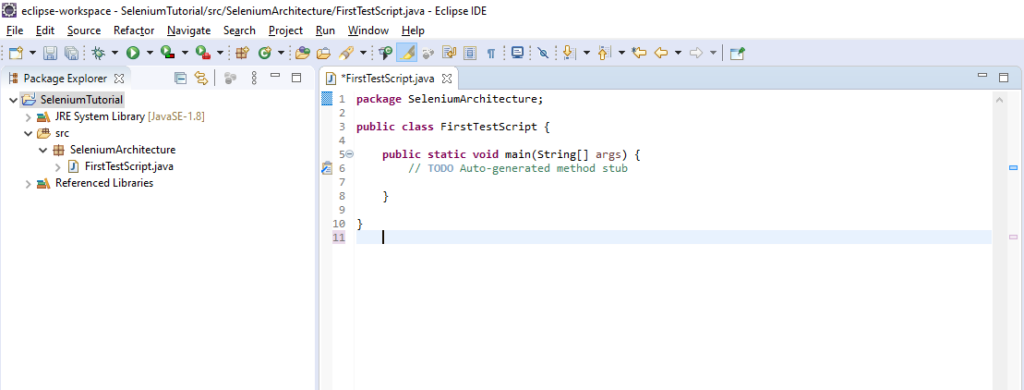
Setup gecko driver to environmental variable setting with below steps:
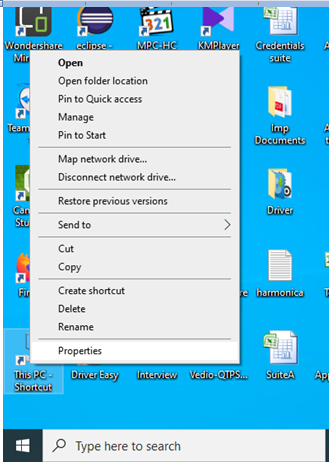
- Go to My computer from your local, right click->select properties menu
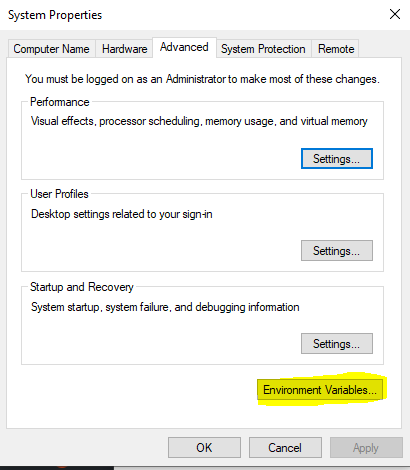
- Click to Advanced system settings.

- Click to Environment variable.
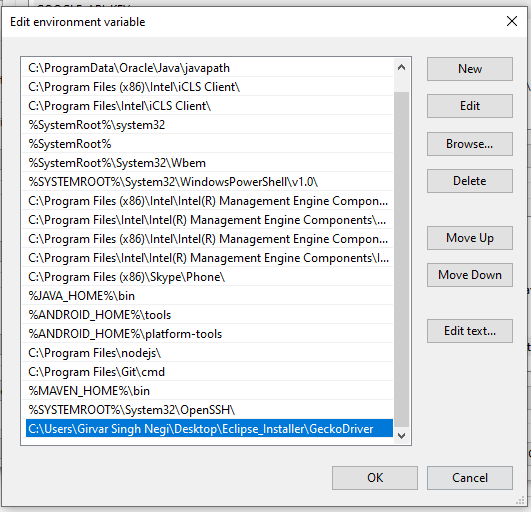
- Under Environment variable window-> System setting-> select Path and click to edit button at bottom and add the location where the Gecko driver is placed after semi colon (we are using window 10 so add the location of gecko driver) and click to OK button as per screenshot.
Now move to scrip and write below code:
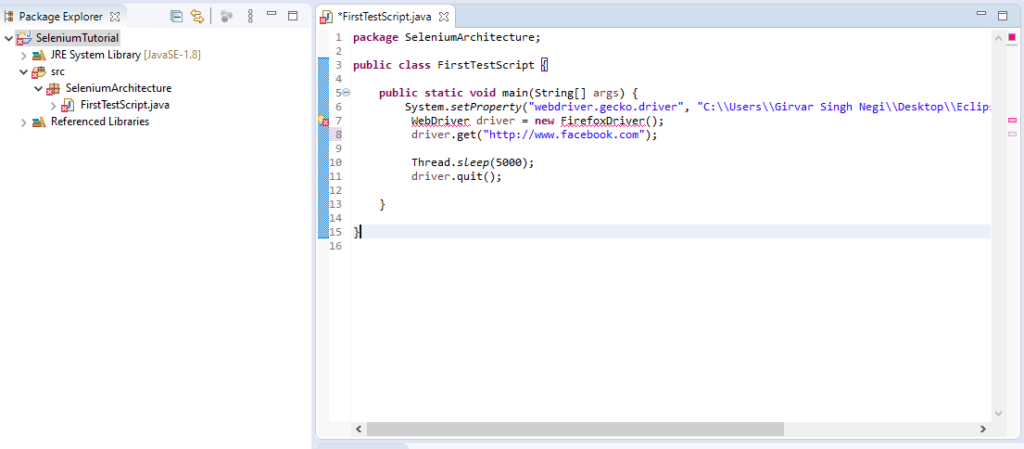
- Code2test be sharing you code for copy to your eclipse below.
package SeleniumArchitecture;
public class FirstTestScript {
public static void main(String[] args) {
    System.setProperty("webdriver.gecko.driver", "C:\\Users\\Tutorial\\Desktop\\Eclipse_Installer\\GeckoDriver\\geckodriver.exe");
     WebDriver driver = new FirefoxDriver();
     driver.get("http://www.facebook.com");

     Thread.sleep(5000);
     driver.quit();

}}- To remove error from line on FirefoxDriver(); just mouse over to it and click to import FirefoxDriver link . Do same with Webdriver and on Thread.sleep(add exception to it)

Now right click to you class file and click to Run as ->Java Project, Firefox browser will open and launch the facebook page.
Download Eclipse and configure
After the installation of Java and environment setup. Next step is how to download eclipse in your local system.
Steps to Download Eclipse are as Below:
- Hit the Url->http://www.eclipse.org/downloads and click to download package link.
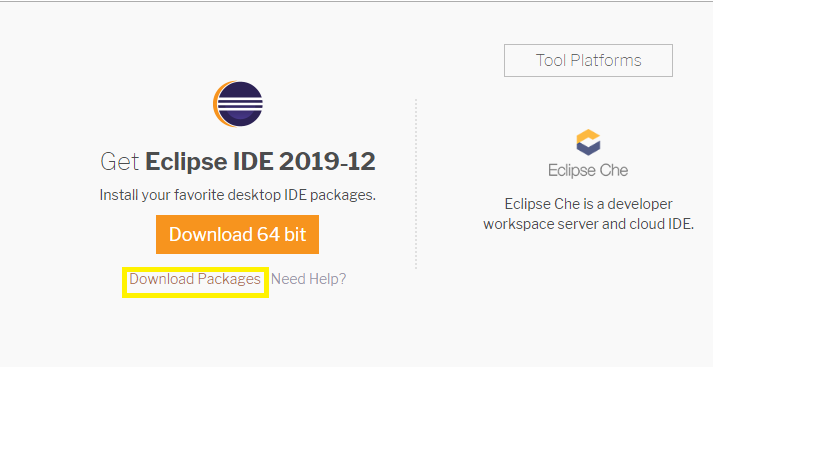
- It will redirect to “Download Package” window. Take the page webpage down and click to ” Eclipse IDE for Java Developers”.

- Click on Window 64-bit (Please select the IDE as per your system configuration)
- Now click to Download the zip file to any of your preferred location on you local system and unzip the file.
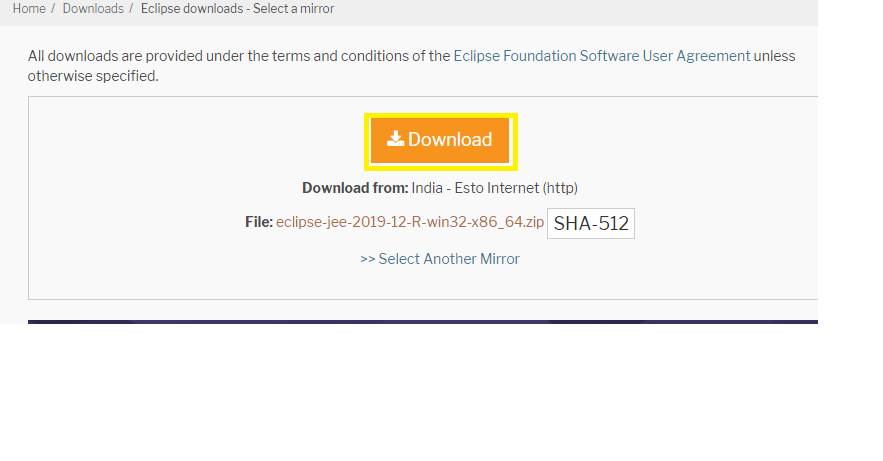

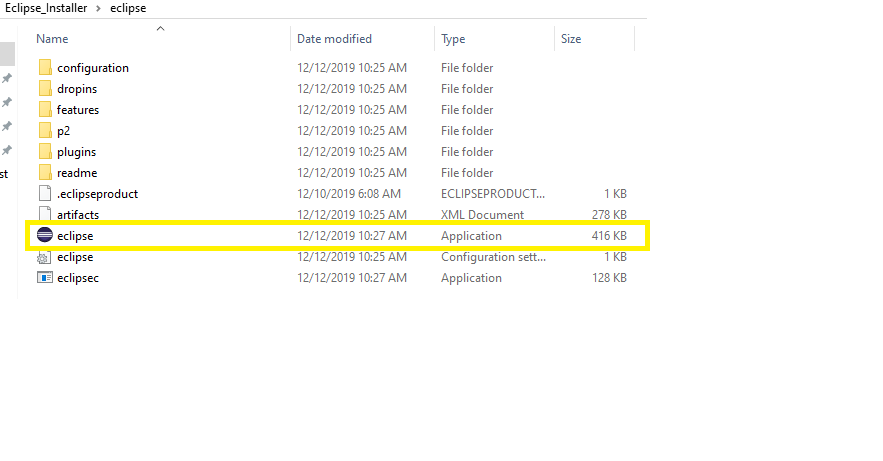
Now open the eclipse .exe file under eclipse folder
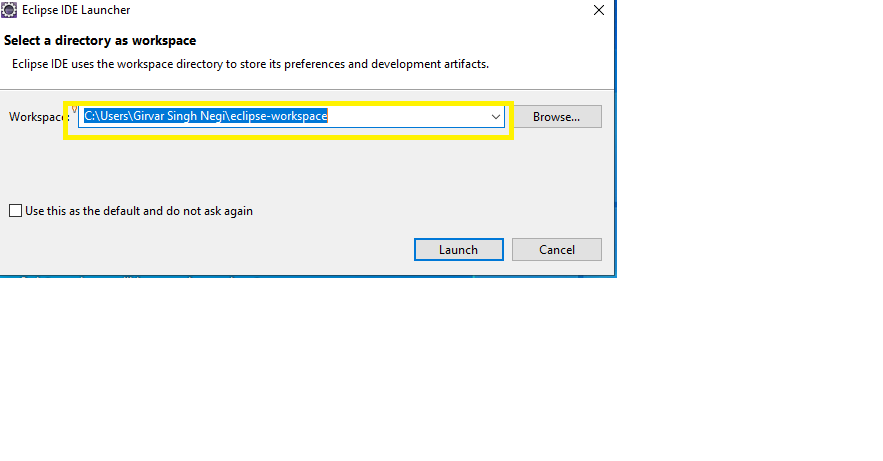
Now create a workspace at any of your preferred location and provide the path to eclipse
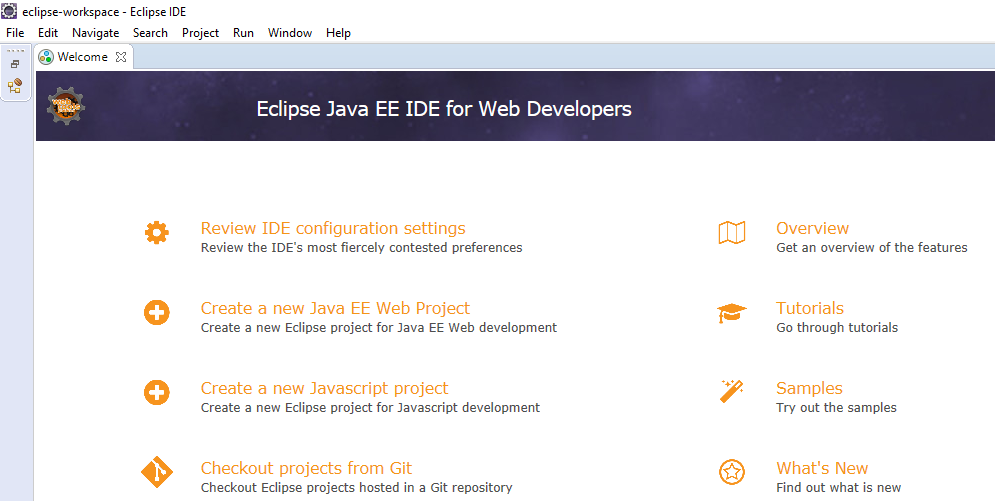
Finally the Eclipse is setup to your system with defined workspace and will display the welcome page for the first time.
So Learners be we me, we will next learn how to setup selenium webdriver in our local system and run our first selenium test case.
Types of Testing Automation Framework
Previous Topic, Test automation Framework provides set of rules for handling data, maintaining object repository and executing test scripts in a proper formal structure. In this tutorial we will learn types of Testing Automation Framework in details.
The guidelines when followed gives a long term benefit like Code-Re usability, easy maintenance, improved test efficiency and maximum test coverage.
Note: These rules are not mandatory but on skipping the defined and well structured framework, benefits also get lost.
Types of Testing Automation Framework
There are basically 4 types of Testing Automation Framework that differs from one another from their architectural point of view with their advantages and disadvantage. So its very important to choose a framework wisely as per the requirement, these frameworks are as below.
- Linear Framework
- Modular Testing Framework
- Data Driven Framework
- Keyword Framework
- Hybrid Framework
- Behaviour Driven Development Framework
Lets consider their details:
1) Linear Framework: It is basic level test automation framework which is in the form of ‘Record and Playback’ in a linear fashion. Tester manually executes the application and the tools record the steps of manual execution, capturing it attributes along the value with its test data(manually filled). Once the record is done and terminated by the tester, the recorded script can be executed & is used for testing.
When to use Linear Framework?
Answer→ Linear Framework is used when we need to test a complete flow with single test data(Parameterization of test data not required). As it requires no coding skill sets with no customised records(ex : logs, report, integration with other tool).
Advantages of Liner Framework:
- Easy to create script
- No coding skills are required
- Easy to learn(as its have restricted features)
Disadvantages of Linear Framework:
- No reusable functions
- Not easy to maintain
- Cannot execute the scripts with multiple sets of data.
Note: Linear framework is out from market now, its never used further as a part of framework.
2) Modular Testing Framework: In this framework, the application under test(AUT) is divided in to multiple modules and each module are further divided in to small scripts which are independent to each other. These individual test scripts are combined to create a large script which further fulfill the requirement of execution on defined scenario.
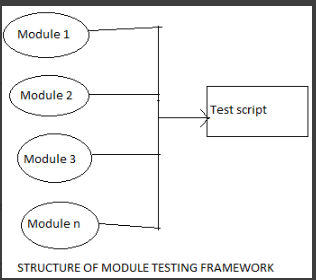
Advantages of Liner Framework:
- If any change comes to an application only a particular module is being changed
- Scalable
- Easy maintenance of code due to modular structure
Disadvantages of Linear Framework:
- Due to embedded test data in test script, creates problem while updating the code
3) Data Driven Framework:In this framework ,the test data and test logic are placed in different file. The test data is usually kept external from the script in the form of CSV, Excel, ODBC etc. Functions/methods are made generic & data is passed in the form of parameter to the method body.
Here scripts are executed with different sets of data provided on external test data sheet unlike in linear programming where we are bounded to use hard coded data defined in script
When to use Data Driven Framework?
Answer→ Data Driven framework comes in to picture when we want our scripts to run them on large sets of data with different combinations.
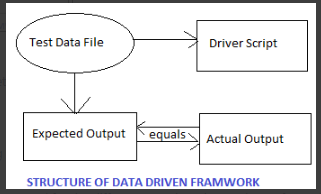
Advantages of Data Driven Framework:
- Same scenario can be tested with different set of data
- Structured framework easy to understand
Disadvantages of Data Driven Framework:
- Tester has to create different files for keeping the test data and test logic
- Time consuming
4) Keyword Driven Framework: In this Framework, keywords are been created for the different generic actions to be performed in GUI, these keywords are kept at external file and not under the test logic. Under this framework the keyword, object repository and functions are associated to work properly.
The external sheet contains keyword along with test data and object details. Whenever any keyword is been called, it executes its process(created function), identify its object and provide data in the Test Data column
When to use Keyword Driven Framework?
Answer→ Keyword framework is a preferred when we have limited type of objects in our application & our test script consist of repeative action on those objects. Example in case of Siebel CRM application, we have limited type of control available.
Here we can create our own standard library of common components and extend reusability. Also by following this framework we can can hide our scripts from user and write our script in abstract manner

Advantages of Keyword Driven Framework:
- Code reusability
- Test designing can be done without AUT (application under test)
- Save time for multiple test design
Disadvantages of Keyword Driven Framework:
- Shilled tester is required with programming skills
- initial Cost of scripting is high
- Need to maintain multiple sheets for test creation.
5) Hybrid Framework: This framework is a combination of one or more framework. As per the requirement we customise the framework & use the strength associated with different type of frameworks. Most commonly hybrid framework is the combination of Keyword and Hybrid approach.
Here we can use data from different channels (xml, csv, database, etc) with process defined in a form of keywords. This helps a tester to easily create, maintain and execute the automation scripts which can be re used in longer run
When to use Hybrid Framework?
Answer→ Whenever we come with a requirement to parameterise the test case with multiple sets of test data and have lot of repetitive steps called in every or most of the test cases, along with frequent execution, Hybrid framework comes in to picture. This type of framework has almost captured the market and in use mostly used.
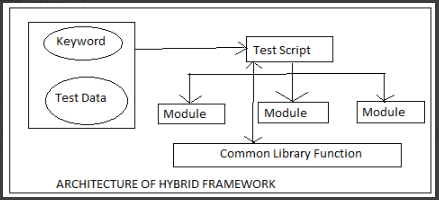
6) Behaviour Driven Development Framework: This framework helps in active participation of (Business Analyst, Developer, Tester). It does not require user to be highly skilled programmer, user just need natural language to create test scripts. There are few tools available in market like cucumber, jBehave , etc.
Advantages of Data Driven Framework:
- Easy to create test script.
- No need to have programming skills.
Disadvantages of Data Driven Framework:
- Need to have understanding of BDD structure and syntax.
How to Download & Install Java JDK 8 in window
In this tutorial we will learn how to Download & Install Java JDK 8 in window?
Step 1: Download java and setup java
- To install java open the URL->http://www.oracle.com/technetwork/java/javase/downloads/index.html
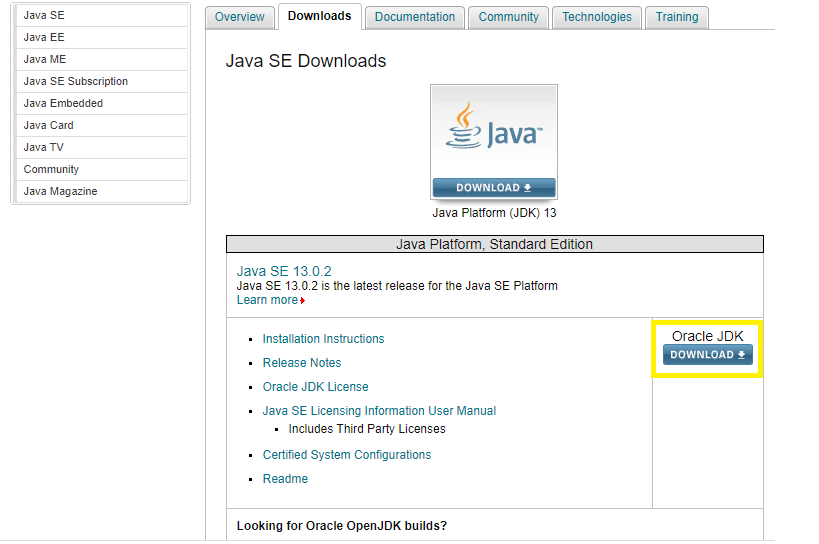
- Now Accept the Licence Agreement, always remember to choose correct JDK as per OS (Window, Mac, Linux)
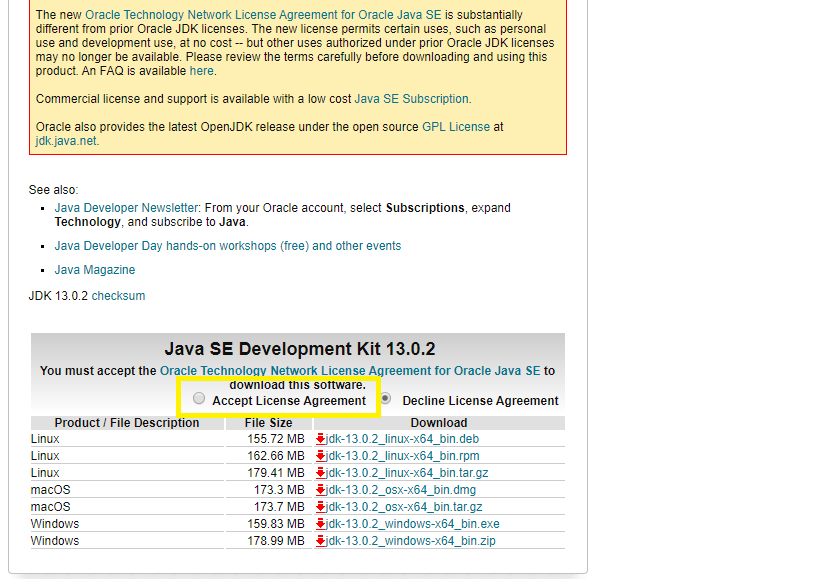
- On click to JDK .exe file,It will start downloading at the bottom(refer screenshot) below

- Now double click to jdk .exe file . The installation will start and click to next button
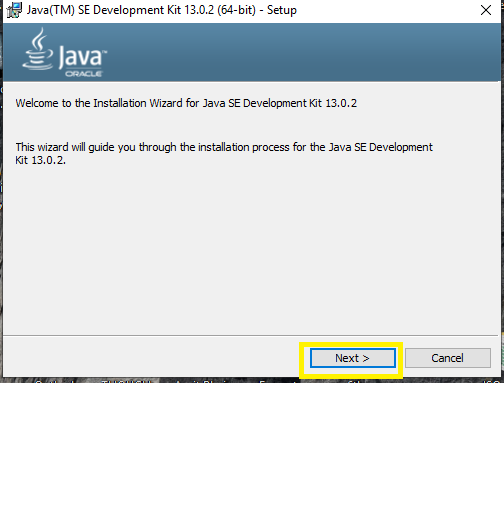
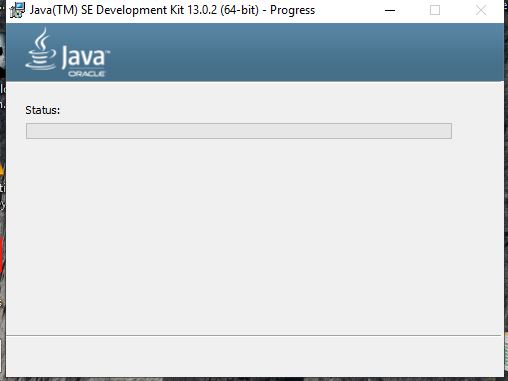
- Installation will start with status of download
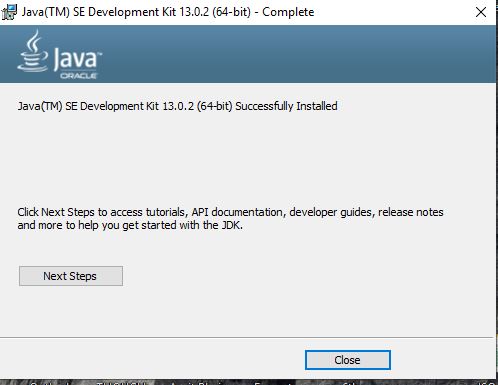
- Once the installation is completed. A last window of installer will open click to Close.
- Now the next step is to install Java path on environment variable
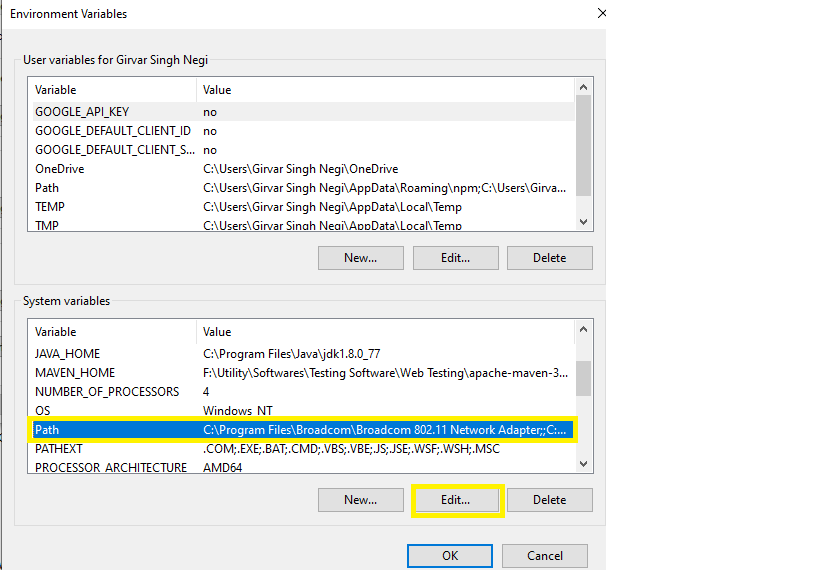
Step->Right click to My computer-> properties->Select Advanced system settings->Click to Environment Variables at the bottom
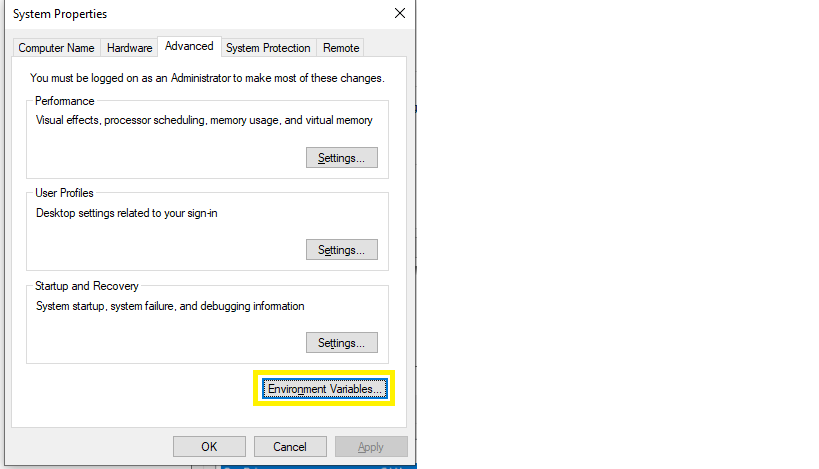
- Under Environment Variable window->Under System variable->Select Path from Grid and click to Edit button(Refer Screenshot)
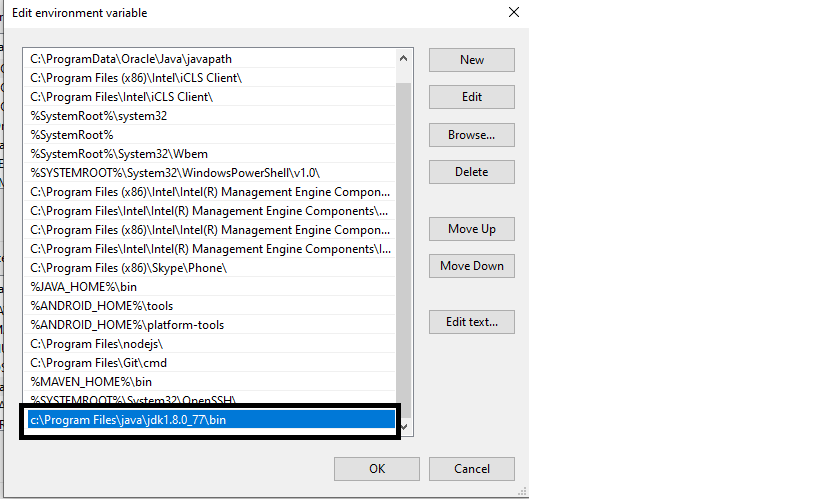
- Under Edit Environement window, Click to new button and add the java path till bin. Suppose you have Installed JDK in path->c:\Program Files\java\jdk1.8.0_77\bin
So in this case provide the jdk path till bin folder and click to OK button(Refer screenshot)
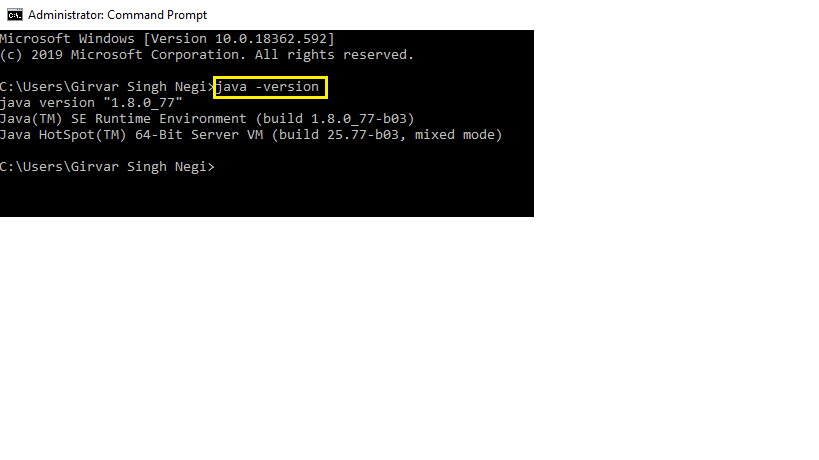
- Now Verify Java Installation
Open Command Prompt and enter java -version and click Enter(Refer Screen shot)
So following the below steps we have learned how to Download & Install Java JDK 8 in window.
Why Selenium?
Why to use selenium webdriver
Selenium: is an (open source) web based automation tool. Selenium has the capability to integrate with different other tool and come up with a complete package.
Why to use selenium webdriver?
Selenium provides a list of platform and browser support these are:
- Google Chrome
- Safari
- Firefox
- IE
- Phantom JS (Headless browser)
- Html Unit (Headless browser) etc
Why to use selenium webdriver when we have multiple tools in market?
- Open Source: The advantage of using selenium oven other tools is its open source, so we do not have to pay a huge cost on purchase of heavy license and easily accessible.The developers of selenium keeps on providing the updates and versions with new functionality. Due to refined methods and classes available in selenium it become easy in managing the code and integrating with third party tool.
- Platform Independent: Selenium is platform independent, so a single piece of code can be executed on different platform and execution is performed in same behaviour .
- Multi Browser Testing: Multiple browsing testing can be performed easily in selenium, we can run same code on different browsers like google chrome, firefox, safari, IE etc without any change in code.
- Integration with other tools: Due to easy integration with third party tool, selenium is much preferred for web automation than other tools in market. It is easy integrated with browserstack, saucelab, reporting tools like Extend report, etc.
- Easy to setup: Selenium is easy to setup in local system as compared to other tool which required heavy hardware installation and framework. In selenium we just need to add the provided jar to get started in any of preferred IDE (ex eclipse).